DVD SURROUND SYSTEM D-M71DVS DVD SURROUND RECEIVER ADV-M71 OPERATING INSTRUCTIONS MODE D’EMPLOI OFF SLEEP ON VCR REC NTSC/PAL TITLE ENTER A-B REPEAT CHARAC. SLIDE MODE SOURCE TV CH B SURROUND / SELECT DVD SURROUND RECEIVER ADV-M71 TIME TV IN CLEAR T V EDIT/MENU ZOOM - PROG/DIRECT REPEAT RANDOM MODE MEMO BAND DVD TUNER D.
SAFETY PRECAUTIONS WARNING: TO PREVENT FIRE OR SHOCK HAZARD, DO NOT EXPOSE THIS APPLIANCE TO RAIN OR MOISTURE. This device complies with Part 15 of the FCC Rules. Operation is subject to the following two conditions: (1) This device may not cause harmful interference, and (2) this device must accept any interference received, including interference that may cause undesired operation. This Class B digital apparatus meets all requirements of the Canadian Interference-Causing Equipment Regulations.
SAFETY INSTRUCTIONS 1. 2. 3. 4. 5. 6. 7. 8. 9. 10. 11. 12. Read Instructions – All the safety and operating instructions should be read before the product is operated. Retain Instructions – The safety and operating instructions should be retained for future reference. Heed Warnings – All warnings on the product and in the operating instructions should be adhered to. Follow Instructions – All operating and use instructions should be followed.
ENGLISH 2 INTRODUCTION Thank you for choosing the DENON ADV-M71 DVD Surround Receiver. This remarkable component has been engineered to provide superb surround sound listening with home theater sources such as DVD, as well as providing outstanding high fidelity reproduction of your favorite music sources. As this product is provided with an immense array of features, we recommend that before you begin hookup and operation that you review the contents of this manual before proceeding.
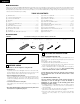
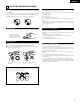
ENGLISH • This is an anti-magnet type speaker system which can be used near television sets, etc., but with some TV sets the colors may become blotchy. If this happens, turn off the TV’s power, wait 15 to 30 minutes, and turn the power back on. The TV’s self demagnetizing circuit will improve the picture. If the colors are still blotchy, move the speaker systems further away from the TV.
ENGLISH 5. High performance DVD drive for progressive image output compatibility The ADV-M71 is compatible with various functions offered by DVD sources, including multiple audio (up to 8 languages), multiple subtitle (up to 32 languages), multiple angle playback, viewing restriction, etc. 7.
ENGLISH 6 CAUTIONS ON HANDLING DISCS Discs Cautions on Handling Discs Only the discs including the marks shown on page 6 can be played on the ADV-M71. Note, however, that discs with special shapes (heart-shaped discs, hexagonal discs, etc.) cannot be played on the ADV-M71. Do not attempt to play such discs, as they may damage the player. Holding Discs • Do not get fingerprints, grease or dirt on discs. • Be especially careful not to scratch discs when removing them from their cases.
ENGLISH 7 CONNECTIONS • Do not plug in the AC cord until all connections have been completed. • Be sure to connect the left and right channels properly (left with left, right with right). • Insert the plugs securely. Incomplete connections will result in the generation of noise. • Note that binding pin plug cords together with AC cords or placing them near a power transformer will result in generating hum or other noise.
ENGLISH CAUTION: • Only one cassette deck can be connected to the ADV-M71 using system connections. System operations cannot be performed properly if two cassette decks are connected using system connections. • Whenever the power operation switch is in the STANDBY position, the unit is still connected to AC line voltage. • Please be sure to unplug the power cord when you leave home for, e.g.,a vacation, etc. NOTES: • Do not plug the power cord into the power outlet until all connections are completed.
ENGLISH (2) Connecting the PRE OUT terminals (only with multi-channel settings) • When used in combination with a commercially available subwoofer with built-in amplifier and power amplifier, the ADV-M71 can be expanded into a 5.1-channel surround system. • When making connections, also refer to the operating instructions of the other components. • To make the 5.1-channel setting, set the speakers to “5.1 CH SURROUND” in the quick system setup and select “Room Setting” and “Listening Position”.
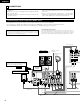
ENGLISH (4) Connecting a TV • When making connections, also refer to the operating instructions of the TV. S VIDEO TV S VEDEO OUT • Connect the TV’s S video input (S-VIDEO INPUT) to the S-VIDEO OUT jack using a S jack connection cord. VIDEO OUT • Connect the TV’s video input (VIDEO INPUT) to the VIDEO jack using a video connection cord. NOTES: • Connect this unit video outputs to the TV either directly. Do • not connect it via a VCR (video cassette recorder). Some discs contain copy prohibit signals.
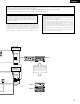
ENGLISH (5) Connecting the antenna terminals DIRECTION OF BROADCASTING STATION AM LOOP ANTENNA (Supplied) FM INDOOR ANTENNA (Supplied) FM ANTENNA 75 Ω/ohms COAXIAL CABLE FM ANTENNA ADAPTER (Option) GROUND AM OUTDOOR ANTENNA • An F-type FM antenna cable plug can be connected directly. • If the FM antenna cable’s plug is not of the F-type, connect using the F-type antenna adapter (Option). AM loop antenna assembly Connection of AM antennas Connect to the AM antenna terminals.
ENGLISH (6) Connecting to a TV or Monitor Equipped with Component Input Connectors. • When making connections, also refer to the operating instructions of the other components. • The video signals input to the VIDEO input (yellow) and S-Video input jacks are not output to the color difference (component) video jacks. Color component output connectors (PR/CR, PB/CB and Y) The red (PR/CR), blue (PB/CB) and brightness (Y) signals are output independently, achieving more faithful reproduction of the colors.
ENGLISH (7) Sound output from this unit digital and analog audio output connectors 2 When a disc is played on the ADV-M71 (DIGITAL OUT) Settings Audio recording format Refer to page Digital audio data output Dolby Digital bitstream Digital out : Normal Dolby Digital 2 channels PCM data (48 kHz/16bit) Digital out : PCM conversion 98 Digital out : Normal DTS bitstream Digital out : PCM conversion 2 channels PCM data (48 kHz/16bit) LPCM conversion mode : OFF 48 kHz/16 ~24 bit PCM LPCM conversion mo
ENGLISH (8) Speaker system connections Be sure to turn the amplifier’s power off when connecting the speaker systems. • Use the included cables to connect the input terminals on the back of the speaker systems (see diagram) to the amplifier’s speaker output terminals. Connect the speaker system for the left channel amplifier’s “L” terminals, the one for the right channel to the amplifier’s “R” terminals, matching the polarities (“≈” and “√” marks).
ENGLISH 8 PART NAMES AND FUNCTIONS Front Panel • For details on the functions of these parts, refer to the pages given in parentheses ( ). !4 B !3 !2 !1 !0 o i SURROUND / SELECT DVD SURROUND RECEIVER ADV-M71 PUSH - PARAM. - + BAND MENU / SET VIRTUAL SPEAKER TONE / SDB VOLUME FUNCTION ON / STANDBY PHONES qw e q Power button (ON/STANDBY)..................................................(30) w Remote control sensor.............................................................
ENGLISH Remote control unit • For details on the functions of these parts, refer to the pages given in parentheses ( ). • Some of the buttons on the remote control unit have some functions. The functions are switched using the remote control mode selector switches. @4 q w e r t y u i o !0 !1 OFF ON VCR REC NTSC/PAL SLEEP SOURCE TITLE TIME TV IN T V CLEAR ENTER A-B REPEAT CHARAC. SLIDE MODE PROG/DIRECT REPEAT RANDOM MODE MEMO BAND DVD TUNER D.
ENGLISH Names and functions of remote control unit buttons on the ADV-M71 • Buttons in sections q ~ e can be operated regardless of the position of mode switches 1 and 2. • Consider A / V and DVD as standard positions, and switch as necessary to operate. q OFF SLEEP ON VCR REC NTSC/PAL TITLE TV IN T V ENTER A-B REPEAT CHARAC. SLIDE MODE EDIT/MENU ZOOM SOURCE CLEAR TV CH 3 q 1 TIME - PROG/DIRECT REPEAT RANDOM MODE MEMO BAND DVD TV CH TUNING / TV VOL TUNER D.
ENGLISH 3 Operate the ADV-M71. [1] Surround amplifier system buttons (Operated with mode switch 2 set to “IN/SURR.”) • These operations are possible with mode switch 1 at any position. The operations in gray print can be performed. OFF ON VCR REC NTSC/PAL SLEEP ENTER A-B REPEAT OFF TIME SLEEP T V SOURCE CHARAC. SLIDE MODE EDIT/MENU ZOOM CLEAR TV CH - PROG/DIRECT REPEAT RANDOM MODE MEMO BAND TV CH TUNING / TV VOL TUNER D.
ENGLISH 3 [3] Tuner system buttons (Operated with mode switch 2 set to “TUNER”) OFF SLEEP ON VCR REC NTSC/PAL TITLE TV IN T V ENTER A-B REPEAT CHARAC. SLIDE MODE EDIT/MENU ZOOM SOURCE CLEAR TV CH PROG/DIRECT REPEAT TIME - TV CH RANDOM MODE MEMO BAND DVD TUNER D.
ENGLISH 9 REMOTE CONTROL UNIT • The included remote control unit (RC-936) can be used to operate not only this unit but other remote control compatible DENON components as well. In addition, the memory contains the control signals for other remote control units, so it can be used to operate non-DENON remote control compatible products. (1) Inserting the batteries q Remove the remote control unit’s rear cover. w Set three R6P/AA batteries in the battery compartment in the indicated direction.
ENGLISH • The included remote control unit (RC-936) can be used to operate not only the ADV-M71 but also to perform system operations for the D-M31 series and to operate other remote control compatible DENON products. In addition, the remote control operation codes of other major brands of TVs and video decks are also stored in the remote control unit, so the unit can be used to operate these TVs and video decks as well.
ENGLISH (4) TV and video deck preset memories • Components of other brands can be operated with the included remote control unit by storing their codes in the preset memory. Note that depending on the model some operations may not be possible and some buttons may not operate properly. 3 4 4 OFF ON VCR REC NTSC/PAL SLEEP ENTER A-B REPEAT CLEAR TIME TV IN T V CHARAC. SLIDE MODE EDIT/MENU ZOOM TV CH - PROG/DIRECT REPEAT RANDOM MODE MEMO BAND TUNER D.
ENGLISH Combinations of preset codes for different brands TV 24 Admiral 045, 121 Fujitsu 004, 062 Adventura 122 Funai 004, 062 Aiko 054 Futuretech 004 Akai 016, 027, 046 GE 020, 036, 037, 040, 044, 058, 066, 088, 119, 120, Alleron 062 A-Mark 007 Amtron 061 Anam 006, 007, 036 Grundy 062 Anam National 061, 147 Hitachi 029, 031, 051, 052, 070, 111, 112, 113, 124, 134 AOC 003, 007, 033, 038, 039, 047, 048, 049, 133 Hitachi Pay TV 151 Archer 007 Infinity 017, 071 Audiovox
ENGLISH National Quenties 002 Sharp 011, 012, 013, 026, 093, 099, 100, 104, 121 NEC 031, 038, 039, 048, 057, 084, 086, 135, 147 Siemens 013 Nikko 054 Signature 045, 144 NTC 054 Simpson 050 Optimus 128 Sony 043, 046, 138, 146, 150 Optonica 011, 012, 093, 121 Soundesign 030, 050, 062 Orion 004, 139 Spectricon 007, 033 Panasonic 002, 009, 017, 036, 037, 071, 141, 143, 147 Squareview 004 Philco 005, 010, 030, 050, 051, 056, 079, 085, 127, 131, Supre-Macy 032, 122 132, 145, 14
ENGLISH VCR Admiral 081 JVC 004, 005, 006, 026, 029, 043, 044, 045, 046, 085 Aiko 095 Kenwood 004, 005, 006, 026, 029, 033, 045, 085, 090 Aiwa 009 Kodak 088 Akai 026, 027, 070, 072, 082, 083, 084 Lloyd 009, 094 Alba 055 LXI 088 Amstrad 009 Magnavox 015, 016, 042, 049, 063, 106 ASA 042 Magnin 087 Asha 087 Marantz 004, 005, 006, 015, 042, 049, 085, 090 Audio Dynamic 005, 085 Marta 088 Audiovox 088 MEI 049 Beaumark 087 Memorex 009, 033, 049, 053, 060, 081, 087, 088,
ENGLISH Randex 088 Symphonic 009, 094 RCA 007, 013, 019, 023, 058, 063, 064, 065, 073, 080, Tandy 009 082, 087 Tashiko 009, 088 009, 021, 031, 033, 049, 053, 081, 087, 088, 091, Tatung 004, 026, 030 094, 097, 098 Teac 004, 009, 026, 094 Ricoh 055 Technics 024, 049 Salora 033, 041 Teknika 009, 010, 022, 049, 088, 094 Samsung 007, 011, 051, 059, 070, 083, 087, 089, 113 TMK 087, 092 Sanky 081 Toshiba 013, 017, 020, 041, 059, 089, 098, 099, 117 Sansui 005, 026, 029, 045, 061,
ENGLISH (5) Operating the TV/video deck after storing its remote control signals in the preset memory OFF 3-w 1 ON VCR REC NTSC/PAL SLEEP SOURCE TITLE TIME TV IN T V CLEAR ENTER A-B REPEAT CHARAC. SLIDE MODE PROG/DIRECT REPEAT RANDOM MODE MEMO BAND DVD TUNER D.
ENGLISH 10 SETTING UP THE SYSTEM (1) System setup items • Once all connections with other AV components have been completed as described in “CONNECTIONS” (see pages 8 to 15), make the various settings described below on the monitor screen using the ADV-M71’s on-screen display function. • Use the following buttons to set up the system: SYSTEM SETUP button 6 Press this to display the system setup menu.
ENGLISH (2) Quick setup procedure • Refer to “Connections” (pages 8 to 15) and check that all the connections are correct. B 1 SURROUND / SELECT DVD SURROUND RECEIVER ADV-M71 PUSH - PARAM. - + BAND MENU / SET VIRTUAL SPEAKER TONE / SDB Turn on the power. • The power indicator (LED) lights green, the power turns on and the display lights. VOLUME FUNCTION ON / STANDBY Green ON / STANDBY PHONES ON 1 Main unit OFF SLEEP TITLE TV IN T V ENTER A-B REPEAT CHARAC.
ENGLISH 4 Press the ENTER button to display the menu’s setting screen. On the setting screen, the selected item is displayed in yellow and the values of the other items are displayed in green. ENTER 6 [2] Speaker system settings Remote control unit [1] TV screen size setting • “Return” is displayed in yellow. • The currently set value is displayed in green. • If you do not want to change the setting, press the ENTER button at “Return”. The screen in step 2 reappears.
ENGLISH 9 About the speaker system settings Use the • and ª cursor buttons to select “Room Settings”, then use the 0 and 1 cursor buttons to set the size of the room. • The set size is displayed in yellow. B 2CH VIRTUAL Select this when only using with the two speakers for the front channels. B 2CH VIRTUAL & SW Select this when using two speakers for the front channels and a subwoofer with built-in amplifier.
ENGLISH (3) Detailed system setup (changing the system settings) • The quick system settings and original settings set upon shipment from the factory are changed using the system setting changing menu. The settings are stored in the memory until they are changed the next time, and remain valid even when the power is turned off.
ENGLISH NOTE: • Select the speaker size not by the physical size of the speaker but by the speaker’s capacity to reproduce low frequencies of 100 Hz or less. If you do not know, determine the best setting by comparing the sound when the setting is set to “Small” and “Large”, keeping the volume low enough to prevent damage to the speaker. Subwoofer (SW FREQ.) frequency • For the subwoofer frequency at the speaker setting screen, set the bass crossover frequency for playback from the subwoofer.
ENGLISH [2] Delay time (distance setting) • Input the distances from the listening position and the various speakers to set the surround delay time. • Upon shipment from the factory default the delay time is set to the default values in step 3 below. Preparation: Measure the distance from the listening position to the various speakers.
ENGLISH [3] Adjusting the channel level • Adjust so that the playback levels of the different channels are equal. • Make this adjustment by listening to the test tones output from the speakers at the listening position. • By factory default all the levels of all the channels are set to 0 dB. • This adjustment can also be made directly from the remote control unit. (CH SELECT Button) 1 2 If you are not at the system setting changing menu screen, read step 1 and 2 on page 33.
ENGLISH 7 Press the ENTER button to enter the settings. • The next screen in the system setting changing menu appears. ENTER 4 Press the ENTER button to enter the settings. • The next screen in the system setting changing menu appears. Remote control unit To cancel the settings after the adjustments have been made Display the channel level adjustment screen, then use the •, ª, 0 and 1 cursor buttons to select “Level Clear” and select “Yes”. The level settings for all the speakers are set to 0 dB.
ENGLISH 4 11 PLAY BACK Press the ENTER button to enter the settings. • The next screen in the system setting changing menu appears. ENTER (1) Before Operating Remote control unit B Input function settings • LINE-1 and LINE-2 can be set as described below. LINE-1 : “MD”, “CD-R”, “MD/CD-R” or “AUX” can be selected. (“MD/CD-R” can only be set when a system MD recorder, cassette deck and CD recorder are all connected and system operations are being used.
ENGLISH (2) Loading Disc 2 Set discs in the disc tray with the labeled (printed) side facing up. Figure 2 Inner disc tray 12 cm disc guide 8 cm disc guide 8 cm disc Disc tray NOTE: • Do not move the this unit while a disc is playing. Doing so may scratch the disc. NOTES: • If a foreign object is caught in the disc tray during closing, simply press the OPEN/CLOSE button again and the tray will open. • Do not press the disc tray in by hand when the power is off. Doing so will damage it.
ENGLISH (3) Playback IMPORTANT SETUP INFORMATION This set has the following presettings: “DISC SETUP”, “OSD SETUP”, “VIDEO SETUP”, “AUDIO SETUP”, “RATINGS”, and “OTHER SETUP”. These presettings have been preset upon shipment from the factory. If you wish to change them to suit your specific purposes, refer to pages 91 to 103. OFF (3)-3 T V ENTER A-B REPEAT CHARAC. SLIDE MODE PROG/DIRECT REPEAT RANDOM MODE MEMO BAND DVD - TV CH TUNING / TV VOL D.
ENGLISH 6 Use the cursor buttons (•, ª, 0 and 1) to select the desired item. • For some discs there is a second menu screen. If so, press the 9 button to display the next menu screen. (See the disc’s jacket.) 8 Either turn the main unit’s main volume control or use the main volume control buttons on the remote control unit to adjust the volume. The volume is shown on the display. M.VOLUME -20 The cursor buttons (•, ª, 0 and 1) do not work for video CDs.
ENGLISH (5) Playing Still Pictures (Pausing) 1 During playback, press the 13 button on the main unit or the 3 button on the remote control unit. • Press the PLAY button to resume normal playback. 3 Main unit (5)-1 (7)-1 Remote control unit + 7 8 9 DIRECT STEREO VIRTUAL CALL 0/10 +10 - TEST TONE INPUT MODE SURROUND FUNCTION CH TUNER TV / VCR DVD IN/SURR. A/V SYSTEM IN/SURR. MD CDR TAPE B (7)-1 SURROUND / SELECT DVD SURROUND RECEIVER ADV-M71 PUSH - PARAM.
ENGLISH (9) Slow Playback (for DVDs and video CDs only) 6 1 In the still mode, press one of the 6 / 7 buttons on the remote control unit. 6 : Reverse direction 7 : Forward direction • When pressed again, the slow play speed increases. (Four step) (Three step on video CDs) • Press the PLAY button to resume normal playback. 7 Remote control unit NOTE: • Reverse slow play is not possible on video CDs.
ENGLISH 3 Either turn the SURROUND/SELECT dial or press the SURROUND button on the remote control unit to select the surround mode. Input mode display Lit • In the AUTO mode SURROUND / SELECT One of these lights, depending on the input signal. SURROUND PUSH - PARAM. • In the DIGITAL PCM mode Main unit Remote control unit • The function switches as shown below. • The function only changes in the “Æ” direction when operated from the remote control unit.
ENGLISH After starting playback [1] Adjusting the sound quality (TONE/SDB) The TONE/SDB function will not work in the direct mode. [2] Turning the sound off temporarily (MUTING) TEST TONE 2 INPUT MODE SURROUND FUNCTION TUNER TV / VCR DVD IN/SURR. A/V SYSTEM IN/SURR. MD CDR TAPE B 1 2 + SURROUND / SELECT DVD SURROUND RECEIVER ADV-M71 PUSH - PARAM.
ENGLISH 13 DOLBY / DTS SURROUND Surround This unit is equipped with a digital signal processing circuit that lets you play program sources in the surround mode to achieve the same sense of presence as in a movie theater. Dolby Surround (1) Dolby Digital (Dolby Surround AC-3) Dolby Digital is the multi-channel digital signal format developed by Dolby Laboratories. Dolby Digital consists of up to “5.
ENGLISH 2 Sources recorded in Dolby Surround are indicated with the logo mark shown below. Dolby Surround support mark: Manufactured under license from Dolby Laboratories. “Dolby”, “Pro Logic” and the double-D symbol are trademarks of Dolby Laboratories. DTS Digital Surround Digital Theater Surround (also called simply DTS) is a multi-channel digital signal format developed by Digital Theater Systems. DTS offers the same “5.
ENGLISH Dolby Virtual Speaker Dolby Virtual Speaker technology uses proprietary technology of Dolby Laboratories to create a virtual surround sound field using only two speakers for the front channels, allowing the user to experience sound as if surround speakers were actually being used. 2 Features of Dolby Virtual Speaker sound B Accurate surround sound field positioning The virtual surround speakers are positioned at 105° to the left and 105° to the right.
ENGLISH 14 SURROUND PLAYBACK (1) Playing in the Dolby Virtual Speaker mode • The Dolby Virtual Speaker mode is a mode using 3D sound technology from Dolby Laboratories to achieve multi-channel surround sound using only two speakers for the front channels. • With two speakers for the front channels, one of two modes can be selected: Reference or Wide. • The Dolby Virtual Speaker mode can be used not only with Dolby Digital and DTS multi-channel sources but also with 2-channel sources.
ENGLISH 6 Select and set the surround parameters. (On the remote control unit, use the 0 , 1 cursor buttons to set the parameters.) Surround parameters (1) SURROUND / SELECT PUSH - PARAM. If nothing is done for 6 seconds from when the parameter is displayed, the normal display reappears. B Main unit D.COMP. (Dynamic range compression) • This parameter adjusts the dynamic range of the Dolby Digital sound.
ENGLISH [2] 2-channel mode settings • When 2-channel signals are input, one of two playback modes can be selected and set according to the 2-channel mode setting, Virtual 1 or Virtual 2. (The Virtual 1 mode is set by factory default.) Virtual 1 : 2-channel sources are played in virtual surround using Dolby Pro Logic II Cinema processing. Virtual 1 : 2-channel sources are played in virtual surround using Dolby Pro Logic processing. 1,2,3 B 1 SURROUND / SELECT DVD SURROUND RECEIVER ADV-M71 PUSH - PARAM.
ENGLISH Surround parameters (2) 1. VIRTUAL1 (Virtual 1 mode) In this mode, 2-channel sources are played with Dolby Pro Logic II Cinema processing. This mode is suited for playing movie sources recorded in Dolby Surround and regular stereo sources. 2. VIRTUAL2 (Virtual 2 mode) In this mode, 2-channel sources are played with Dolby Pro Logic processing. This mode is compatible with regular Dolby Pro Logic playback.
ENGLISH [1] DSP Surround simulation 2,4,5 B 4 SURROUND / SELECT DVD SURROUND RECEIVER ADV-M71 PUSH - PARAM.
ENGLISH 5 • DEFAULT setting Surround parameters (3) DEFAULT Y/N Y/N YES , NO / When “YES” is selected, the settings are reset to their factory default values. Stop operating buttons once the surround parameter settings have been completed. After several seconds the normal display reappears and the settings are automatically set. 54 ROOM SIZE: • This sets the size of the sound field. There are five settings: “SMALL”, “MED-S” (mediumsmall), “MED”, “MED-L” (medium-large) and “LARGE”.
ENGLISH 2 Table of Surround Mode Parameters (1) Presence/absence of signals and controllability in the various modes Surround Mode DVS: Dolby Virtual Speaker DHP: Dolby Headphone Channel output SUB-WOOFER B E B B B B C (H/P ONLY) E E E DH2 C (H/P ONLY) E E E DH3 C (H/P ONLY) E E E BYPASS C (H/P ONLY) E E E STEREO C E E B DIRECT DHP DVS SURROUND L/R FRONT L/R CENTER REFERENCE C WIDE C DH1 E E B C B B B DTS SURROUND C B B B DOLBY PL II C B B B AUTO S
ENGLISH 2 Table of Surround Mode Parameters (3) Presence/absence of signals and controllability in the various modes Surround Mode DVS: Dolby Virtual Speaker DHP: Dolby Headphone Surround parameter – default value indicated in (parentheses) TONE CONTROL SDB 2ch DECODE MODE Pro Logic II Music mode only PANORAMA DIMENSION CENTER WIDTH E E E E E E E E E E E E E E E C (OFF) C (OFF) WIDE C (OFF) C (OFF) DH1 C (OFF) C (OFF) DH2 C (OFF) C (OFF) DH3 C (OFF) C (OFF) BYPASS C (OFF
ENGLISH (3) Playback using the Dolby Headphone mode • The ADV-M71 is equipped with the Dolby Headphone mode, a technology developed jointly by Dolby Laboratories and Lake Technology for achieving 3D sound over regular headphones. • The Dolby Headphone mode is set when headphones are connected to the ADV-M71’s headphones jack. • There are actually four Dolby Headphone modes creating different sound field effects: DH1, DH2, DH3 and Bypass (normal stereo playback).
ENGLISH 2 Recording Surround parameters (4) DOLBY H (Dolby Headphone modes) DH1 ..............Reference room (small room with little reverberation) DH2 ..............Live room (room with more reverberation than DH1) DH3 ..............Large room (Larger room than DH1. Use this mode to achieve a sense of distance and diffusion of the sound.) BYPASS ........Stereo playback. 2-channel modes These can be selected when playing 2-channel sources (analog, PCM, etc.).
ENGLISH Surround parameters (5) (2-channel mode) AUTO-ST (auto stereo) mode 2-channel sources are played in 2-channel stereo. When this mode is selected in the auto decode mode, multi-channel sources (DVD, BS digital, etc.) are played in the multi-channel mode, while 2-channel sources (CDs, etc.) are automatically played in stereo. PLII CINEMA / PLII MUSIC / PRO LOGIC mode Even 2-channel sources undergo Dolby Pro Logic II processing and are played in the multi-channel mode.
ENGLISH [3] Setting the parameters in the PLII Cinema, PLII Music and Pro Logic modes • When PLII Cinema, PLII Music or Pro Logic is selected for the 2-channel mode, detailed parameters can be set for each of these modes. PLII Music mode: Make the settings using the procedure below. • Program sources including the mark and CDs and other 2-channel sources are decoded with Dolby Pro Logic II processing and played in the multi-channel mode.
ENGLISH [4] Playing in the Dolby Pro Logic II mode (all functions) • The source is played according to the settings that have been made for the 2-channel mode and the parameters in the PLII Cinema, PLII Music and Pro Logic modes. • Applicable sources • Digital input signals (LINE-1 and D.AUX functions, including DVD playback discs) Dolby Digital 2-channel sources PCM 2-channel sources • 2-channel analog input signals (TUNER, LINE-1 and LINE-2) 1 Select the input function.
ENGLISH 15 LISTENING TO THE RADIO (1) Tuning 3 OFF ON VCR REC NTSC/PAL SLEEP TITLE SOURCE ENTER A-B REPEAT CLEAR T V CHARAC. SLIDE MODE EDIT/MENU ZOOM TV CH B SURROUND / SELECT DVD SURROUND RECEIVER ADV-M71 PUSH - PARAM. - + BAND MENU / SET VIRTUAL SPEAKER TONE / SDB VOLUME FUNCTION ON / STANDBY PHONES Set the remote control selector switches to A/V and TUNER. TUNER TV / VCR DVD IN/SURR. A/V SYSTEM 1 2 IN/SURR.
ENGLISH (2) Presetting stations that have been tuned in and giving names to stations (remote control unit only) 2 A total of 40 stations (including both FM and AM stations) can be preset. 2 Preset stations can be given names with up to 8 characters (letters, numbers and symbols). 2 Preset stations using the including remote control unit. SLEEP Set the remote control selector switches to A/V and TUNER. CLEAR 2,3, 4,6 TUNER TV / VCR DVD IN/SURR. A/V SYSTEM IN/SURR.
ENGLISH (3) Auto tuner presets Use this to automatically search for FM broadcasts and store up to 40 stations at preset channels 1 to 40. NOTE: • If an FM station cannot be preset automatically due to poor reception, use the “Manual tuning” operation to tune in the station, then preset it using the manual “Preset memory” operation. 1 2 Using the TUNER function, press and hold the MENU/SET button of the main unit for 2 seconds or longer.
ENGLISH 16 ON-SCREEN DISPLAY • The ADV-M71 is equipped with an on-screen display (“OSD”) function that displays various types of information on the surround functions and the disc on the screen when the function is set to DVD. q Setup screen • This is used to select the speaker system being used (quick system setting) and to change the function of the ADV-M71 and various settings when playing discs (system setting change and DVD setting change).
ENGLISH 17 USING THE ON-SCREEN DISPLAY (1) Operating using the disc information OSD SLEEP 2 Use this function to display and change information on the disc (titles, chapters, time, etc.) Set the remote control selector switches to A/V and DVD. CLEAR TITLE TV IN T V CHARAC. SLIDE MODE EDIT/MENU ZOOM TV CH PROG/DIRECT 3 TUNER TV / VCR DVD IN/SURR. A/V SYSTEM REPEAT - RANDOM MODE MEMO BAND DVD TUNER D.
ENGLISH (2) Adjusting the picture quality • The quality of the picture when playing discs can be adjusted. STATUS Set the remote control selector switches to A/V and DVD. 3 SYSTEM 1,2 ENTER SURROUND PARAMETER CH SELECT - 1 IN/SURR. MD TONE /SDB 1,2,3 TUNER TV / VCR DVD IN/SURR.
ENGLISH (3) Playing Repeatedly 2 Use this function to play your favourite audio or video sections repeatedly. OFF SLEEP ON VCR REC NTSC/PAL TITLE TV IN T V ENTER A-B REPEAT CHARAC. SLIDE MODE EDIT/MENU ZOOM SOURCE [2]-1,2 Set the remote control selector switches to A/V and DVD. [1]-1 TUNER TV / VCR DVD IN/SURR. A/V SYSTEM CLEAR TV CH PROG/DIRECT REPEAT TIME - RANDOM MODE MEMO BAND DVD TUNER D.
ENGLISH [2] Playing a Certain Section Repeatedly (A-B Repeat Playback) 1 During playback, press the A-B REPEAT button. • This sets start point A. ENTER A-B REPEAT A TO B SET A Remote control unit 2 Press the A-B REPEAT button again. • This sets end point B, and repeat playback of the A-B section starts. ENTER A-B REPEAT A TO B SET B Remote control unit To return to normal playback: Press the A-B REPEAT button until “A TO B CANCELLED” appears on the TV screen.
ENGLISH (4) Playing Tracks in the Desired Order 2 Use this function with video and music CDs to play the tracks in the desired order. 2 This function does not affect with DVD. SLEEP REC NTSC/PAL TITLE TV IN T V ENTER A-B REPEAT CHARAC. SLIDE MODE EDIT/MENU ZOOM SOURCE CLEAR TV CH 1 Set the remote control selector switches to A/V and DVD. 2 REPEAT RANDOM MODE MEMO BAND TUNER TUNING / TV VOL D.
ENGLISH (5) Playing Tracks in the Random Order 2 Use this function with video and music CDs to play the tracks in random order. 2 This function does not affect with DVD. SLEEP NTSC/PAL TITLE TV IN T V ENTER A-B REPEAT CHARAC. SLIDE MODE EDIT/MENU ZOOM SOURCE CLEAR TV CH PROG/DIRECT REPEAT RANDOM MODE MEMO BAND DVD Set the remote control selector switches to A/V and DVD. TUNER D.
ENGLISH (6) MP3 WMA Playback [1] Listening to Recorded MP3 CD/CD-R/CD-RW 2 There are many music distribution sites on the internet from which music files in MP3 format can be downloaded. Music downloaded as instructed on the site and written onto a CD-R/RW disc can be played on the ADV-M71.
ENGLISH 3 Use the • and ª cursor buttons to select the MP3 file you want to play, then press the PLAY (1) button or ENTER button. • Playback starts. The display can be switched between the single elapsed time and the single remaining time by pressing the Remote control unit DISPLAY button. Programmed playback is not possible with MP3 discs.
ENGLISH [2] Listening to Recorded WMA (Windows Media Audio) CD-R/CD-RW • This unit can play CD-R/RW music files that have been recorded in the WMA (Windows Media Audio)* audio compression format. Windows Media, and the Windows logo are trademarks, or registered trademarks of Microsoft Corporation in the United States and/or other countries. WMA (Windows Media Audio): New audio coding of Microsoft Corporation (U.S.A.
ENGLISH (7) Playing still picture files (JPEG format) 2 JPEG files stored on Kodak picture CDs, CD-Rs and CD-RWs can be played as a slide show and enjoyed on the ADV-M71. [1] Playing Kodak picture CDs/FUJICOLOR CDs 2 Playing Picture CDs and Fujicolor CDs The ADV-M71 can play Kodak Picture CDs and Fuji Film Fujicolor CDs, so you can view the photographs stored on them on a TV screen.
ENGLISH [2] Playing still pictures stored on CD-Rs/RWs 1 B 3 SURROUND / SELECT DVD SURROUND RECEIVER ADV-M71 PUSH - PARAM. - + BAND MENU / SET VIRTUAL SPEAKER TONE / SDB VOLUME CALL 0/10 +10 - TEST TONE INPUT MODE SURROUND FUNCTION TUNER TV / VCR DVD IN/SURR. A/V Set the remote control selector switches to A/V and DVD. SYSTEM IN/SURR. MD CDR TAPE 3 1 2 + DVD 8 6 9 - 7 STATUS FUNCTION 3 TUNER TV / VCR DVD IN/SURR.
ENGLISH To view several of the still pictures stored on the disc at once: • Press the STOP button to display up to 9 still pictures at once. • To select and view a still picture (to start the slide show from a specific still picture), use the cursor buttons (ª, •, 0 and 1) to select the desired still picture, then press the ENTER button. To temporarily stop the slide show: • Press the PAUSE button. • To resume the slide show, press the PLAY button.
ENGLISH (8) Using the Multiple Audio, Subtitle and Angle Functions [1] Switching the Audio Language (Multiple Audio Function) 2 With DVDs containing multiple audio language signals, the audio language can be switched during playback. CDR TAPE 1 2 + DVD 8 9 6 Set the remote control selector switches to A/V and DVD. - 7 STATUS 3 MUTING SETUP TONE /SDB 2 ENTER SURROUND PARAMETER CH SELECT TUNER TV / VCR DVD IN/SURR. A/V DISPLAY RETURN SYSTEM MENU VCR CH + TOP MENU IN/SURR.
ENGLISH [2] Switching the Subtitle Language (Multiple Subtitle Function) 2 With DVDs containing multiple subtitle language signals, the subtitle language can be switched during playback. CDR TAPE 1 2 + DVD 8 9 6 Set the remote control selector switches to A/V and DVD. - 7 STATUS 3 MUTING SETUP TONE /SDB 2 ENTER SURROUND PARAMETER CH SELECT TUNER TV / VCR DVD IN/SURR. A/V DISPLAY RETURN SYSTEM MENU VCR CH CDR TAPE ANGLE AUDIO + TOP MENU IN/SURR.
ENGLISH [3] Switching the Angle (Multiple Angle Function) 2 With DVDs containing multiple angle signals, the angle can be switched during playback. CDR TAPE 1 2 + DVD 8 9 6 Set the remote control selector switches to A/V and DVD. - 7 STATUS 3 MUTING SETUP TONE /SDB 2 ENTER SURROUND PARAMETER CH SELECT TUNER TV / VCR DVD IN/SURR. A/V RETURN SYSTEM IN/SURR. MD CDR TAPE 1 DISPLAY ANGLE VCR CH MENU AUDIO + TOP MENU SUB TITLE RC-936 1 During playback, press the ANGLE button.
ENGLISH (9) Using the Menus [1] Using the Top Menu 2 For DVDs containing multiple titles, the desired title can be selected and played from the top menu. CDR TAPE OFF 1 ON VCR REC NTSC/PAL TITLE TV IN T V CLEAR ENTER A-B REPEAT CHARAC. SLIDE MODE EDIT/MENU ZOOM PROG/DIRECT REPEAT RANDOM MODE MEMO BAND DVD TUNER D.AUX SLEEP SOURCE 2 8 TV CH Set the remote control selector switches to A/V and DVD. 2 TUNER TV / VCR DVD IN/SURR. A/V SYSTEM IN/SURR.
ENGLISH [2] Using the DVD Menu 2 Some DVDs include special menus called DVD menus. For example, DVDs with complex contents may contain guide menus, and DVDs with multiple languages may contain audio and subtitle language menus. These menus are called “DVD menus”. Here we describe the general procedure for using DVD menus. CDR TAPE OFF 1 ON VCR REC NTSC/PAL TITLE TV IN T V CLEAR ENTER A-B REPEAT CHARAC. SLIDE MODE EDIT/MENU ZOOM PROG/DIRECT REPEAT RANDOM MODE MEMO BAND DVD TUNER D.
ENGLISH (10) Playing in the zoom mode CDR TAPE OFF SLEEP 1 ON VCR REC NTSC/PAL TITLE TV IN T V ENTER A-B REPEAT CHARAC. SLIDE MODE EDIT/MENU ZOOM SOURCE 8 CLEAR TV CH Set the remote control selector switches to A/V and DVD. TUNER TV / VCR DVD IN/SURR. A/V SYSTEM IN/SURR. MD PROG/DIRECT REPEAT - RANDOM MODE MEMO BAND DVD TUNER D.
ENGLISH 18 USING THE TIMER 2 Timer and system operations are possible once the setup procedure has been completed. (1) Setting the clock (12-hour display) Example: Setting the current time to “7:30 p.m.” 4,6 2,3,5,7 B 5 SURROUND / SELECT DVD SURROUND RECEIVER ADV-M71 PUSH - PARAM. TONE / SDB Adj PM 7:00 MENU / SET + BAND MENU / SET VIRTUAL SPEAKER Press the MENU/SET button.
ENGLISH (2) Setting the everyday timer and once timer 2 Be sure to set the current time before setting the timer. (See page 84.) 2 Use the everyday timer to switch the power on and off (standby) once at the same time each day. Use the once timer to switch the power on and off (standby) at the specified time once only. 2 With the ADV-M71 it is possible to play the tuner, a DVD or a CD with the timer.
ENGLISH 10 Press the MENU/SET button. • The “PM12” in the hours place is stored in the memory. E on PM12:00 17 MENU/SET Main unit 11 Turn the SURROUND/SELECT knob and set the minutes place to “35”. Turn the SURROUND/SELECT knob to display “Eon”. • The everyday timer is turned on and SURROUND / SELECT PUSH - PARAM. the timer standby indicator lights. This completes the setting of the timer. Main unit For more details, see “Turning the everyday timer and once timer on and off” on page 85.
ENGLISH Example 2: Listening to a CD with the once timer 4,6 2 4 2 Turn the SURROUND/SELECT knob to display “ONCE”, then press the MENU/SET button. SURROUND / SELECT PUSH - PARAM. B ONCE SURROUND / SELECT DVD SURROUND RECEIVER ADV-M71 PUSH - PARAM. - + BAND MENU / SET VIRTUAL SPEAKER TONE / SDB VOLUME The display switches as follows each time the SURROUND/SELECT knob is turned: FUNCTION ON / STANDBY PHONES 1 ONCE 3,4,5,7 1 MENU / SET EVERYDAY Main unit Turn on the power.
ENGLISH (3) Turning the everyday timer and once timer on and off • After the timer has been set using the procedure described under “(2) Setting the everyday timer and once timer” (pages 85 to 86), turn the everyday timer and/or once timer on so that the set operations will be performed. 2 B • If only the once timer is set, the setting changes as shown below each time the SURROUND/SELECT knob is turned. SURROUND / SELECT DVD SURROUND RECEIVER ADV-M71 PUSH - PARAM.
ENGLISH (4) Everyday timer and once timer priority • If the times set for the everyday timer and once timer overlap, the once time has priority. (5) About the everyday timer and once timer 2 Checking the timer settings • Use the same procedure as when setting the timer to check the timer settings. q w e r Press the MENU/SET button to display “TIMER”. Turn the SURROUND/SELECT knob to display “EVERYDAY” or “ONCE”.
ENGLISH (6) Setting the sleep timer (remote control unit only) • The included remote control unit can be used to turn the power to the standby mode after a maximum of 120 minutes. (Sleep timer) • Use this function to automatically switch the power to the standby mode after a specific amount of time (minutes). Example: To set the power to the standby mode in 50 minutesaccording to the clock. Be sure to correct the current time setting. Set the remote control selector switches to A/V and IN/SURR..
ENGLISH 19 CHANGING THE DEFAULT SETTINGS (DVD) 2 The initial setting that was set prior to shipping from the factory can be changed. The setting contents are maintained until they are next changed even when the power is switched off. 1 In the stop mode, press the SETUP button. At the Setup Menu, use the • and ª cursor buttons to select “DVD SETUP” and press the ENTER button.
ENGLISH (1) “DISC SETUP” is selected 1 See page 91. 2 3 Use the 0 and 1 cursor buttons to select the “DISC SETUP”, then press the ENTER button. • DIALOG Use this to set the language of the sound output from the speakers. • SUBTITLE Use this to set the language of the subtitles displayed on the TV. • DISC MENUS Use this to set the language of the menus recorded on the disc (top menu, etc.).
ENGLISH 4 To exit the dialog mode Press the ENTER button, you can go back to the previous screen. 2 When “SUBTITLE” is selected: • OFF (Factory default) Select this if you do not want to display the subtitles. (For some discs it is not possible to turn off the subtitle display.) • ENGLISH Select this when you want to play the DVD with the subtitles in English. • FRENCH Select this when you want to play the DVD with the subtitles in French.
ENGLISH Language code list Code 94 Language Code Language Code Language Code Language 6565 Afar 7079 Faroese 7678 Lingala 8375 Slovak 6566 Abkhazian 7082 French 7679 Laothian 8376 Slovenian 6570 Afrikaans 7089 Frisian 7684 Lithuanian 8377 Samoan 6577 Ameharic 7165 Irish, Scots 7686 Latvian, Lettish 8378 Shona 6582 Arabic 7168 Gaelic 7771 Malagasy 8379 Somali 6583 Assamese 7176 Galician 7773 Maori 8381 Albanian 6588 Aymara 7178 Guarani 7775 Maced
ENGLISH (2) When “OSD SETUP” is selected 1 2 3 If you are not at the DVD setting screen, read steps 1 and 2 on page 91. Use the 0 and 1 cursor buttons to select the “OSD SETUP” tag icon, then press the ENTER button. • WALL PAPER The image displayed when in the stop mode or when playing a CD can be selected. Remote control unit d ENTER Remote control unit 4 Use the • and ª cursor buttons to select the setting to be set, then press the ENTER button.
ENGLISH (3) “VIDEO SETUP” is selected 1 See page 91. 2 3 Use the 0 and 1 cursor buttons to select the “VIDEO SETUP”, then press the ENTER button. • TV ASPECT Use this to set the shape of your TV’s screen. • TV TYPE Use this to set your TV’s video format (NTSC, PAL or MULTI). • VIDEO MODE Use this to select the video mode. (AUTO, FILM, VIDEO) • BLACK LEVEL The picture’s black level can be set to “lighter” or “darker”.
ENGLISH 4 2 When “TV TYPE” is selected: • NTSC (Factory default) Select this when your TV’s video format is NTSC. If NTSC is selected, output format is fixed to NTSC. • PAL Select this when your TV’s video format is PAL. If PAL is selected, output format is fixed to PAL. • MULTI Select this when your TV is compatible with both the NTSC and PAL formats.
ENGLISH (4) “AUDIO SETUP” is selected 1 See page 91. 2 3 Use the 0 and 1 cursor buttons to select the “AUDIO SETUP”, then press the ENTER button. • DIGITAL OUT Use this to select the digital output’s signal format. • LPCM (44.1 kHz / 48 kHz) Use this to set the digital audio output when playing DVDs recorded in linear PCM audio. Remote control unit To exit the audio setup mode Use the • and ª cursor buttons to select “> NEXT DVD MENU”, then press the ENTER button.
ENGLISH 4 2 “LPCM SELECT (96 kHz / 48 kHz)” is selected. • OFF (Factory default) Make the selection when playing back to a decoder DVDs that were recorded with this unit using linear PCM 48 kHz/20/24 bit and 96 kHz modes. Note that DVDs with Copyright Protection are converted to 48 kHz/16 bits and played back. The same signal is output from the digital output jacks. • ON DVDs that were recorded with linear PCM 48 kHz/20/24 bit and 96 kHz modes are all converted to 48 kHz/16 bits.
ENGLISH (5) “RATINGS” is selected 1 2 3 See page 91. Use the 0 and 1 cursor buttons to select the “RATINGS”, then press the ENTER button. • RATING LEVEL Use this to restrict playback of adult DVDs you do not want children to view. Note that even with adult DVDs, viewing cannot be restricted unless the restriction level is recorded on the disc. It is however possible to disable playback of all DVDs. • PASSWORD Use this to change the password. The set’s password is set to “0000” by default.
ENGLISH 4 Use the number buttons to input a 4-digit password, then press the ENTER button. Be sure to set the DVD mode using the remote control mode selector buttons. The set's password is set to “0000" by default. Do not forget the password. The setting cannot be changed without inputting the correct password. When the password has been forgotten or when a RATING LEVEL setting change is suspended, press the ENTER button several times and terminate the rating setup mode. DVD TUNER D.
ENGLISH (6) “OTHER SETUP” is selected NOTES: • An English caption decoder is required to display English captions. • DVDs with caption signals are indicated by the , , , mark. English captions cannot be displayed when playing DVDs which do not contain caption signals. • The characters in which the captions are displayed (capital letters, small letters, italics, etc.) depend on the DVD and cannot be selected with this unit. 1 2 3 See page 91.
ENGLISH 4 2 When “SLIDE SHOW” has been selected • Use the • and ª cursor buttons to set the time. • The interval can be set from 5 to 15 seconds in steps of 1 second.
ENGLISH 20 SYSTEM FUNCTIONS 2 Making system connections between the ADV-M71 and the D-M31 series cassette deck (DRR-M31) makes operation even easier. (For instructions on connections, refer to “Connecting to D-M31 Series System Components” on pages 8 to 9.) 2 System functions will not work properly if the input/output function settings are not right for the connected components. Be sure to set the input/output functions for the components being used. (See page 37.
ENGLISH (3) CD Æ TAPE recording (when the ADV-M71 and DRR-M31 are connected with a system cord) • CDs can easily be recorded onto cassette tapes. OFF Main unit (ADV-M71) Cassette deck (DRR-M31) B CLEAR 3,e 3,e 7 5,t 5,t PROG/DIRECT PLAY TONE / SDB BAND REPEAT BAND D.
ENGLISH (4) Edited recording (when the ADV-M71 and DRR-M31 are connected with a system cord) • The tracks on the CD can be automatically divided into sides A and B for recording according to the length of the cassette tape (tape time). (For CDs only) • Edited recording is possible for CDs containing up to 25 tracks. For CDs with 26 tracks or more, editing is not possible.
ENGLISH 6 Press the play/pause button on the ADV-M71 or the DVD play button on the remote control unit. • Playback of the CD and recording onto the cassette tape start simultaneously. 01Tr ADV-M71 00:01 1 DVD Remote control unit To quit the edited recording function, press the ADV-M71’s stop button. BAND 2 ADV-M71 Remote control unit NOTES: • The edited recording function cannot be used with CDs containing 26 tracks or more.
ENGLISH 21 LAST FUNCTION MEMORY • This unit is equipped with a last function memory which stores the input and output setting conditions as they were immediately before the power is switched off. This function eliminates the need to perform complicated resettings when the power is switched on. • The unit is also equipped with a back-up memory. This function provides memory storage when the power switch is off and with the power cord disconnected.
ENGLISH 23 TROUBLESHOOTING Check again before assuming the player is malfunctioning 2 Are all the connections correct ? 2 Are you following the instructions in the manual ? 2 Are the speakers and other components operating properly ? If this unit does not seem to be functioning properly, check the table below. If this does not solve the problem, this unit may be damaged. Turn off the power, unplug the power cord from the power outlet, and contact your store of purchase or nearest Denon sales office.
ENGLISH DVD operation Symptom • Is there condensation on the disc or player ? (Let stand for 1 or 2 hours.) • Discs other than DVDs, video CDs and music CDs cannot be played. • Disc is dirty. Wipe off the dirt. — 6 7 Menu playback of video CD’s is not possible. • Menu playback is not possible with anything but video CDs with playback control. — Picture is disturbed during the search operation. • Some disturbance is normal. — Buttons do not operate. • Some operations are disabled for some discs.
ENGLISH 24 SPECIFICATIONS 2 2 2 Audio Section • Power Amplifier Section Rated output: Practical maximum output: Output terminals: • Analog Section Input sensitivity/Input impedance: Frequency response: Signal-to-noise ratio: Rated output: Tuner Section Reception frequency range: Receiving sensitivity: FM stereo separation: • Digital Section Digital input/output: Video Section • Standard Video Jack Output level/impedance: • S-video Connector Output level/impedance: • Color Difference (Component) Video Co
16-11, YUSHIMA 3-CHOME, BUNKYO-KU, TOKYO 113-0034, JAPAN Telephone: (03) 3837-5321 Printed in China 511 4048 005