User’s Manual LCD Color TV DFT-3215 To enjoy your set to the full from the very beginning, read this manual carefully and keep it handy for future reference.
Thank you very much for your purchase of our LCD TV products. To enjoy your set to the full from the very beginning, read this manual carefully and keep it handy for future reference. Contents Safety Instructions.........................................................3 How to use “SET UP”································· 11 To place .............................................................. 3 TIMER......................................................................... 13 Power cord protection ..
Safety Instructions To place Place the TV on a horizontal, stable surface, do not block the ventilation holes, avoid placing the TV in direct sunshine, or in high temperature, damp, dusty or causticity environment, otherwise the internal components will be damaged. When you install the base-stand, be sure to install it according to the installation instruction strictly. The wall should have enough loading strength to avoid falling and injury.
Maintenance Maintenance * First, please confirm that the power is turned off and the plug is pulled out. * Do not use benzene, petrol or oil thinner, etc. to clean the TV. * Clean the cabinet with a soft and dry cloth. If the cabinet is very dirty, use a soft and wet cloth, then dry it. * Clean the LCD panel with soft and dry paper or cloth. Do not press it. * Please be careful because the cabinet and the panel are easy to be scratched.
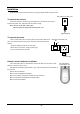
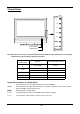
Installation Confirm that the power switch is OFF before you plug the Signal Cables and Power Cords. Part of the TV set’s back cover To connect the antenna Connect the antenna or the CATV signal cable directly to the antenna input terminal ANT located on the back cover, otherwise it will cause inferior image. Note: 1.Please use 75 ohm coaxial cable. 2.Do not enlace the signal cable and the power cord.
Control Panel V+ V- P+ P- MENU TV/AV Power indicator Infrared sensor Panel on the side Note: Because the necessity of structure, different TV has different shape and position of control key. Same marks of the control keys have same function.
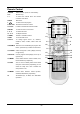
Remote Control 1.POWER Switch between “power on” and “standby” 2.0-9 Numeric keys 3.-/-- To select the channel which the channel number is more than 9 4.MUTE Mute on/off 5. To return to the last program 1 4 6.VOL-/VOL+ Decrease /Increase the volume 7.CH+/CH- Increase / Decrease the channel number 8.ENTER To enter into menu or menu item 9. ▲ / ▼ To select menu item 10. ◄ / ► To adjust menu item 11.MENU Activate or exit Menu window 2 3 12.EXIT To exit the main menu 13.
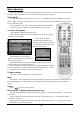
Basic Operation All the functions can be conducted by pressing the keys on the remote control. For some functions you can also press the buttons on the front panel of the TV set. Please check the table on Page 6 for details. Power On/Off 1.Turn on the POWER button on the back cover, the TV is at STANDBY status, press on the remote control or < > on the control panel to turn on the TV. The power indicator is red at STANDBY status, it is green when the TV is ON and has signal. 2.
Using Menus PICTURE There are nine menu items in the “PICTURE”: Picture Mode, Contrast, Brightness, Color, Tint, Sharpness, Color temperature, DNR and Advanced. The user can get the picture effect you needed by adjusting the above menu items. How to enter “PICTURE” 1.Press
Using Menus SOUND There are five menu items in the “SOUND”: Volume, Sound Mode, Bass, Treble and Balance. How to enter “SOUND” 1.Press
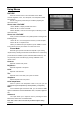
Using Menus SET UP There are five menu items in the “SET UP”: Language, Auto tuning, Manual tuning, Program label and Program Edit. How to enter “SET UP” 1.Press
Using Menus Manual search Manual search option allows you to preset channels one by one, in the order of your choice. Program Label This option allows you to name for a selected channel, you can also rename the program which you have named. 1.Select a channel which you would like to operate for it. 2.Press <▲ / ▼> to select Program Label in SET UP menu. 3.Press <◄ / ►> to perform your selection, and the menu bar of program label will display on the bottom side of the screen. 4.
Using Menus TIMER There are four menu items in the “TIMER”: Sleep Timer, Off timer, On timer, On time position. How to enter “TIMER” 1.Press
Using Menus FUNCTION There are four menu items in the “FUNCTION”: Aspect, Blue screen, Keylock, Country. How to enter “FUNCTION” Press
Using Menus How to use “YPbPr position” in YPbPr mode When you enter “SET UP” menu, please operate according to the following steps: 1.Press <▲ / ▼> to select “YPbPr position”(fig.1). 2.Press <◄ / ►> to enter the sub menu(fig.2). This option allows you to adjust the position in YPbPr mode. 1 H Position Adjust the screen horizontal position. V Position Adjust the screen vertical position. Reset Replace H position, V position with the factory default values.
Teletext Operation Select Teletext Mode Press / to select the channel providing the Teletext service. Press to enter TELETEXT mode. By this key, mode will be changed as: Teletext→Teletext+TV→TV. The overview station page or the last page viewed (in case you already watched TELETEXT at this channel previously) appears. If you need to return to TV mode, press again the on the remote control. INDEX The contents page can be redisplayed at any time by pressing the .
Connection of External Equipment Socket Location YUV Connecting your DVD/VCR YPbPr/YCbCr output PC AUDIO IN Connecting your PC audio output TV back cover terminals HDMI Connecting equipment with HDMI interface AV AUDIO IN Connecting your DVD/VCR audio output VIDEO Connecting your DVD/VCR by CVBS cable VGA Connecting your PC SCART2 Connecting your DVD/VCR by SCART cable S-VIDEO SCART1 Connecting your Connecting your DVD/VCR by DVD/VCR by S-video cable SCART cable YUV AUDIO IN Connecting your DVD/VCR
Connection of External Equipment The power should be turned off when you plug the connecting line in. Please read the instruction of the equipment, which you want to connect. Basic Connection Before you receive different source signal programs, please enter button to choose the right source of signal.
Trouble Shooting When a problem occurs, you can check the table below and find some solutions before call for service.
Specification and Accessory 1. Receiving system: Video input: PAL SECAM PAL NTSC 2. Number of Pixels: 1366x768 pixels 3. Active screen size: 16:9 TFT-LCD display panel The min. diagonal size of the image: 80cm. 4. Power voltage: AC 240V 50Hz 5. Power consumption: 150W 6. Sound power consumption: (admitted distortion rate 10%) Left and right sound channel: 7W+7W 7. VGA interface input: 640x480/60Hz, 800x600/60Hz, 1024x768/60Hz 8. Dimensions: See the package box 9.
ENGLISH Instructions on environment protection Do not dispose of this product in the usual household garbage at the end of its lifecycle; hand it over at a collection point for the recycling of electrical and electronic appliances. The symbol on the product, the instructions for use or the packing will inform about the methods for disposal. The materials are recyclable as mentioned in this marking.