
Installation Guide


FINISH
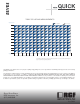
Joints may be finished with a sanded or urethane grout.
Urethane Grout Finish
Follow directions for mixing, application and cleaning on the grout
packaging.
Using a rubber trowel, fill the joints with the grout
After the grout has dried, but before it has hardened,
clean the joints with a sponge
Perform finishing work on the joints before they harden
•
•
•
SPECIAL NOTES AND RECOMMENDATIONS:
These instructions are intended for general reference
only and should not be solely relied on for information
needed for a particular project
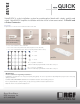
Perform a “trial” layout with your first course of block.
Create the initial strip of profiles and connectors. Lay this
strip in place. Set the first course of glass blocks and
insert a profile vertically between each block. Insert a
profile between the block and the jambs or wall. Once
your first course is properly aligned, using a pencil, mark
the outline of the glass block on the floor or curb.
Remove block and trace the location of the profiles. Make
sure these lines are square and level.
If the project is created with a curb or jamb make sure the
curb and jamb are securely fastened to the floor and wall
and are square, plumb and level before proceeding.
Make sure the material the glass block will be attached to
is strong enough and will bear the project’s weight.
Finish all joints
with grout
Wash and clean wall
with soap and soft cloth
•
•
•
•
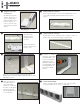
SPECIAL SHAPES
For nominal 4”x8”
block, each profile
may be snapped
apart to make two
4” profiles (discard
remaining center
section).
For nominal 8”x8” Linear End block, snap off short end of
profile immediately below the words “Terminal Linear”
which are embossed on the profile.
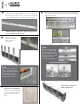
Apply an approximate 3/8” bead of
silicone to the inside edges of the
glass block before installing the
shortened profile. Remember to
apply a bead of silicone to each
side of the glass block that will be in
contact with a profile.
ENJOY YOUR BEAUTIFUL
NEW GLASS BLOCK PROJECT!
NOMINAL 4” X 8” NOMINAL 8” X 8” LINEAR END BLOCK