
Owner's manual

104851Page7
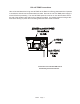
Low Voltage Activation Connections
You must disconnect all voltage sources before attempting to install an accessory.
AlongwithyourDetexLowEnergyAutomaticDoorOperator,youreceivedanInstallationGuidefor
DetexLowEnergyOperatorControlModule,P/N104827.Thisdocumentwillhelpwiththeproper
setup,switchoptionsandwiringschematics.
TheON/OFF/HOLD3-waytoggleswitchhasbeenpre-wiredintotheControlModuleandislocated
atoneendoftheenclosure.
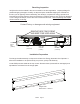
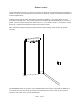
Beforeanyadjustmentscanbemadethefollowingcheckmustbeperformed.Firstthearmmust
beproperlyconnectedtothedoorleaf.ThepowermustbeconnectedandtheswitchintheON
position.Thedoorleafmustbefullyclosed.ExaminetheDoorControl.Thecontrolboardmust
havethreelightsilluminated.LATCH,POWER,andMODULEON.IftheCLOSElightison,review
thearmassemblylocationbymanuallyopeningdoorleafuntilitisstoppedbyinternalstop.Ifthe
doorarmrotateswellbeyond80degreesreferbacktoarminstallationdirections.Ifarmstopsat
approximately80degrees,allowtheleaftoclose.
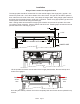
TheLATCH-CHECKandBACK-CHECKSarecontrolledviathecamontopofthegearbox.Access
isthruthetopoftheoperatorcasedirectlyabovethegearbox.Usinga1/8thinchAllenwrench,
gentlyloosenthescrewthatholdsthecaminplace.Rotatecamintheclosingrotationdirectionuntil
theCLOSElightgoesoutandtheLATCHlightcomeson.Holdingthecaminplacegentlyretighten
theholdingscrew.
DONOTOVERTIGHTENASTHATWILLDAMAGETHECAM.
TesttheLATCH-CHECKpositionbymanuallyopeningthedoorleafuntilyouseeLATCH-CHECK
lightgooutandtheCLOSElightcomeson.Thisshouldbeapproximately4inchesfromJamb.Fine
tuneadjustmentasnecessary.
Ifthelightsfailtoworkcallforfactoryassistance.
THE DETEX, LOW ENERGY AUTOMATIC DOOR OPERATOR, IS TO BE USED WITH
APPROVED SWITCHES.
ContactfactoryforinformationonSensorconnections.
Typicallyyouwilluseawallmounted,hardwiredpushbuttonforactivation.Youmustprovidewire
fromthepushbuttonswitchtotheControlModuleinputs.Knockoutsareavailableontheenclosure
forwireruns.Theconnectionsareterminatedonterminals#1and#2oftheControlModule.Refer
tothediagramincludedwiththeControlModule.
BE SURE ALL WIRING MEETS ALL STATE AND LOCAL CODES.