
Use and Care Manual


ENGLISH
8
This band saw is a professional powertool.
DO NOT let children come into contact with the tool.
Supervision is required when inexperienced operators use
thistool.
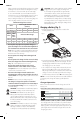
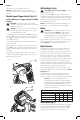
Variable Speed Trigger Switch (Fig. D, E)
Lock-off Button, Trigger Switch and Red
Trigger
WARNING: This tool has no provision to lock the
switch in the ON position, and should never be locked
ON by any othermeans.
CAUTION: Use of very slow speed is recommended
only for beginning a cut. Prolonged use at very slow
speed may damage yoursaw.
To lock the variable speed trigger switch
3
, press the lock-
off button
2
as shown in FigureD. Always lock the trigger
switch
3
when carrying or storing the tool to eliminate
unintentionalstarting.
To unlock the trigger switch, press the lock-off button as
shown in FigureD.
Pull the variable speed trigger switch then depress the red
trigger
18
(Fig. E) to turn the motor ON. Releasing the red
trigger and/or the variable speed trigger switch turns the
motorOFF.
The variable speed trigger switch will give you added
versatility. The further the trigger switch is depressed, the
higher the speed of thesaw.
Fig.D
2
3
Fig.E
18
1
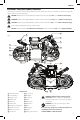
LED Worklight (Fig. A)
CAUTION: Do not stare into worklight. Serious eye
injury couldresult.
There is a worklight
12
located above the blade. The
worklight is activated when the trigger switch is depressed,
and will automatically turn off 20 seconds after the trigger
switch is released. If the trigger switch remains depressed,
the worklight will remainon.
NOTE: The worklight is for lighting the immediate work
surface and is not intended to be used as aflashlight.
Blades
WARNING: The use of any other blade or accessory
might be hazardous. DO NOT use any other type
of accessory with your band saw. Blades used on
stationary band saws are of different thickness. Do not
attempt to use them on your portableunit.
This portable band saw is designed to use .020" (0.5 mm)
thick, 1/2" (12.5 mm) wide and 44–7/8" (1140 mm) long
blades. DO NOT use .025 (.64 mm) thickblades.
Blade Selection
In general, first consider the size and shape of the work,
and the type of material to be cut. Remember, for the
most efficient cutting, the coarsest tooth blade possible
should be used in a given application, because the coarser
the tooth, the faster the cut. In selecting the appropriate
number of teeth per inch of the band saw blade, at least
two teeth should contact the work surface when the blade
is rested against the workpiece. As a rule of thumb, soft
materials usually require coarse tooth blades, while hard
materials require fine tooth blades. Where a smoother finish
is important, select one of the finer toothblades.
Select the appropriate band saw blade according to the
material type, dimensions, and number of teeth. See Blade
Descriptionchart.
The following table is intended as a general guide only.
Determine the type of material and dimension of the
workpiece and select the most appropriate band sawblade.
NOTICE: Never use the band saw to cut resin
materials which are subject to melting. Melting of
resin material caused by high heat generated during
cutting may cause the band saw blade to become
bound to the material, possibly resulting in overload
and burn-out of themotor.
BLADE DESCRIPTION
Type of band saw blade Bi-Metal
Number of teeth 24 18 14 14/18
Workpiece thickness
1/8" (3.2 mm) and under • •
1/8"–1/4" (3.2 mm–6.4 mm) • •
Blade Speed (Fig. A)
Your DCS376 portable band saw is equipped with variable
speed for greater versatility. Turn the speed wheel
11
to
select the desired speed (Fig.A). Speed 1 is the slowest
speed; Speed5 is the fastest. Use speed settings 1–5.