
Instruction manual


3
English
3
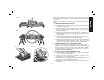
• GUARD AGAINST KICKBACK. Kickback occurs when the saw
stalls rapidly and is driven back towards the operator. Release switch
immediately if blade binds or saw stalls. Keep blades sharp. Support
large panels as shown in Figure 10. Use fence or straight edge guide
when ripping. Don’t force tool. Stay alert-exercise control. Don’t
remove saw from work during a cut while the blade is moving.
• ADJUSTMENTS. Before cutting be sure depth and bevel adjustments
are tight.
• AVOID CUTTING NAILS. Inspect for and remove all nails from lumber
before cutting.
WARNING: Some dust created by power sanding, sawing, grinding,
drilling, and other construction activities contains chemicals known to
cause cancer, birth defects or other reproductive harm. Some examples
of these chemicals are:
• lead from lead-based paints,
• crystalline silica from bricks and cement and other masonry products,
and
• arsenic and chromium from chemically-treated lumber (CCA).
Your risk from these exposures varies, depending on how often you do
this type of work. To reduce your exposure to these chemicals: work in
a well ventilated area, and work with approved safety equipment, such
as those dust masks that are specially designed to filter out microscopic
particles.
• The label on your tool may include the following symbols.
V .................. volts A .................amperes
Hz ................ hertz W ................watts
min ............... minutes
...............alternating current
................. alternating or ............direct current
..................... direct current
n
o ................no load speed
.................
Class II …/min ..........revolutions or
...................... Construction ..................... reciprocation per
.................. earthing terminal ..................... minutes
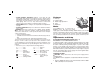
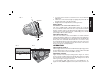
Features
A. End cap
B. Trigger switch
C. Bevel angle adjustment
D. Shoe
E. Blade bolt
Motor
Your DEWALT tool is powered by a
D
EWALT motor. Be sure your power
supply agrees with name plate marking. AC/DC means your saw will
oper ate on alter nating or direct current. As little as 10% lower voltage
can cause loss of power and can result in overheating. All D
EWALT
tools are factory-tested; if this tool does not operate, check the power
supply.
Adjustments and Setup
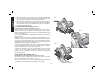
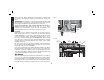
ATTACHING AND REMOVING BLADES (Fig. 1-3)
DISCONNECT PLUG FROM POWER SUPPLY.
To attach the blade, retract lower blade guard and place inner clamp
washer and blade on saw spindle with printed side of blade out.(Teeth
at bottom of blade pointing forward) (Figure 1.) Place outer clamp
washer on saw spindle. The larger surfaces of both washers must
face the blade. Thread on blade clamping screw firmly by hand to hold
both blade washers in position. Depress the lock pin Figure 2 (A) and
turn the saw spindle until lock pin engages the shaft. Tighten blade
screw clockwise with blade wrench.
CHANGING BLADES
CAUTION: Always disconnect saw from power supply before
changing blades.
Your D
EWALT saw is equipped to accept blades with 5/8”round arbor
holes.
1. Depress LOCK PIN, Figure 2 (A) and turn blade until the LOCK
PIN locks firmly into the saw shaft.
B
C
A
D
E