
Instruction manual


6
English
(Figure 11 & 13). When operating the saw, keep the cord away from
the cutting area and prevent it from becoming hung up on the work
piece.
WARNING: It is important to support the work properly and to hold
the saw firmly to prevent loss of control which could cause personal
injury; Figure 12 illustrates typical hand support of the saw.
ALWAYS DISCONNECT SAW BEFORE MAKING ANY ADJUST-
MENTS! Place the work with its “good” side - the one on which
appearance is most important - down. The saw cuts upward, so any
splintering will be on the work face that is up when you saw it.
CUTTING
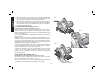
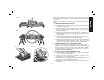
Support the work so that the waste will be on your right. Place the
wider portion of the saw shoe on that part of the work piece which is
solidly supported, not on the section that will fall off when the cut is
made. As examples, Figure 12 illustrates the RIGHT way to cut off
the end of a board, and Figure 13 the WRONG way. Always clamp
work. Don’t try to hold short pieces by hand! Remember to support
cantilevered and overhanging material. Use caution when sawing
material from below.
Be sure saw is up to full speed before blade contacts material to
be cut. Starting saw with blade against material to be cut or pushed
forward into kerf can result in kickback.
Push the saw forward at a speed which allows the blade to cut without
laboring. Hardness and toughness can vary even in the same piece
of material, and knotty or damp sections can put a heavy load on the
saw. When this happens, push the saw more slowly, but hard enough
to keep it working without much decrease in speed.
Kickback
When the saw blade becomes pinched or twisted in the cut, kickback
can occur. The saw is thrust rapidly back toward the operator. When
the blade is pinched or bound tightly by the kerf closing down, the
blade stalls and the motor reaction drives the unit backward. When
the blade becomes twisted or misaligned in the cut, the teeth at the
6
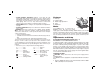
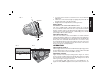
FIG. 7
FIG. 8
A
B
0˚
45˚
1/4”
6.35 mm
1/2”
13 mm
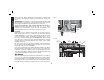
TIGHTEN
LOOSEN