SAFE OPERATION PRACTICES, cont'd AN vars sta stickpin pi fury Sed, dean, and low Lesley es nd sections In the Mara) 0d on the cor bef tempting sci disco Four ft doh ny the dc stems ins nd undertone Abyss the pried elt sere thee ye min ie locked potions % emitting ta emotive 2 en wet deck ga A mG Remove .
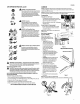
ENGLISH ASSEMBLY, cont'd 3. Rotate both locking pins into the LOCKED position. Mace the upper TOPS slightly until the locking pins sett. engaged in the LOCKED position, NOTE: See properly seated (duly engaged) TOPS pin in Figure 6, AN DAncER:dlwaysverty that both nightstand left lacking pins of the TOPS are settled and fully engaged all the way through the binge assembly so that each jacking pin fs visible on the inside face. Allure to fully dock each locking pin may result in serious Injury or death.
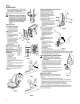
ASSEMBLY, cont'd 6. Remove the lock nut {o) securing one of the front gauge wheels to the deck. Remove the shoulder drew (b, tube spacer {send shoulder spacer (e] to remove the wheel (d]. See Figure 15, , Une up the gauge wheel with the tube spacer though the center, with the shoulder spacer on the shatter side tub of the gauge wheel and position the assembly inside the brackets at the desired height. NOTE: Allow 3 14-12" {635-127 mm clearance between the ground and gauge wheel, 8.
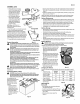
ENGLISH ASSEMBLY, cont'd Adjusting the Seat 1. Push theft and hold the seat adjustment lever to adjust the seat position. Side seat forward or rearward to desired position. . Release the adjustment fever Ensure seat Is Nicked info pe before operation, See Figure 21.