
Installation Guide

(03/13/09)
A5027 R15
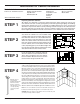
Continue with your wall cabinet installation by placing the next
cabinet on the wall at the predetermined reference line. After the
two cabinets are mounted to the wall, use clamps and clamp
the cabinet face frames together firmly. Be careful to line up the
bottom horizontal edges. With a 3/32" drill bit, drill starter holes
through the face frames near the top and bottom. Insert and
tighten the screws. These screws will need to be purchased
separately, a #8 x 2 1/2" is recommended. Check cabinet with
a level on the cabinet front, sides, and bottom. Shim where
necessary. Once the cabinet is level and plumb, tighten all the
installation screws and remove the clamps. Continue installing
the rest of your wall cabinets in the same manner.
Note: if installing single wall cabinet, follow instructions shown in
Step #9 for proper installation.
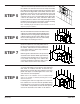
STEP 5
Once the wall cabinets have been installed, the base
cabinets can now be installed. Start installing the base
cabinets in the corner. Using clamps, align and join the
cabinets together at the face frames. Make sure that
the face frames align both on the face and vertically.
Follow Step 5 for attaching face frames.
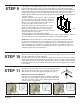
STEP 8
STEP 6
Check the cabinet for level and plumb. Shim to
fill uneven areas between the floor and base of
the cabinet, and between the wall and the back
of the cabinet. Failure to do this step could result
in damage to the cabinet.
Drill through the cabinet back into the prelocated
studs with a 3/32" diameter drill bit, approximately
2" deep. The hole should come no closer than 2"
to any inside vertical edge of the cabinet. One
screw hole should be located in the upper section
of the cabinet and one in the lower section.
STEP 7
Insert the #10 x 2 1/2" screws into the holes until they
are nearly tight. Make sure the back is fully supported
with shims, as needed, and does not bow into any
imperfections in the wall. Check the cabinet for level and
plumb and adjust as needed. Tighten the screws fully
and recheck for level and plumb.
NOTE: #10 x 2 1/2" installation screws not included with all
styles. If not included, recommend purchasing #10 x 2 1/2"
washer head screws.
If switching door from left to right side of face frame on
base cabinets, the face frame must be predrilled. Using
marked locations on face frame as a guide, predrill using
a 1/8" drill bit, 1" deep. Make sure that all shelf clips are
used on the back side of the mullion on all cabinets.
Shim
Shim