
Installation Guide
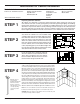

Check for Door and Drawer Alignment:
When all of your base cabinets are securely installed to the walls, the next step is to check
each door and drawer for proper alignment.
Example: When a drawer front does not lie flush against the face frame, check that each cabinet
is level, both vertically and horizontally. You may find it necessary to realign the side-mounted
drawer guide. The drawer guide can be adjusted side to side by moving the slide member by
hand and making the necessary adjustments until the drawer lies flush against the front frame
of the cabinet.
STEP 11
(03/13/09) A5027 R15
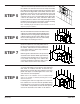
STEP 9
Installing Single Wall Cabinets:
Follow Steps 2 & 3 for preparing the wall for your cabinet. The cabinet should be located so
that the studs that you plan to attach it to do not fall within 2" of the inside vertical edges.
Make sure the cabinet is level and plumb. Shim to fill uneven areas between the wall and the back
of the cabinet. Failure to do this step could result in damage to the cabinet. Pay close attention to
the spots where you plan to screw the cabinets to the wall to make sure there are no voids.
Drill through the cabinet back into your pre-located stud(s) with a 3/32" diameter bit, approximately
2" deep in 4 places.
The holes should be no closer than 2" and no further than
12" from any inside vertical edge. The holes should also
be located at the top and bottom of the back. The use of
#10 x 2 1/2" screws is required. Cement, block, brick or
tile walls will require anchors for the screws.
These will need to be purchased separately, if needed.
Insert the supplied #10 x 2 1/2" screws into the holes
until they are nearly tight. Make sure that the back is
fully supported with shims, as needed, and does not bow
into any imperfections in the wall.
Check the cabinet for level and plumb and adjust
as needed. Tighten the screws down fully and reinstall the shelves and doors. Make sure that the
clear shelf clips are used on the back side of the mullion on all applicable cabinets.
Important: Structural modification of a wall cabinet can significantly weaken the cabinet.
For this reason modifications are not recommended, such as cutting the back to clear wall
obstructions. If an obstruction exists, we suggest you first try to use cabinet(s) that do not
require modifications. If modification is required, the warranty of the cabinet is void and it
is the responsibility of the installer to take appropriate steps to compensate for any loss of
strength or support due to the modification.
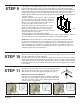
STEP 10
2" Min.
Standard Hinge Adjustment:
The hinge on all framed door styles can be easily adjusted up and
down by loosening the hinge screw attached to the door frame.
Slide the door up or down until aligned and tighten the screw.
Full Overlay 6-Way Hinge Adjustment:
Full overlay style cabinet hinges allow for additional adjustment.
They have the "Up and Down" adjustment as mentioned above.
They also have "Side to Side" and "In and Out" adjustments. See
below for details on adjustments.
(Side to Side Adjustment) (In and Out Adjustment) (Up and Down Adjustment)
12" Max.