OWNER'S MANUAL DieHard ° 15/2/125 AMP FULLY AUTOMATIC BATTERY CHARGER ENGINE STARTER Model No. 200.713151 CAUTION: Before first use of charger, read this manual, and follow all its Safety and Operating every charger use. Save these Instructions with instructions. Made in U.S.A. of U.S. and imported parts. Sears, Roebuck and Co., Hoffman Estates, IL 60179 U.S.A.
WARRANTY ............................................................................................................... 2 SAFETY ..................................................................................................................... 3 Important Safety Instructions .................................................................................... OPERATION 3 ..............................................................................................................
WARNING: HELP US HELP YOU -- To reduce the risk of explosion, explosive gases, or injury while using your battery charger, follow the precautions listed below: • Remember: • Place charger as far away from battery being charged as the charger cables will permit. Read all instructions and cautions printed on the battery charger, battery, and vehicle or equipment using battery. • Usechargeronlyon • Do not expose charger to rain or snow. • Never charge a frozen battery.
Personal Safety Precautions For your own personal safety, please follow the following • Wear complete eye and clothing protection when working with leadacid batteries. • Be sure that someone is within range of your voice to come to your aid if needed while you work with or are near a lead-acid battery. • Have plenty of fresh water and soap nearby for use in case battery acid contacts your eyes, skin, or clothing. If this happens, wash immediately with soap and water. Then get medical attention.
It is important to understand your charger's requirements. This section will tell you about your charger's electrical requirements and how to prepare a battery for charging. PLUGGING USING AN EXTENSION IT IN CORD The use of an extension cord is not WARNING: Electrical Shock Hazard. Be sure that the power cord fits properly into the outlet. If not, have a qualified technician install a proper outlet. Never alter the AC cord or plug provided. recommended.
It is important that you road and follow these guidelines while you are preparing to charge yourbattery. Make sure that you have a 12 volt or 6 volt lead-acid battery. Set the selector switch to match the voltage rating of the battery to be charged. Clean the battery terminals. Be careful to keep corrosion from getting in or around your eyes. For batteries with removable cell caps, if required by the manufacturer, add distilled water to each cell until the battery acid roaches the level recommended.
AMMETER: The ammeter indicates the measured Charge Type: • Use the MANUAL setting only ifyou check the charging progress frequently. The charger will not stop charging when the battery reaches full charge, possibly damaging the battery if left on too long. You must monitor and unplug the charger when battery is fully charged. • Use the AUTOMATIC amount of amperes being drawn by the battery.
GREEN, STEADY GLOW: • In AUTOMATIC, the green LED indicator will glow steadily and the meter needle will be at zero when the charger has completed the charging cycle. Identify which battery post is ground or connected to the chassis. THE NEGATIVE POST IS NORMALLY THE ONE THAT IS GROUNDED, , To charge a negative grounded post system: Connect the red (POSITIVE) battery charger clamp to the ungrounded POSITIVE (POS, P, +) post of the battery.
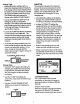
sparking occur, it will be at a distance from the battery. NOTE: The battery cable is not provided with the charger, but may be purchased at most automotive stores. Take the other end of the 6-gauge (AWG) or a 4-gauge (SAE) insulated 24-inch cable and, standing as far 5_ NEGATIVE GROUNDED Figure A away from the battery as possible, connect the black (NEGATIVE) lead of the charger to the free end of the cable. Rock the clamp to make a solid connection.
NEGATIVE post first. Then remove the lead from the POSITIVE post. POSITIVE 12. Clean and store the battery charger NEGATIVE in BATTERY a dry location. 24", 6 GAUGE CABLE GROUNDED POWER Figure B OUTLET Your battery charger can be used to jump start your car if the battery is low. Follow these instructions on how to use the ENGINE START feature. 1. Connect the charger to the battery and vehicle as instructed in the "Charging your battery" section on page 8. 4.
Battery Rating Method Use the following chart to determine the approximate time it will take to fully charge a battery that is initially at 50% State-of-Charge. Identify your battery type and its associated Charge Time in the table. Common battery types are: • Small batteries, motomycles, garden tractors, etc., usually rated in Amp-Hours • Car and truck batteries, usually rated in Reserve Capacity (RC), Cold Cranking Amps (CCA), or both.
Charge Time Needed if Amp-Hours is Known • Find the Charge Factor for your battery in the table on page 11. • Multiply by the Amp-Hour rating of the battery. • Divide by the Charger Setting (either 2 Amp or 15 Amp). • Multiply by 1,25 to get the approximate Hours Needed to bring the battery to full charge, Example: 15Amp-Hour (AH) Battery, 50% State-of-Charge, 2 Amp Charger Setting [(AH x Charge Factor) + Charger Setting] x 1.25 = Hours Needed (15 x 0.5 - 2) x 1.25 = 4.
Performance problems often result from little things that you can fix yourself. Please read through this chart for a possible solution No ammeter reading Clamps not making good connection. if a problem occurs. The red LED should be glowing steadily. Check for poor connection at battery. Make sure clamps and posts are clean. 2-amp charge rate. Ammeter needle will show little or no activity at the 2-amp charge rate.
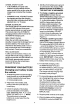
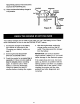
This section shows an illustration of your battery charger. Use it to become familiar with where all the parts are located, and what they look like.
I MOV18 3M8 3n78 15
For information about troubleshooting Call toll-free from anywhere in the U.S.A.