
Manual


GREEN, STEADY GLOW:
• In AUTOMATIC, the green LED
indicator will glow steadily and the
meter needle will be at zero when the
charger has completed the charging
cycle.
• In MANUAL mode, YOU MUST monitor
the charging and stop the charging
when the meter indicates about half the
selected rate, 2 or 15 amps.
GREEN, SLOW BLINK:
The charger will be in the MAINTAIN mode
when the LED indicator blinks green
slowly, approximately once per second.
This occurs only in the AUTOMATIC
charging positions after the end of the
AUTOMATIC charging cycle.
RED, STEADY GLOW:
When the red LED indicator glows
steadily, it means that the charger has not
sensed a battery. The leads may be
reversed on the battery posts or one or
both connections may not be making a
solid contact. Check your connections.
RED, SLOW BLINK:
If, after a pre-set number of hours, the
charger fails to fully charge a battery, it
will give up and the red LED indicator will
blink slowly, approximately once per
second, to tell you that something is
wrong with the battery.
CHARGING YOUR BATTERY
Charging your battery inside
the vehicle:
1. Arrange the power cord and charging
leads carefully to avoid damage that
could be caused by the hood, door,
or moving engine pads.
2. Keep clear of fan blades, belts,
pulleys, and other parts that can
cause injury.
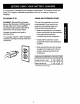
3. Check the polarity of the battery
posts as indicated on the battery
case: POSITIVE (POS, P, or+) and
NEGATIVE (NEG, N, or -). NOTE:
The positive post on top-post
batteries is usually larger than the
negative post.
,
.
.
.
Identify which battery post is ground
or connected to the chassis. THE
NEGATIVE POST IS NORMALLY
THE ONE THAT IS GROUNDED,
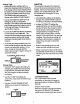
To charge a negative grounded
post system: Connect the red
(POSITIVE) battery charger clamp to
the ungrounded POSITIVE (POS,
P, +) post of the battery. Rock and
twist the clamps back and forth
to make a solid connection. Then
connect the black (NEGATIVE)
clamp to a heavy, unpainted metal
part of the chassis or engine block,
away from the battery. DO NOT
connect clamp to carburetor, fuel
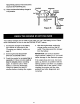
lines or sheet metal pads. (See
Figure A.)
To charge a positive grounded
post system: Connect the black
(NEGATIVE) battery charger clamp to
the ungrounded NEGATIVE (NEG, N,
-) post of the battery. Then connect
the red (POSITIVE) clamp to a heavy,
unpainted metal part of the chassis
or engine block, away from the
battery. DO NOT connect clamp to
carburetor, fuel lines or sheet metal
parts. IMPORTANT: Wear safety
glasses and turn face away from the
battery when making connections.
For automatic charging, select
AUTOMATIC DEEP CYCLE or
AUTOMATIC REG ULAR as acharge
type, and then select a charge rate.
The charger will stop charging when
the battery is ful{ycharged.
For manual charging, select MAN UAL
as a charge type then select a charge
rate. The charger will not stop
charging when the battery is fully
charged; you must monitor and unplug
charger when battery is fully charged.
Avoid overcharging; monitor the
AMMETER frequentlywhen inthe
MANUALmode.
8. Plug the power cord into an AC outlet.
9. When the battery is fully charged, in
the MANUAL mode, the AMMETER