VEGA WIRELESS CAMERA User’s Manual 7D1476 rev. 0.
TABLE OF CONTENTS PREFACE............................................................................................................................4 INSTALLATION PRECAUTIONS ........................................................................................5 WARNING INSTRUCTIONS................................................................................................6 1. INTRODUCTION .............................................................................................................
PREFACE Dear Customer, congratulations on purchasing a Digicom product and many thanks for your confidence! We advise a careful reading of the whole manual, in order to get an in-depth knowledge of our products’ features and learn how to use it best. Any critical comment is most welcomed as a reason for professional growth and precious contribution to the development of products and services aiming at customer’s best satisfaction.
INSTALLATION PRECAUTIONS In order to guarantee your safety and a correct device functioning, be sure to follow these safety warnings. The whole set (with cables included) must be installed in a place lacking of or distant from: • Dust, humidity, high temperatures and direct exposure to sunlight. • Heat irradiating objects, which may damage your device or cause any other problem. • Objects producing a high electromagnetic field (Hi-Fi speakers, etc.) • Corrosive liquids or chemical substances.
WARNING INSTRUCTIONS SAFETY WARNINGS Read these instructions and norms carefully before powering the Vega Wireless Camera. Violation of such norms may be illegal and cause hazard situations. For any of the described situations please refer to the specific instructions and norms. The Vega Wireless Camera is a low power radio transmitter and receiver. When it is ON, it sends and receives radio frequency (RF) signals. The Vega Wireless Camera produces magnetic fields.
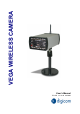
1. INTRODUCTION The Vega Wireless Camera is Digicom’s new camera, equipped with two high quality CMOS sensors, in order to ensure the best image capture under any light conditions. The Color sensor can be used for daylight shots, while the Black&White sensor is especially indicated for night shots with poor light. The built-in infrared LEDs help getting better quality images in poor light environments.
1.
POWER SUPPLY • 12 Vdc – 1000 mA • Internal rechargeable Nickel Metal Hydride battery OPERATING ENVIRONMENT • Operating temperature: from 0°C to +40°C • Storage temperature: from –20°C to +70°C OVERALL DIMENSIONS • External dimensions: 127 x 77 x 48 mm • Weight: about 300 gr 9
1.3 APPLICATIONS The Vega Wireless Camera can be used in a wide range of applications. With the built-in CPU, it can work as a standalone system that provides a web-based solution transmitting high quality video images for monitoring purposes. It can be managed remotely, accessed and controlled from any PC desktop over the Intranet or Internet via a web browser. With the easy installation procedure, real-time live images will be available.
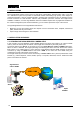
1.4.2 VEGA WIRELESS CAMERA GPRS CONNECTED TO AN ADSL ROUTER In this scenario, the Vega Wireless Camera GPRS uses a faster means of transport: the ADSL line. An ADSL Router was connected to the camera LAN port in order to monitor the real status and the alarmrelevant images by a remote station. This process is much faster if compared to the use of a GPRS network.
1.4.3 VEGA WIRELESS CAMERA WLAN CONNECTED TO AN ACCESS POINT ADSL ROUTER In this scenario two Vega Wireless Cameras WLAN have been installed and both are provided with presence detection sensors. The images can be accessed by a remote station with a LAN wireless connection to the Access Point via any device provided with a web browser (e.g. Internet Explorer, Firefox, Safari, Opera): a computer, Macintosh or PDA.
1.4.4 VEGA WIRELESS CAMERA WLAN CONNECTED TO DIGICOM’S VEGA VIDEO In this scenario, a new device is mentioned: Digicom’s Vega Video. The Vega Video is an image concentrator with an integrated Access Point. The Vega Video is able to connect up to four Vega Wireless Cameras WLAN with local stations and remote stations, for an optimal management of the cameras with a single device.
1.5 ALARM DETECTION In the event of an alarm detection, the Vega Wireless Camera WLAN and the Vega Wireless Camera GPRS act in a different way. The following table shows such differences: Vega Wireless Camera WLAN When the camera detects a motion on one of the activated digital inputs, it saves the images preceding (Frame before) and following (Frame after) such a motion according to the configuration values.
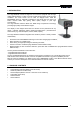
2. INSTALLATION The installation of the Vega Wireless Camera must be performed according to the instructions of this manual. 2.1 FRONT PANEL The Vega Wireless Camera’s front panel consists of: • • • • • Color optics Black&White optics Infrared LEDs Twilight sensor Status LED The hole located in the middle of the panel will be used as a room monitor function microphone in future versions. Color optics Black&White optics Infrared LEDs Status LED Twilight sensor 2.
LAN port RESET button SIM Card slot (for Vega Wireless Camera GPRS) PWR LED INPUT clamp strip SIGNAL LED PWR connector Antenna connector 2.
The LEDs can act as follows: PWR OFF Blinking ON Camera is OFF - OFF Blinking Camera is ON SIGNAL GSM signal is OFF or PIN is requested Login to GSM network STATUS OFF - Blinking - ON Camera is OFF ON Camera is connected to the Internet When the Vega Wireless Camera GPRS is powered, the device goes through the following stages: 1. Vega Wireless Camera’s power: PWR LED is ON; 2. Start of the Operating System: LED is steady ON for about 30 seconds; 3. Status LED steady ON for about 10 seconds; 4.
2.4.2 POWER SUPPLY OUTPUTS The Vega Wireless Camera’s clamp strip is provided with 2 power supply outputs to power any possible presence detection sensor. To power the sensor you only need to connect the Vega Wireless Camera’s pin 1 to the positive contact (+) of the presence detector and the Vega Wireless Camera’s pin 3 to the negative contact (–) of the presence detector.
2.5 SIM CARD (only for the VEGA WIRELESS CAMERA GPRS) The Vega Wireless Camera GPRS supports PLUG-IN SIM cards. In order to prevent damaging of the SIM or an information loss we advise not to touch the golden section of the SIM card (where the contacts are to be found). WARNING: the Vega Wireless Camera GPRS can operate with any SIM Card. The GPRS function is available according to the type of contract stipulated for the SIM Card.
2.6 INSTALLING THE EXTERNAL ANTENNA To install the external antenna follow these steps: Make sure that the Vega Wireless Camera is off by turning off the power supply and deactivating the backup battery in the configuration pages. Connect the external antenna connector to the Vega Wireless Camera’s connector by screwing it clockwise. In case of problems do not force the connector and check if it is right positioned.
2.9 FACTORY SETTINGS When first started, the Vega Wireless Camera shows the factory parameters indicated in the following table. To access the configuration, connect the NIC of your PC to the Vega Wireless Camera’s LAN port, using the Ethernet cable in the package. Follow the instructions described in the CONFIGURATION chapter. User Id: Password: Vega Wireless Camera GPRS admin digicom LAN Address: Subnet Mask: Gateway: 192.168.30.1 255.255.255.0 0.0.0.
3. CONFIGURATION The Vega Wireless Camera is configured through its built-in Web-based configuration (e.g. Internet Explorer, Netscape, Firefox or other web browsers). You can therefore use any device (PC, PDA) equipped with a NETWORK INTERFACE CARD and an Internet Browser. This chapter describes the necessary checks to access the configuration, together with the main configuration menus for the installation and use of the Vega Wireless Camera. 3.
3.2 VEGA WIRELESS CAMERA CONFIGURATION On your PC open the web browser (Internet Explorer, Netscape, Firefox, etc.) and establish a connection by entering the following address: http://192.168.30.1 . After the connection is established, you will find the following window: In the User Id field enter: admin In the Password field enter: digicom User Id and Password must be entered in lower-case digits. By default settings, the User Id and Password are blank.
3.3 CONFIGURATION MENU This section describes the configuration menus of the Vega Wireless Camera. Most menus are equivalent for both the WLAN and GPRS versions; some differences are yet to be found. In the descriptive configuration sections you will obviously find only the menu for the specific version. The configuration windows are split in two parts. On top of the screen you may enter the values to change the configuration settings; the lower part of the window shows the current values.
3.3.2 LAN In this window you may change the parameters of the LAN interface to be found on both Vega Wireless Camera versions. Enter the value you wish to change and click SAVE. The new settings will be immediately effective. IP Address: insert the IP address the camera will use for transmission on the LAN port. WARNING: the IP address of the LAN interface must belong to another network than the IP address of the WLAN interface.
3.3.2 WiFi (only for the VEGA WIRELESS CAMERA WLAN) In this window you may change the parameters of the WLAN interface to be found on both Vega Wireless Camera versions. In order to communicate via wireless LAN with the Vega Wireless Camera WLAN you need to use an Access Point. For a correct communication with the camera you then need to set all values for this window. IP Address: insert the IP address the camera will use for wireless transmission on the LAN port.
Encryption: Wireless network communications can be intercepted easily. To prevent unauthorized access to the network you may activate WEP encryption. WEP (Wired Equivalent Privacy) is an encryption method specified by the IEEE 802.11g standard to make any intercepted communications extremely difficult to interpret by unauthorized parties. The default setting for this option is Enable. Enable WEP encryption also for the Access Point. EncryptKey: WEP encryption uses an encryption key.
3.3.3 GPRS (only for the VEGA WIRELESS CAMERA GPRS) In this window you may set the parameters of the GPRS configuration for the Vega Wireless Camera GPRS. WARNING: the Vega Wireless Camera GPRS can operate with any SIM Card. The GPRS function is available according to the type of contract stipulated for the SIM Card. Check availability and any possible restriction to the functions of the SIM card profile. Check the parameters for the Internet access (APN, User Name and Password) with your phone company.
Service Center Address: it is the phone number of the Service Center provided by the phone company managing the SMS messages. Such a value is read directly by the SIM card inserted in the camera. GPRS Phone Number: it is the phone number you must dial for the GPRS Internet connection. For all phone companies the correct number is usually *99***1#. In case of problems, check the correct number with your phone company. Connection timeout: defines the Internet connection duration.
Status: to check registration to the GSM network, signal quality and GPRS network presence, verify the Status field. 30 Off Line Vega Wireless Camera GPRS disconnected to the Internet. On Line Vega Wireless Camera GPRS connected to the Internet. Searching GSM/GPRS network research. Registered Vega Wireless Camera GPRS registered to the GPRS network.
3.3.4 CAMERA In this window you may change the parameters of the image capture. Fps (Frame per second): it is the frame rate of the camera. It supports values from 1 to 10 frames per second. Alarm Rate: it is the saving rate, in case of alarm detection on digital inputs. The value inserted will define the time interval (expressed in seconds) for an image saving. The minimum value is 1 second. Live Update: it is the image display frequency in the Live page.
Frame Size: defines the image quality. Very High Excellent image quality. (VGA: 80 KByte – QVGA: 20 KByte). High Good image quality. (VGA: 50 KByte – QVGA: 12 KByte). Medium Standard image quality. (VGA: 30 KByte – QVGA: 8 KByte). Low Poor image quality. (VGA: 20 KByte – QVGA: 6 KByte). This option will allow you to increase or decrease the total number of images that can be saved to the internal memory of the Vega Wireless Camera. Check the Max Frame value in the relevant table.
3.3.5 SYSTEM In this window you may act on some of the camera’s functions. Show Current Date: by selecting the Enabled item and clicking the SAVE button you may check date and time for the Vega Wireless Camera GPRS. For date and time synchronization, please refer to the description contained in the GPRS page.
Switch Off Timeout: defines the management of the backup battery. In case of main power supply lack, the Vega Wireless Camera keeps functioning thanks to a rechargeable backup battery. 0 Battery management is disabled. In case of main power supply lack, the camera turns off. 1 Battery management is disabled only with next main power supply lack.
3.3.6 ALARM CFG In this window you may enable the digital inputs, the relevant messages associated to it and the relevant management in case of main power supply lack. Input1 Mode and Input2 Mode: activation and deactivation of the two digital inputs. Disabled Disabled input. Any change of status on the input will not be handled by the camera. Rising Edge Enabled input. The Vega Wireless Camera will start managing the alarm event as soon as the input turns from the falling to the rising edge.
Sms Main Power Off: enables the sending of a SMS message (with the Vega Wireless Camera GPRS) in case of a main power supply lack. The SMS message will be sent to the phone numbers inserted in the SMS Number item to be found in the GPRS configuration page. Main Power Off Message: defines the text of the message sent if the Sms Main Power Off is enabled. The text can be maximum 30 characters long. The default message is PWR OFF.
3.3.7 CALLBACK (only for the VEGA WIRELESS CAMERA GPRS) In this window you may associate a function of the Vega Wireless Camera GPRS to a phone call. After selecting the phone call association option according to your needs, you may call the phone number of the SIM card in the Vega Wireless Camera GPRS from your mobile phone, as if you were calling an ordinary mobile phone number.
Live The phone call is associated to an Internet connection request. When you need to access the Vega Wireless Camera GPRS remotely, you only need to call the Vega Wireless Camera GPRS phone number from your mobile phone. The camera reads the incoming phone number and compares it to the phone numbers in the Cli Enabled configuration page. If the user is enabled, then Vega Wireless Camera denies the call and immediately activates an Internet connection via GPRS.
3.3.8 SECURITY In order to guarantee a more secure access to the camera, you can enable the User Id and Password request each time you access the configuration pages of the Vega Wireless Camera. User Id: in this field you must enter the User Id selected to access the camera. The default value is admin. Password: in this field you must enter the Password selected to access the camera. The default value is digicom. Password Enable: enables or disables the authentication request.
3.3.9 DYNAMIC DNS If you use an Internet subscription with a dynamic IP address or a GPRS connection, you do not have the chance to offer remote access services because the ISP or phone company assigns a different IP address to the device each time. To solve this problem, as already described in the previous pages, at each connection the Vega Wireless Camera GPRS notifies the IP address for the current connection by SMS.
Interface: select the interface for the Dynamic DNS service. LAN The camera will notify the DDNS Server with the IP address assigned by the LAN port. This option can be selected both on the Vega Wireless Camera WLAN and the Vega Wireless Camera GPRS. Wi-Fi The Vega Wireless Camera WLAN will notify the DDNS Server with the IP address assigned by the WLAN port. This option is not available with the Vega Wireless Camera GPRS.
3.3.10 ALARM In this window you may view the images saved by the Vega Wireless Camera on alarm detection. In the SMS message sent by the Vega Wireless Camera GPRS you can find the direct link to this page, to save time and view the images concerning the alarm event immediately: http://217.201.196.19/mnt/flash/config/alarm.html . WARNING: the internal memory of the Vega Wireless Camera is 2 MByte. The total number of images that can be saved depends on the image quality and the selected resolution.
3.3.11 LIVE Click Live from the main menu to view the current shooting status of the camera. The image displayed refers to the configuration of the previous pages, especially to the settings for the Camera configuration page.
3.3.12 STATUS LOG In this window you can check the status of the Vega Wireless Camera.
4. F.A.Q. (FREQUENTLY ASKED QUESTIONS) AND TROUBLESHOOTING Q: What algorithm is used to compress the digital image? A: The Vega Wireless Camera utilizes the JPEG image compression technology providing high quality images for users. JPEG is adopted since it is a standard for image compression and can be applied to various web browser and application software without the need to install extra software.