
Quick Start Guide
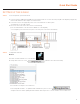
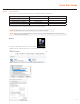
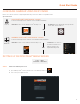

7. Enter IP Address then press Tab on the keyboard to move to Netmask.
8. Ignore any populated values and enter the valid Netmask value, then press Tab on the keyboard to move to the Gateway.
9. Enter the Gateway address if required then press Enter on the keyboard.
* Gateway is not required on the camera network.
10. Click ‘Save’ to save the settings.
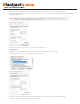
11. In the Network Settings main page, make sure the Wired Status is marked as “Connected” or Managed” With the IP Address displayed.
Local Network
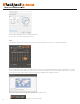
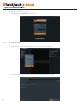
12. Select Wired with picture of network port and repeat 2 to 8 of STEP 3 Configure Network.
13. Click on the DNS Servers field box and enter DNS server address.
14. Click Save.
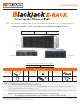
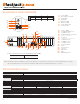
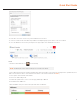
15. Connect a network cable to the Ethernet port B8 on the diagram (page 2) to the switch on the local network.
16. Verify the network is Connected.
NOTE It must be the same network as the cameras and must not be the same network as the local network.
Contact your network administrator for more information.
NOTE If you are not connecting to the Blackjack
®
from within the same network, you may be required to perform port forwarding on your
router to access the server. Contact your Network Administrator or Installer for additional information
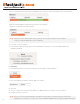
7. Enter IP Address then press Tab on the keyboard to move to Netmask.
8. Ignore any populated values and enter the valid Netmask value, then press Tab on the keyboard to move to the Gateway.
9. Enter the Gateway address if required then press Enter on the keyboard.
* Gateway is not required on the camera network.
10. Click ‘Save’ to save the settings.
11. In the Network Settings main page, make sure the Wired Status is marked as “Connected” or Managed” With the IP Address displayed.
Local Network
12. Select Wired with picture of network port and repeat 2 to 8 of STEP 3 Configure Network.
13. Click on the DNS Servers field box and enter DNS server address.
14. Click Save.
15. Connect a network cable to the Ethernet port B8 on the diagram (page 2) to the switch on the local network.
16. Verify the network is Connected.
NOTE It must be the same network as the cameras and must not be the same network as the local network.
Contact your network administrator for more information.
NOTE If you are not connecting to the Blackjack
®
from within the same network, you may be required to perform port forwarding on your
router to access the server. Contact your Network Administrator or Installer for additional information
9. Enter the Gateway address if required then press Enter on the keyboard.
* Gateway is not required on the camera network.
10. Click ‘Save’ to save the settings.
11. In the Network Settings main page, make sure the Wired Status is marked as “Connected” or Managed” With the
IP Address displayed.
Local Network
12. Select Wired with picture of network port and repeat 2 to 8 of STEP 3 Congure Network.
14. Click Save.
15. Connect a network cable to the Ethernet port B8 on the diagram (page 2) to the switch on the local network.
16. Verify the network is Connected.
13. Click on the DNS Servers eld box and enter DNS server address.
NOTE If you are not connecting to the Blackjack
®
from within the same network, you may be required to perform port
forwarding on your router to access the server. Contact your Network Administrator or Installer for additional information
NOTE It must be the same network as the cameras and must not be the same network as the local network.
Contact your network administrator for more information.
8
7. Enter IP Address then press Tab on the keyboard to move to Netmask.
8. Ignore any populated values and enter the valid Netmask value, then press Tab on the keyboard to move to the Gateway.
9. Enter the Gateway address if required then press Enter on the keyboard.
* Gateway is not required on the camera network.
10. Click ‘Save’ to save the settings.
11. In the Network Settings main page, make sure the Wired Status is marked as “Connected” or Managed” With the IP Address displayed.
Local Network
12. Select Wired with picture of network port and repeat 2 to 8 of STEP 3 Configure Network.
13. Click on the DNS Servers field box and enter DNS server address.
14. Click Save.
15. Connect a network cable to the Ethernet port B8 on the diagram (page 2) to the switch on the local network.
16. Verify the network is Connected.
NOTE It must be the same network as the cameras and must not be the same network as the local network.
Contact your network administrator for more information.
NOTE If you are not connecting to the Blackjack
®
from within the same network, you may be required to perform port forwarding on your
router to access the server. Contact your Network Administrator or Installer for additional information
8. Ignore any populated values and enter the valid Netmask value, then press Tab on the keyboard to move to the Gateway.