Owner’s Manual Model DF2524L DF2524G 6908921359 6908921459 IMPORTANT SAFETY INFORMATION: Always read this manual first before attempting to install or use this fireplace. For your safety, always comply with all warnings and safety instructions contained in this manual to prevent personal injury or property damage. To view the full line of Dimplex products, please visit www.dimplex.
Table of Contents Welcome & Congratulations. . . . . . . . . . . . . . . . . . . 3 IMPORTANT INSTRUCTIONS . . . . . . . . . . . . . . . . . 4 Fireplace Installation . . . . . . . . . . . . . . . . . . . . . . . . . 6 Front Glass Installation. . . . . . . . . . . . . . . . . . . . . . . . 6 Mantel Installation. . . . . . . . . . . . . . . . . . . . . . . . . . . . 7 Operation. . . . . . . . . . . . . . . . . . . . . . . . . . . . . . . . . . 8 Maintenance. . . . . . . . . . . . . . . . . . . . . . . . . . .
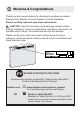
Welcome & Congratulations Thank you and congratulations for choosing to purchase an electric fireplace from Dimplex, the world leader in electric fireplaces. Please carefully read and save these instructions. CAUTION: Read all instructions and warnings carefully before starting installation. Failure to follow these instructions may result in a possible electric shock, fire hazard and will void the warranty.
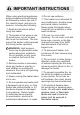
IMPORTANT INSTRUCTIONS When using electrical appliances, basic precautions should always be followed to reduce the risk of fire, electric shock, and injury to persons, including the following: ① Read all instructions before using this heater. ② This heater is hot when in use. To avoid burns, do not let bare skin touch hot surfaces. The trim around the heater outlet becomes hot during heater operation. ARNING: High temperaW tures may be generated under certain abnormal conditions.
IMPORTANT INSTRUCTIONS ⑬ Do not modify the heater. Use it only as described in this manual. Any other use not recommended by the manufacturer may cause fire, electric shock, or injury to persons. ⑭ To reduce the risk of electric shock, this heater has a polarized plug (one blade is wider than the other). This plug will fit in a polarized outlet only one way. If the plug does not fit fully in the outlet, reverse the plug. If it still does not fit, contact a qualified electrician to install the proper outlet.
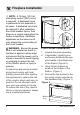
Fireplace Installation ! NOTE: A 15 Amp, 120 Volt alternating current (VAC) circuit is required. A dedicated circuit is preferred but not essential in all cases. A dedicated circuit will be required if, after installation, the circuit breaker trips or fuse blows on a regular basis when the heater is operating. Additional appliances on the same circuit may exceed the current rating of the circuit breaker.
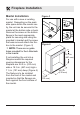
Fireplace Installation Mantel Installation For use with a new or existing mantel. Depending on the available space within the mantel cavity, the unit can be secured to the mantel at the bottom side or back. Remove the screw on the bottom flange in the most appropriate place for securing and using the provided L-bracket and the screw that was removed attach the firebox to the mantel. (Figure 3) ! NOTE: There are no guide holes provided for the L-Brackets in the mantel.
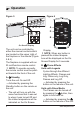
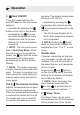
Operation Figure 5 Figure 6 A B C F C F A D E B F C On Screen Display The unit can be controlled by either the manual controls which are located on the upper right of the fireplace or the remote (Figure 5 & 6). The fireplace is supplied with an IR multifunction remote control. ! NOTE: To operate correctly, the remote control must be pointed towards the front of the unit. A. Standby Turns the unit On and Off. → Activated by pressing the Standby button on the remote or the unit.
Operation C. Heat ON/OFF Turns the heater function On and Off based on the thermostat setpoint. → Activated by pressing the button on the unit or the remote. • Indicated by the icon and the intake temperature being displayed on the On Screen Display, for 5 seconds before turning off. ! NOTE: The unit can be operated in Heat Only Mode. When the unit is only running with the heater, the icon and the intake temperature will continuously be displayed on the On Screen Display.
Operation utes to 8 hours). → To set the timer press the timer button on either the remote or the unit, repeatedly, until the desired time is displayed. • The On Screen Display will display the different times as it is adjusted. Once the timer has begun, pressing the button will display the time remaining before the unit turns Off. ! NOTE: The Sleep Timer can be cancelled at any time by pressing the button repeatedly until the sleep timer displays nothing.
Maintenance WARNING: Disconnect power before attempting any maintenance or cleaning to reduce the risk of fire, electric shock or damage to persons. Glass Cleaning The glass is cleaned in the factory during the assembly operation. During shipment, installation, handling, etc., the front glass panel may collect dust particles; these can be removed by dusting lightly with a clean dry cloth. To remove fingerprints or other marks, the front glass panel can be cleaned with a damp cloth.
Warranty One Year Limited Warranty Products to which this limited warranty applies This limited warranty applies to your newly purchased Dimplex electric fireplace. This limited warranty applies only to purchases made in any province of Canada except for Yukon Territory, Nunavut, or Northwest Territories or in any of the 50 States of the USA (and the District of Columbia) except for Hawaii and Alaska. This limited warranty applies to the original purchaser of the product only and is not transferable.
Warranty • Dimplex will in its sole discretion either repair or replace such defective product or part without charge. If Dimplex is unable to repair or replace such product or part, or if repair or replacement is not commercially practicable or cannot be timely made, Dimplex may, in lieu of repair or replacement, choose to refund the purchase price for such product or part.
Replacement Parts Flicker Motor. . . . . . . . . . . . . . . . . . . . . . . . . . . . . . . . . Heater Assembly (with Cutout) . . . . . . . . . . . . . . . . . . . Thermistor . . . . . . . . . . . . . . . . . . . . . . . . . . . . . . . . . . Cord Set . . . . . . . . . . . . . . . . . . . . . . . . . . . . . . . . . . . . Flicker Rod . . . . . . . . . . . . . . . . . . . . . . . . . . . . . . . . . . Partially Reflective Panel. . . . . . . . . . . . . . . . . . . . . . . . Front Glass . . . . . . . . . . .