Portable Air Conditioner – DAC 9005 – DAC 12005 Please read this manual carefully before use and keep it for future reference. Downloaded from www.Manualslib.
CONTENTS Page Introduction . . . . . . . . . . . . . . . . . . . . . . . . . . . . . . . . . . . . . . . . . . . . . . . . . . . . . . . . 1 Features . . . . . . . . . . . . . . . . . . . . . . . . . . . . . . . . . . . . . . . . . . . . . . . . . . . . . . . . . . . 2 Specification . . . . . . . . . . . . . . . . . . . . . . . . . . . . . . . . . . . . . . . . . . . . . . . . . . . . . . . . 2 Important Safeguards . . . . . . . . . . . . . . . . . . . . . . . . . . . . . . . . . . . . . . . . . . . . . . .
FEATURES The air-conditioning unit is of the mono tube type, transportable (on wheels) with air/air operating system for domestic use and has 3 settings. • Ventilate/Fan. • Cool. • Dehumidify. The ventilation mode "moves" the air allowing for its recycling much like a fan. The cooling mode, a refrigerating circuit (compressor), cools the room by transferring the heat from inside to outside though the air exhaust hose.While cooling, the airconditioning unit also dehumidifies the room air.
IMPORTANT SAFEGUARDS • The air conditioning unit must always be stored and transported upright, otherwise you may cause irreparable damage to the compressor; in case of doubt we suggest you wait for at least 24 hours before you start the air-conditioning unit. • Avoid restarting the air conditioning unit unless 4 minutes have passed since its turned off or the compressor may get damaged. • Never use the mains plug as a switch to start and turn off the air conditioning unit.
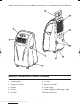
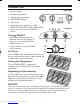
• Please read the instructions carefully and save them in a safe place for future reference. 5 6 1 7 2 8 3 9 10 4 KNOW YOUR AIR CONDITIONER 1. Control panel 6. Air inlet 2. Cooling air outlet 7. Exhaust air outlet 3. Handle 8. Cord hanger 4. Castor 9. Water stopper (rubber plug inside) 5. Air filter 10. Water inlet draw 4 Downloaded from www.Manualslib.
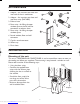
ACCESSORIES 6 1. Adaptor - for insertion over hose and into back of the air conditioner. 1 2. Adaptor - for insertion over hose and into foam strip. (DAC9005) 3 2 3. Exhaust hose 4. Foam strip - for filling the open window space and with hole for connection to exhaust hose. 7 5. Foam strip - for filling the open window space. 4 6. Round window, floor and wall connector. 8 7. Cap for round connector. 5 8. Water tray. 9 9. Drain hose.
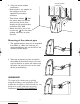
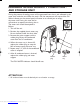
Round window connector 2. Using the round window connectors. • Make a hole to suit adaptor on the wall/glass to fit the supplied round window connector. • Take off the adaptor (the one which does not connect with the unit), fit the hose directly to the round window connector. DAC 9005 cm 50 • When the hole is not in use. Use the cap for the round window connector to cover the hole. Mounting of the exhaust pipe 1. The supplied exhaust hose can be extended from 50cm to 150cm for mounting.
ADDING WATER An added feature of these models. Humidity absorbed from the air condenses at the Evaporator, turns into water and is collected in the internal tank.When enough water is collected it is pumped up and over the condenser, assisting the cooling of the refrigerated gas, increasing the COOLING CAPACITY. Some of this recycled water is evaporated at the condenser and expelled from the machine as water vapour though the exhaust hose.
OPERATION DAC12005 1. Power indicator 2. Fan operating indicator 3. Cooling operating indicator 4. FULL WATER indicator 5 5. Thermostat 1 2 3 4 6 7 6. Speed switch with options for - LOW FAN, HIGH FAN, LOW COOL, HIGH COOL. 1 7. Timer (1-8 hours) as well as ON/OFF switch 2 3 4 DAC9005 Turning ON/OFF • Set TIMER to ON for continuous operation (the unit will operate as long as it is not turned off). Power indicator comes on. 5 • To turn off the unit, turn the TIMER to OFF position.
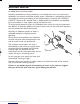
DRAINAGE IN HIGH HUMIDITY CONDITIONS AND STORAGE ONLY During the process of cooling, water will be generated from the air and collected in the water tank inside the unit.When the tank is full, the compressor will stop and the Full Water indicator on the control panel will come on to remind you to empty the water tank. During this time the fan will continue to operate circulating the air. The water tank should be emptied as follows: 1. Turn off the unit. Water stopper 2.
Dehumidification. NOTE! The machine operates in the cooling mode but it does not lower the room temperature. It absorbs the excessive humidity present in the air. 1. Plug the unit into a proper electrical outlet. 2. Position the exhaust tube as shown or remove from the air-conditioner. 3.Turn the TIMER to position ON or 1 to 8 hours automatic timer setting. 4. Set the FAN SPEED control to the desired output of airflow, high or low. 5. Set the THERMOSTAT to the maximum cooling position. 6.
MAINTENANCE Always unplug the unit from the mains before beginning the cleaning. Cleaning the housing • Use a soft, damp cloth to wipe the body clean. • Never use aggressive chemicals, gasoline, detergents, chemically treated cloths, or other cleansing solutions.These all could possibly damage the cabinet. Cleaning the filter and side vent • Use a vacuum cleaner or tap the filter lightly to remove loose dust and dirt from the filters and then rinse thoroughly under running water (no hotter than 40°C).
TROUBLE SHOOTING GUIDE. If the product is treated in the right manner, you should encounter no problems. In case of difficulties, please check the following points before consulting the maintenance service. Product does not work • Check whether the product is plugged in. No cool air • Has three minutes passed after switching on the unit, check whether the water tray is full. • The room temperature should be in the operation range of 18°C-32°C • Is the set temp higher than the room temp.