C User Manual 2020.10 v1.
Searching for Keywords Search for keywords such as “battery” and “install” to find a topic. If you are using Adobe Acrobat Reader to read this document, press Ctrl+F on Windows or Command+F on Mac to begin a search. Navigating to a Topic View a complete list of topics in the table of contents. Click on a topic to navigate to that section. Printing this Document This document supports high resolution printing.
Contents Using this Manual 2 Legend 2 Download the Ronin App 2 2 Before You Begin Introduction 4 5 DJI RSC 2 Diagram Getting Started 6 Unfolding the Gimbal 6 Unlocking and Locking the Gimbal 7 Balancing 9 Attaching the Extended Grip/Tripod 6 Mounting the Camera 7 Grip and Built-In Battery 12 12 Charging 12 Safety Guidelines Operations 16 Activating DJI RSC 2 16 Ronin App Settings 19 Screen Operation 16 Image Transmission 27 Operation Modes 28 Updating Firmware 29 Sp
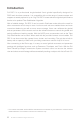
Introduction DJI RSC 2 is a professional single-handed 3-axis gimbal specifically designed for DSLR and mirrorless cameras. It is compatible with a wide range of camera setups and supports a tested payload of up to 3 kg. DJI RSC 2 boasts enhanced gimbal performance thanks to its updated Titan Stabilization Algorithm. With a foldable design, DJI RSC 2 can be used in Briefcase mode without the need for other accessories and is easy to store.
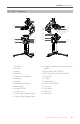
DJI RSC 2 User Manual DJI RSC 2 Diagram 1 2 13 12 14 15 16 24 23 22 21 11 10 9 3 4 5 6 7 20 19 17 18 8 1. Tilt Motor 14. Image Transmission/Focus Motor Port 3. Screen 15. Focus Motor Port (USB-C) 5. Camera Control Button 17. Front Dial 2. Tilt Lock 4. Side Dial 6. M Button 7. Joystick 8. Extended Grip/Tripod 9. Back Button 10. M4/NATO Port 11. Lock Knob 12. Lower Quick-Release Plate 13. Upper Quick-Release Plate (USB-C) 16. RSS Camera Control Port (USB-C) 18. Trigger 19.
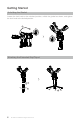
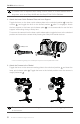
Getting Started Unfolding the Gimbal Loosen the lock knob to the unlocked position, unfold the gimbal as shown, and tighten the lock knob to the locked position. 2 1 3 Attaching the Extended Grip/Tripod 1 2 3 6 © 2020 DJI OSMO All Rights Reserved.
DJI RSC 2 User Manual Unlocking and Locking the Gimbal To unlock the gimbal, toggle the tilt, roll, and pan lock levers to the unlocked position. Adjust the gimbal position as shown and toggle the three locks to the locked position. Tilt Lock Roll Lock Pan Lock Mounting the Camera Supported Cameras and Lenses DJI RSC 2 has been rigorously tested to support a payload of 3 kg. Make sure the combined weight of the camera, lens, and other accessories are within 3 kg.
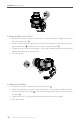
DJI RSC 2 User Manual A camera riser is required when using a focus motor or a small camera with a large lens, such as a Sony A6400 with the Sony FE 24-70 f2.8 GM lens. 2. Attach the Lower Quick-Release Plate and Lens Support Toggle the lever on the lower quick-release plate to the unlocked position camera 2 , and toggle the lever to the locked position the lens support to the lower quick-release plate support* when using a long or heavy lens. 4 3 1 , insert the after it is engaged. Attach .
DJI RSC 2 User Manual To remove the lower quick-release plate from the gimbal, toggle the lever on the camera mounting plate to the unlocked position and remove the lower quick-release plate while pressing the safety lock on the mounting plate. Safety Lock Lever RSS Camera Control Port 4. Connect the Camera Control Cable Choose the proper camera control cable according to the camera type.
DJI RSC 2 User Manual 1 2 2. Balancing Depth for the Tilt Axis a. Rotate the tilt axis so that the camera lens is pointing forward. Toggle the lever to the unlocked position 1 . b. Check to make sure the camera is not front or back-heavy. If front-heavy, move the camera backward 2 . If back-heavy, move the camera forward 2 . c. Toggle the lever to the locked position. The tilt axis is balanced when the camera is steady while tilted up or down by 45°. d. Lock the tilt axis. 1 2 3.
DJI RSC 2 User Manual 1 2 4. Balancing the Pan Axis a. Unlock the pan axis. Loosen the knob 1 . b. While holding the grip, tilt DJI RSC 2 forward, and rotate the pan arm until parallel with you. c. Check the movement of the pan axis. If the camera lens rotates to the left, push the pan axis to the right the left 2 . 2 . If the camera lens rotates to the right, push the pan axis to d. Tighten the knob. The pan axis is balanced if the camera is steady when rotating the pan while tilting the grip.
Grip and Built-In Battery The grip is for handheld use. The built-in battery within the grip has a capacity of 3400 mAh and the maximum runtime is 14 hours (when DJI RSC 2 is properly balanced). Charging Before using for the first time, charge DJI RSC 2 through the power port using a charging cable (included) and a USB adapter (not included). It is recommended to use a QC 2.0 or PD USB adapter (max. 18W). Check the battery level on the screen.
DJI RSC 2 User Manual To avoid fire, serious injury, and property damage, observe the following safety guidelines when using, charging, or storing the grip. Grip Use 1. DO NOT allow the grip to come into contact with any kind of liquid. DO NOT leave the grip out in the rain or near a source of moisture. DO NOT drop the grip into water.
DJI RSC 2 User Manual Grip Storage 1. Keep the grip out of the reach of children and animals. 2. If the grip will be stored for an extended period, charge the grip until the battery level reaches between 30% and 50%. 3. DO NOT leave the grip near heat sources such as a furnace or heater. DO NOT leave the grip inside of a vehicle on hot days. The ideal storage temperature is 22° to 28° C (72° to 82° F). 4. Keep the grip dry. Grip Maintenance 1.
DJI RSC 2 User Manual Grip Maintenance 1. Battery life may be reduced if not used for an extended period. 2. Discharge and charge the grip completely once every three months to keep it in good condition. Grip Disposal 1. If the grip is disabled and the battery cannot be fully discharged, contact a professional battery disposal or recycling agent for further assistance. 2. Dispose of the grip immediately if it cannot be powered on after over-discharging. © 2020 DJI OSMO All Rights Reserved.
Operations Activating DJI RSC 2 DJI RSC 2 needs to be activated through the Ronin app before using for the first time. 1. Press and hold the power button to power on the gimbal. 2. Enable Bluetooth on your mobile device and launch the Ronin app. Once detected in the list of Bluetooth devices, select DJI RSC 2 and input the default Bluetooth password: 12345678. Make sure you are connected to the internet and follow the on-screen instructions to activate DJI RSC 2.
DJI RSC 2 User Manual Auto Tune: press the side dial to select Auto Tune after balancing the gimbal. If the lens-fastening strap is installed, users can enable SuperSmooth prior to auto tune for optimal performance. SuperSmooth will take effect after auto tune completed. The stiffness can be adjusted on the auto tune screen. Follow Mode Settings: tap to select follow mode and speed.
DJI RSC 2 User Manual Button Functions Power Button Press and hold to power on or off. Tap or press twice to enter or exit sleep mode. Joystick Push up or down to control the movement of the tilt axis and left or right to control the movement of the pan axis (default setting). Camera Control Button* Press halfway for autofocus. Press once to start or stop recording. Press and hold to take a photo. Front Dial* Turn to control focus (default setting).
DJI RSC 2 User Manual Ports NATO ports can be used to attach a Briefcase Handle and Twist Grip Dual Handle. Ronin App Settings The Ronin App is easy to use to control gimbal movement and parameter settings with intelligent functions such as Panorama, Timelapse, and Track, as well as more features of the gimbal and the DJI Ronin RavenEye Image Transmission System. The screenshots below are based on the iOS version of the app. Top Bar Sleep/Wake: tap to enter or exit sleep mode.
DJI RSC 2 User Manual Create Virtual Joystick 1 2 3 4 6 5 Use the virtual joystick in the app to control the movement of the gimbal and to shoot. 1. Control Bar: control the speed and smoothness of the gimbal by adjusting the control bar. Speed allows users to adjust the remote-controlled rotational speed. Smoothness allows users to adjust the sensitivity of the gimbal. The lower the smoothing value, the more sensitive the movement of the gimbal. 2.
DJI RSC 2 User Manual Force Mobile Force Mobile requires the phone holder and a mobile phone mounted on a tripod or handlebar vertically. After enabling this feature in the Ronin app, the gimbal movement can be controlled by tilting and rotating your mobile phone. Speed determines the relationship between the rotational speed and angle. When the speed is set to 50, the angle of rotation for the gimbal and mobile phone is 1-to-1. The gimbal will move at an identical angle to the mobile phone.
DJI RSC 2 User Manual Make sure you have connected the camera and gimbal using the corresponding camera control cable before using Panorama. Overlap: determines the overlap ratio of every photo when generating a panorama. The interval time between shooting photos should be set to one second more than the shutter time to avoid blurred footage when using a long exposure.
DJI RSC 2 User Manual In Timelapse, DJI RSC 2 triggers the camera to capture still images with the set interval time and will automatically stop when completed. The duration for the Timelapse and the frame rate can be set so that DJI RSC 2 can calculate the exact number of images required. By enabling Push mode, users can manually adjust the pan and tilt axes before starting the Timelapse. Users can push DJI RSC 2 to alter the camera orientation and adjust the framing.
DJI RSC 2 User Manual Gaming Controller PS4 DualShock and Xbox controllers can be used to control the gimbal and camera. After connecting the controller to the mobile device and gimbal, users can control gimbal movements, focus and zoom, and can record videos, recenter gimbal, capture photos, and switch profiles. The speed and smoothness of the control sticks can be adjusted. Set the focus value within 10 on the camera settings for optimal performance. iOS 13 or higher, Android 9.
DJI RSC 2 User Manual Motor Parameters Auto Tune: the stiffness value is determined by the payload of the gimbal. Use Auto Tune to obtain the stiffness value automatically after balancing. Tap Auto Tune and DJI RSC 2 automatically calculates the result based on the weight of the gimbal setup. Alternatively, press and hold the M button and trigger simultaneously for four seconds to start auto tune without using the app. The auto tune process takes approximately 15 to 30 seconds.
DJI RSC 2 User Manual User Profile Three user profiles can be set and saved. Choose from Pan and Tilt Follow, FPV, Customized, and 3D Roll 360. Speed: determines how fast the camera travels while translating a pan, tilt, or roll movement. Deadband: determines how much movement the gimbal tolerates prior to translating the pan, tilt, and roll movement of the camera. Push: after enabling Push, the gimbal axis can be manually pushed to the desired position.
DJI RSC 2 User Manual Endpoint: limits the rotational range of the gimbal by setting the endpoints. The pan axis has a slip-ring, enabling DJI RSC 2 to rotate continuously when the endpoints are set to 180°. On the tilt axis, you can set up the endpoints according to your requirements. Some longer lenses may hit the gimbal frame. Set the endpoint angle to prevent such cases.
DJI RSC 2 User Manual Using ActiveTrack 3.0 When tracking a person, it is recommended to select and confirm the person in the center of the camera view by pressing the trigger once. When tracking an object, it is recommended to select and confirm the object by dragging a box around it in order to recognize the object better. The gimbal begins to track after recognizing the object successfully. The appropriate speed should be set when using ActiveTrack.
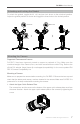
DJI RSC 2 User Manual Flashlight Mode Briefcase Mode Briefcase mode: when DJI RSC 2 is powered on and working in Upright mode, loosen the lock knob of the gimbal, adjust to the lower position, and tighten the lock knob. Briefcase mode is enabled after pressing the trigger twice. When DJI RSC 2 is powered off, loosen the lock knob of the gimbal, adjust to the lower position, and tighten the lock knob. Briefcase mode is enabled after powering on the gimbal.
Maintenance DJI RSC 2 is not waterproof. Make sure to protect it from dust and water during use. After use, it is recommended to wipe DJI RSC 2 with a soft dry cloth. DO NOT spray any cleaning liquids onto DJI RSC 2. Specifications Accessory Port NATO ports M4 Mounting Holes 1/4”-20 Mounting Holes Cold Shoe Mount Video Transmission/ Follow Focus Motor Port (USB-C) RSS Camera Control Port (USB-C) Follow Focus Motor Port (USB-C) Input Power Model: RB2-3400mAh -7.
DJI RSC 2 User Manual Mechanical and Electrical Characteristics Weight Gimbal: Approx. 1.20 kg (excl. quick-release plate) Quick-Release Plate: Approx.100 g Extended Grip/Tripod (metal): Approx. 220 g Extended Grip/Tripod (plastic): Approx. 160 g Dimensions Gimbal (folded): 260 × 210 × 75 mm (excl. grip) Gimbal (unfolded): 400 × 185 × 175 mm (incl. grip, excl. Extended Grip/Tripod) This content is subject to change. Download the latest version from http://www.dji.
C Quick Start Guide v1.
DJI RSC 2 Quick Start Guide DJI RSC 2 Overview EN 1 2 13 12 24 23 22 21 11 10 9 3 4 5 6 7 20 19 8 1. Tilt Motor 2. Tilt Lock 14. Image Transmission/Focus Motor Port (USB-C) 3. Screen 15. Focus Motor Port (USB-C) 4. Side Dial 16. RSS Camera Control Port (USB-C) 5. Camera Control Button 17. Front Dial 6. M Button 18. Trigger 7. Joystick 19. Power Button 8. Extended Grip/Tripod 20. Power Port (USB-C) 9. Back Button 21. Pan Lock 10. M4/NATO Port 22. Pan Motor 11. Lock Knob 23.
DJI RSC 2 Quick Start Guide EN Getting Started A. Downloading the DJI RONINTM App and Watching the Tutorials Ronin App Tutorials B. Charging the Battery Before using for the first time, charge DJI RSC 2 through the power port using a charging cable (included) and a USB adapter (not included). It is recommended to use a QC 2.0 or PD (max. 18 W) USB adapter. Check the battery level on the screen. Power Outlet 100 - 240 V USB Power Adapter Power Port C.
DJI RSC 2 Quick Start Guide D. Attaching the Extended Grip/Tripod EN 1 2 3 E. Unlocking and Locking the Gimbal To unlock the gimbal, toggle the tilt, roll, and pan lock levers to the unlocked position. Adjust the gimbal position as shown and toggle the three locks to the locked position. Tilt Lock Pan Lock 4 © 2020 DJI OSMO All Rights Reserved.
DJI RSC 2 Quick Start Guide F. Powering On/Off and Entering/Exiting Sleep Mode G. Activating DJI RSC 2 DJI RSC 2 needs to be activated through the Ronin app before using for the first time. 1. Press and hold the power button to power on the gimbal. 2. Enable Bluetooth on your mobile device and launch the Ronin app. Note that a DJI account is required to launch the Ronin app. Once detected in the list of Bluetooth devices, select DJI RSC 2 and input the default Bluetooth password: 12345678.
DJI RSC 2 Quick Start Guide 2. Attach the Lower Quick-Release Plate and Lens Support EN Toggle the lever on the lower quick-release plate to the unlocked position 1 , insert the camera 2 , and toggle the lever to the locked position 3 after it is engaged. Attach the lens support to the lower quick-release plate 4 . It is recommended to use the lens support* when using a long or heavy lens.
DJI RSC 2 Quick Start Guide Safety Lock Lever RSS Camera Control Port 4. Connect the Camera Control Cable Choose the proper camera control cable according to the camera type. Plug one end of the cable into the camera and plug the other end into the RSS camera control port of the gimbal as shown above. Balancing Balancing is required before shooting. Before balancing, make sure to power on the camera if using an optical zoom lens and to select the focal length if using a varifocal lens.
DJI RSC 2 Quick Start Guide 2. Balancing Depth for the Tilt Axis EN a. Rotate the tilt axis so that the camera lens is pointing forward. Toggle the lever to the unlocked position 1 . b. Check to make sure the camera is not front or back-heavy. If front-heavy, move the camera backward 2 . If back-heavy, move the camera forward 2 . c. Toggle the lever to the locked position. The tilt axis is balanced when the camera is steady while tilted up or down by 45°. d. Lock the tilt axis. 1 2 3.
DJI RSC 2 Quick Start Guide 4. Balancing the Pan Axis b. While holding the grip, tilt DJI RSC 2 forward, and rotate the pan arm until parallel with you. c. Check the movement of the pan axis. If the camera lens rotates to the left, push the pan axis to the right 2 . If the camera lens rotates to the right, push the pan axis to the left 2 . d. Tighten the knob. The pan axis is balanced if the camera is steady when rotating the pan while tilting the grip.
DJI RSC 2 Quick Start Guide 3D Roll 360: enable to shoot footage while rotating the camera 360°. EN Portrait: enable to shoot in portrait mode. Custom: enable or disable any axis follow as required. Follow Speed: select the follow speed. Button Functions Power Button Press and hold to power on or off. Tap or press twice to enter or exit sleep mode. Joystick Push up or down to control the movement of the tilt axis and left or right to control the movement of the pan axis (default setting).
DJI RSC 2 Quick Start Guide Ronin App Specifications Model P10 Weight Gimbal: Approx. 1.2 kg (excl. quick-release plate) Quick-Release Plate: Approx.100 g Extended Grip/Tripod (metal): Approx. 220 g Extended Grip/Tripod (plastic): Approx. 160 g Dimensions Gimbal (folded): 260 × 210 × 75 mm (incl. grip) Gimbal (unfolded): 400 ×185 ×175 mm (incl. grip, excl. Extended Grip/Tripod) Input Power Model: RB2-3400mAh-7.2V Type: 18650 2S Capacity: 3400 mAh Energy: 24.
DJI Support DJI 技术支持 DJI技術支援 Dukungan DJI DJI サポート DJI 고객지원 Sokongan DJI ฝ่่ ายสนัั บสนุุ นของ DJI Поддръжка на DJI Podpora společnosti DJI DJI Support DJI Support Asistencia técnica de DJI Υποστήριξη της DJI DJI-tuki Service client DJI DJI Podrška DJI támogatás Assistenza DJI DJI-ondersteuning DJI-støtte Wsparcie DJI Assistência da DJI Suporte DJI Asistență DJI Техническая поддержка DJI DJI-support DJI Support DJI ﺩﻋﻢ http://www.dji.
C DISCLAIMER AND SAFETY GUIDELINES 免责声明和安全操作指引 免責聲明與安全指導方針 免責事項と安全に関するガイドライン 고지 사항 및 안전 가이드 HAFTUNGSAUSSCHLUSS UND SICHERHEITSVORSCHRIFTEN RENUNCIA DE RESPONSABILIDAD Y DIRECTRICES DE SEGURIDAD CLAUSE D'EXCLUSION DE RESPONSABILITÉ ET CONSIGNES DE SÉCURITÉ LIMITAZIONI DI RESPONSABILITÀ E DIRETTIVE SULLA SICUREZZA DISCLAIMER EN VEILIGHEIDSRICHTLIJNEN DECLARAÇÃO DE EXONERAÇÃO DE RESPONSABILIDADE E DIRETRIZES DE SEGURANÇA DECLARAÇÃO DE EXONERAÇÃO DE RESPONSABILIDADE E DIRETRIZES DE SEGURANÇA ЗАЯВЛЕНИЕ ОБ ОТКАЗЕ
EN Disclaimer and Warning Congratulations on purchasing your new DJI OSMOTM product. The information in this document affects your safety and your legal rights and responsibilities. Read this entire document carefully to ensure proper configuration before use. Failure to read and follow instructions and warnings in this document may result in serious injury to yourself or others, or damage to your DJI OSMO product or damage to other objects in the vicinity.
Download Ronin App Download and install the Ronin app. Search “Ronin” on the App Store and then follow instructions for iOS installation. Search “Ronin” on Google Play and then follow instructions for Android installation. * Ronin app supports iOS 11.0 (or later) or Android 7.0 (or later). Safety Guidelines 1. DJI RSC 2 is powered by a built-in battery through the grip. Read the warnings and safety guidelines about the grip in the DJI RSC 2 User Manual before use.
Compliance Information FCC Compliance Notice This device complies with Part 15 of the FCC Rules. Operation is subject to the following two conditions: (1) This device may not cause harmful interference, and (2) This device must accept any interference received, including interference that may cause undesired operation. Any changes or modifications not expressly approved by the party responsible for compliance could void the user’s authority to operate the equipment.
EU megfelelőségi nyilatkozat: A DJI Osmo Technology Co., Ltd. ezúton megerősíti, hogy ez az eszköz megfelel a 2014/53/EU Irányelv alapvető követelményeinek és más vonatkozó rendelkezéseinek. Az EU megfelelőségi nyilatkozat másolata elérhető a www.dji.com/euro-compliance oldalon EU kapcsolati cím: DJI GmbH, Industriestrasse 12, 97618, Niederlauer, Németország EU-försäkran om efterlevnad: SZ DJI Osmo Technology Co., Ltd.
Çevre dostu bertaraf Eski elektrikli cihazlar, diğer atıklarla birlikte bertaraf edilmemeli, ayrıca atılmalıdır. Özel kişiler aracılığıyla genel toplama noktasına bertaraf işlemi ücretsiz olarak yapılmaktadır. Eski cihazların sahibi, cihazları bu toplama noktalarına veya benzer toplama noktalarına getirmekten sorumludur. Bu az miktardaki kişisel çabayla, değerli ham maddelerin geri dönüştürülmesine ve toksik maddelerin işleme alınmasına katkıda bulunmuş olursunuz.
OJI guarantees that warranty service will be provided for this product starting from the date of purchase. The product's warranty period depends on the specific component type. The warranty period varies and can be up to 12 months (or longer where required by local law) for different components For more information about the warranty period and after-sales service policy, please visit http://wWW.dji.com/service/policy. • Warranty policies may vary according to local laws and regulations. ei~mza~.
The products purchased in Australia are complted with the OJI Products and Austra//an Consumer Law hereinafter OJI Products and Australian Consumer Law •oJ/" means OJI TECHNOLOGY AUSTRALIA PTY L TO. Address: 46 Indian Onve, Keysborough. VIC 3173.
• Damage caused by operating the product at a weight greater than the safe takeoff weight as specified by tne instruction manuals. • Damage caused by a forced flight when components have aged or been damaged • Damage caused by reliability or compat1b1lity issues when using unauthenticated third-party parts. • Damage caused by operating the product with a low charged or defective battery • Uninterrupted or error-free operation of a product. • Loss of, or damage to, your data saved in your product.