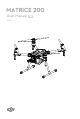
MATRICE 200 User Manual 2018.11 V1.
Searching for Keywords Search for keywords such as “battery” and “install” to find a topic. If you are using Adobe Acrobat Reader to read this document, press Ctrl+F on Windows or Command+F on Mac to begin a search. Navigating to a Topic View a complete list of topics in the table of contents. Click on a topic to navigate to that section. Printing this Document This document supports high resolution printing.
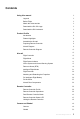
Contents Using this manual 2 Legends 2 Before Flight 2 Watch the video tutorials 2 Download the DJI GO 4 app 2 Download the DJI Assistant 2 2 Product Profile 6 Introduction 6 Feature Highlights 6 Assemble the Aircraft 6 Preparing Remote Controller 8 Aircraft Diagram 9 10 Remote Controller Diagram Aircraft 13 Flight Controller 13 Flight Mode 13 Flight Status Indicator 14 Vision System and Infrared Sensing System 15 Return-to-Home (RTH) 19 Intelligent Flight Modes 24 Flig
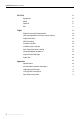
MATRICE 200 User Manual DJI GO 4 53 Editor 57 SkyPixel 57 Me 57 Flight 59 Flight Environment Requirements 59 GEO (Geospatial Environment Online) System 59 Flight Restrictions 60 GEO Unlocking 63 Preflight Checklist 63 Calibrating the Compass 63 Auto Takeoff and Auto Landing 65 Starting/Stopping the Motors 65 Stop the Motor Mid-flight 66 Flight Test 66 Appendix 4 53 Equipment 69 Specifications 69 Aircraft Status Indicator Description 72 Upgrading the Firmware 72 Carry
Product Profile This chapter describes the features of the Matrice 200, shows how to assemble the aircraft, and contains diagrams of the aircraft and remote controller with component explanations. © 2018 DJI All Rights Reserved.
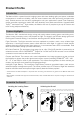
Product Profile Introduction The Matrice 200 is a powerful aerial imaging system with class-leading agility and speed, redundant components for maximum reliability, and new smart features that make performing complex tasks easy. Gimbal cameras can be easily exchanged to suit your application's needs. Dual frequency remote controller transmission makes HD video downlink more stable and efficient.
MATRICE 200 User Manual Mounting the Propellers Propellers without silver rings go on motors without any marks. Press the propeller down onto the mounting plate and rotate in the lock until secure. direction Propellers with silver rings go on motors with the same color marks. Check that the propellers are secure before each flight. Mounting the Gimbal and Camera 1 Press the gimbal detachment button to remove the cover. 3 2 Align the white and red dots and insert the gimbal.
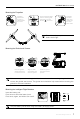
MATRICE 200 User Manual Removing the Intelligent Flight Battery Make sure to press the battery removal button when removing the battery. Preparing Remote Controller Tilt the Mobile Device Holder to the desired position then adjust the antennas as shown. 1. Press the button on the side of the Mobile Device Holder to release the clamp, attach your mobile device, then tighten the clamp to secure it. 2. Connect your mobile device to the remote controller with a USB cable. 3.
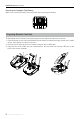
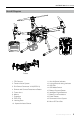
MATRICE 200 User Manual Aircraft Diagram 7 10 11 6 5 8 2 12 13 14 1 15 4 3 9 16 17 18 19 20 21 Folded 1. FPV Camera 2. Forward Vision System 3. DJI Gimbal Connector V2.0 (DGC2.0) 4. Gimbal and Camera Detachment Button 5. Frame Arms 6. Motors 7. Propellers 8. ESC LEDs 9. Landing Gear 10. Upward Infrared Sensor 11. Aircraft Status Indicator 12. Linking Button/Linking Indicator 13. USB Port 14. USB Mode Switch 15. Battery Removal Button 16. Intelligent Flight Batteries 17.
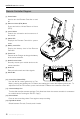
MATRICE 200 User Manual Remote Controller Diagram [1] Power Button Used to turn the Remote Controller on and off. [2] Return-to-Home (RTH) Button Press and hold to initiate Return to Home (RTH). 7 8 [3] Control Sticks Control the orientation and movement of the aircraft. [4] Status LED Displays the Remote Controller's system status. Display the battery level of the Remote Controller.
MATRICE 200 User Manual [14] Shutter Button Press the Shutter Button to take a photo. Photos can also be captured during video recording. [15] Pause Button Press once to allow the aircraft to exit from TapFly, ActiveTrack, and Advanced mode. [16] Micro USB Port Use this port to upgrade the firmware. [17] CAN Bus Reserved extended port. [18] HDMI A Port HDMI A Port is for video output. [19] USB Port Connection to mobile device for DJI GO 4 app. [20] C1 Button Customizable through the DJI GO 4 app.
Aircraft This section describes the features of the Flight Controller, Vision System, and the Intelligent Flight Battery.
Aircraft Flight Controller The Matrice 200 flight controller features several important upgrades. Safety modes include Failsafe and Return-to-Home. These features ensure the safe return of your aircraft if control signal is lost. The flight controller can also save critical flight data from each flight to the on-board storage device. The new flight controller also provides increased stability and a new air braking feature.
MATRICE 200 User Manual Atti Mode Warning The aircraft will enter A-mode in the following two instances: Passive: When there is weak GPS signal or when the compass experiences interference where the Vision System is unavailable. Active: Users toggle the flight mode switch to A-mode. In A-mode, the Vision System and some advanced features are disabled. Therefore, the aircraft cannot position or auto-brake in this mode and is easily affected by its surroundings, which may result in horizontal shifting.
MATRICE 200 User Manual Slow yellow flashing No GPS and Forward and Downward Vision Systems Fast green flashing Braking Fast yellow flashing Remote Controller Signal Lost Slow red flashing Low Battery Warning Fast red flashing Critical Low Battery Warning Red flashing IMU Error Solid Red Critical Error Fast alternating red and yellow flashing Compass Calibration Required Warning — * Slow green flashes indicate P-mode, and fast green flashes indicate S-mode.
MATRICE 200 User Manual Detection Range The detection range of the Vision System is depicted below. Note that the aircraft cannot sense and avoid obstacles that are not within the detection range. 60cm 40cm Ultrasonic sensor detection range is depicted below. Infrared Sensing System detection range is depicted below. 16 © 2018 DJI All Rights Reserved.
MATRICE 200 User Manual Calibration The Forward and Downward Vision System cameras are calibrated prior to delivery. However, these cameras are vulnerable to impact and will require occasional calibration via DJI Assistant 2. Calibration with the included Visual Calibration Plate. 1. 2. 3. 4. Power on the Intelligent Flight Battery and toggle the USB Mode Switch left. Connect the Matrice 200 and the PC with a male to male USB cable. Launch DJI Assistant 2 and log in with a DJI account.
MATRICE 200 User Manual Follow the steps below to use the Vision System: 1. Ensure the aircraft is in P-mode and place the aircraft on a flat surface. Note that the Vision System cannot work properly on surfaces without clear pattern variations. 2. Turn on the aircraft. The aircraft will hover in place after takeoff. The aircraft status indicators will flash green twice, which indicates the Vision System is working. Gently push the left stick up to lift off and the aircraft will hover in place.
MATRICE 200 User Manual The performance of your Vision System and Infrared Sensing System is affected by the surface being flown over. Ultrasonic sensors may not be able to accurately measure distances when operating above sound-absorbing materials and the cameras may not function correctly in suboptimal environments. The aircraft will switch from P-mode to A-mode automatically if neither GPS nor Vision System and Infrared Sensing System are available.
MATRICE 200 User Manual The aircraft can sense and avoid obstacles when the Forward Vision System is enabled and lighting conditions are sufficient. The aircraft will automatically ascend to avoid obstacles and descend slowly as it returns to the home point. To ensure the aircraft returns home while facing forward, it cannot rotate or fly left and right during RTH while the Forward Vision System is enabled.
MATRICE 200 User Manual Battery Level Warning Remark Aircraft Status Indicator DJI GO 4 App Flight Instructions Tap “Go-home” to have the aircraft return to the Home point and land automatically, or “Cancel” to resume normal flight. If no action is taken, the aircraft will automatically go home and land after 10 seconds. Remote controller will sound an alarm. Fly the aircraft back and land it as soon as possible, then stop the motors and replace the battery.
MATRICE 200 User Manual Use the Failsafe RTH for example: ..1. Record Home Point 2. Remote Control Signal Lost 3. Signal Lost for Extended Time 5. Landing (After User Confirmation) 4. RTH (Adjustable Altitude) Height over HP>Failsafe Altitude Elevate to Failsafe Altitude Failsafe Altitude Hovering at 0.7 meters above the Home Point Height over HP<=Failsafe Altitude Aircraft cannot return to the Home Point when GPS signal is weak ( [ ] Less than 4 bars is considered a weak GPS signal) or unavailable.
MATRICE 200 User Manual If you move the left stick when the aircraft is flying above 65 feet (20 meters) but below the pre-set Failsafe RTH altitude, the aircraft will stop ascending and immediately return to the Home Point. Obstacle Avoidance During RTH* The aircraft can sense and actively attempt to avoid obstacles during RTH, provided that lighting conditions are adequate for the Forward Vision System. Upon detecting an obstacle, the aircraft will act as follows: 1.
MATRICE 200 User Manual Landing Protection will not be active in the following circumstances: When the user is controlling the pitch/roll/throttle sticks (Landing Protection will re-activate when the control sticks are not in use) When the positioning system is not fully functional (e.g.
MATRICE 200 User Manual 3. Tap once on the target and wait for the “GO” icon to appear. Tap the “GO” icon to confirm the selection and the aircraft will automatically fly toward the target. In Flight (GPS) 74% 70% 12 P-GPS 4.07V 4.07V 09:29 ISO SHU T TER F 200 1/200 5.6 WB Custom EV 0.3 SD TIME 4KP30 5000K 20:12 AF/ MF AE FPV D 30m H H.S 10.0km/h 10.0m VS VS 2.0m/s 2.0M/S VPS 2.0m DO NOT fly the aircraft over people, animals, small or fine objects (e.g.
MATRICE 200 User Manual The aircraft automatically adjusts its speed when it senses an obstacle in front, or if it flies too close to the ground. The DJI GO 4 app will show a prompt if the aircraft flies over an obstacle or to the left or right of the obstacle. However, this feature should not be relied upon for navigation between obstacles. Failsafe procedures will override TapFly. If the GPS signal weakens, the aircraft will exit autonomous flight and return to home.
MATRICE 200 User Manual to bring up the flight modes and select ActiveTrack. 2. In DJI GO 4, tap In Flight (GPS) 74% 70% 12 P-GPS 4.07V 4.07V 09:29 ISO SHU T TER F 200 1/200 5.6 D WB Custom EV 0.3 5000K 30m H H.S 10.0km/h SD TIME 4KP30 20:12 AF/ MF AE 10.0m VS 2.0m/s VPS 2.0m 3. Tap on the subject you want to track, then tap to confirm your selection. If the subject is not will turn green when tracking is in automatically recognized, drag a box around it. The box progress.
MATRICE 200 User Manual DO NOT select an area with people, animals, small or fine objects (e.g. trees and power lines), or transparent objects (e.g. glass or water). Stay clear of obstacles near the flight path, particularly when the aircraft is flying backward. Be extra vigilant when using ActiveTrack in any of the following situations: a) The tracked subject is not moving on a level plane. b) The tracked subject changes shape drastically while moving.
MATRICE 200 User Manual In Flight (GPS) 74% 70% 12 P-GPS 4.07V 4.07V 09:29 ISO SHU T TER F 200 1/200 5.6 WB Custom EV 0.3 5000K SD TIME 4KP30 20:12 AF/ MF AE Aircraft Head Settings Free Follow Aircraft Head Settings Compisition Compisition Quick Free Quick Follow Compisition Compisition D 30m H.S 10.0km/h H 10.0m VS 2.0m/s VPS 2.0m You can drag on a subject in DJI GO 4 or move the gimbal control sticks to change the subject's position in the shot.
MATRICE 200 User Manual DJI Intelligent Flight Battery Functions 1. Battery Level Display: The LED indicators display the current battery level. 2. Auto-Discharging: To prevent swelling, the battery automatically discharges to below 70% of the total power when it is idle (press the power button to check that the battery level will cause the battery to exit idle state) for more than 10 days to prevent swelling. It takes around 3 days to discharge the battery to 65%.
MATRICE 200 User Manual Overview [6] [1] [5] [4] [2] [8] [7] [3] [1] [2] [3] [4] [5] [6] [7] [8] Power Port Charging Port Charging Port Cover Battery Charging Level Indicators Cover/Battery Release Button Status LEDs Firmware Update Port (Micro USB) Buzzer Switch Connecting to a Power Source Connect the standard Matrice 200 Battery Charger to a power outlet (100-240 V, 50/60 Hz), then uncover the rubber cover on the power port to connect the Charging Hub to the Matrice 200 Battery Charger*.
MATRICE 200 User Manual Always align the grooves on the Intelligent Flight Battery with the battery slot tracks. Press the release button to detach batteries after charging is complete. DO NOT leave metal terminals exposed to open air when not in use. Status LED Descriptions Status LED (Charging Hub) Description Blinks Green — — — Charging Solid Green Fully charged Blinks Red Battery Charger Error. Retry with an official battery charger.
MATRICE 200 User Manual resume charging. Note that you do not need to unplug and plug the charger in the event of a room temperature error, the charger will resume charging when the temperature falls within the normal range. DJI does not take any responsibility for damage caused by third-party chargers. How to discharge the Intelligent Flight Battery before transporting the batteries for a trip: Fly the aircraft outdoors until its power level is lower than 30%.
MATRICE 200 User Manual Turning ON/OFF Turning On: Press the Power button once, then press again and hold for two seconds to power on. The Power LED will turn red and the Battery Level Indicators will display the current battery level. Turning Off: Press the Power button once, then press again and hold for two seconds to power off. Heating the Battery Manual Heating: Make sure the battery is powered off. Press and hold the Power button for three seconds to initiate battery warm up manually.
MATRICE 200 User Manual Battery Level LED1 LED2 LED3 LED4 Battery Level 88%~100% 75%~88% 63%~75% 50%~62.5% 38%~50% 25%~38% 13%~25% 0%~13% DJI AirSense Manned aircraft with an ADS-B transceiver will actively broadcast flight information including location, flight path, speed, and altitude. DJI AirSense receives this by ADS-B transceivers via an on-board receiver or internet connection.
MATRICE 200 User Manual Warning Escalation: The first (or "lowest") level warning occurs three minutes away from the manned aircraft. The second (or “middle”) level warning occurs two minutes away from the manned aircraft. The third (or “highest”) level warning occurs one minute away from the manned aircraft.
Remote Controllers This section describes the features of the remote controller that includes aircraft and remote controller operations and dual remote controller mode.
Remote Controller Remote Controller Profile The Matrice 200 remote controller is a multi-function wireless communication device that integrates a dual frequency video downlink system and the aircraft remote control system. 2.4 GHz frequency is suitable for long transmission distances in open areas while 5.8 GHz frequency* is appropriate for urban areas, being resistant to increased interference (5.8 GHz transmission is not available in some regions due to local regulations).
MATRICE 200 User Manual Charging the Remote Controller Charge the remote controller via the supplied charger. Power Outlet B B Controlling the Camera Shoot videos/photos and adjust the camera settings via the Shutter Button, Camera Settings Dial, Video Recording Button, and Gimbal Dial on the remote controller. [4] [3] [1] [2] [1] Camera Settings Dial Turn the dial to adjust camera settings such as ISO, shutter speed, and aperture without letting go of the remote controller.
MATRICE 200 User Manual Controlling the Aircraft This section explains how to control the orientation of the aircraft through the remote controller. Control can be set to Mode 1, Mode 2 or Mode 3, or to a custom mode.
MATRICE 200 User Manual Remote Controller (Mode 2) ( Aircraft indicates nose direction) Remarks Moving the left stick up and down changes the aircraft’s elevation. Push the stick up to ascend and down to descend. When both sticks are centered, the Matrice 200 will hover in place. The more the stick is pushed away from the center position, the faster the Matrice 200 will change elevation. Always push the stick gently to prevent sudden and unexpected elevation changes.
MATRICE 200 User Manual Adjusting Controller Sticks Hold and twist the controller sticks clockwise or counter clockwise to adjust their height. A proper length of controller sticks can improve the controlling accuracy. Flight Mode Switch Toggle the switch to select the desired flight mode. Choose between; P-mode, S-mode, and A- mode.
MATRICE 200 User Manual Connecting Your Mobile Device Tilt the Mobile Device Holder to the desired position. Press the button on the side of the Mobile Device Holder to release the clamp, then place your mobile device into the clamp. Adjust the clamp to secure your mobile device. Connect your mobile device to the remote controller with a USB cable. Plug one end of the cable into your mobile device and the other end into the USB port on the back of the remote controller.
MATRICE 200 User Manual In Dual Controller Mode, when the primary remote controller is primary, it can control gimbal pitch and pan. When the secondary remote controller is primary, it can control gimbal pitch, pan, and roll. Dual Remote Controller mode is not available in Russia and Israel. Setting Up Dual Remote Controller Mode Dual Remote Controller mode is disabled by default. Users must enable this feature on the primary remote controller via DJI GO 4.
MATRICE 200 User Manual 2. Search the “primary” remote controller in the surrounding area. Remote Controller Settings Primary and Secondary Set Remote Controller Status Primary ID: 28172d OFF Primary Secondary Secondary ID: 14f93f Connection Status:OFF Search Primary 3. Select the primary remote controller from the primary list and input the password to connect. Search Primary Primary RSSI Scan 2816f2 -56.00 Connect 28172d -22.
MATRICE 200 User Manual Status LED Alarm Remote Controller Status — Solid Red —— The remote controller is set as primary but is not connected with the aircraft. — Solid Green —— The remote controller is set as primary and is connected with the aircraft. — Solid Purple —— The remote controller is set as secondary but is not connected with the aircraft. — Solid Blue —— The remote controller is set as secondary and is connected with the aircraft. D-D-D...... Remote controller error.
MATRICE 200 User Manual 4. The remote controller is ready to link. The Remote Controller Status Indicator blinks blue, and a “beep” sound is emitted. 5. Locate the Linking button on the aircraft, as shown in the figure shown below. Press the Linking button to start linking. The Remote Controller Status Indicator will display solid green if the connection is successful. A secondary remote controller cannot link to the aircraft and so therefore cannot control the orientation of the aircraft.
Gimbal and Camera This section focuses on the technical specifications of the camera and explains how to use the gimbal.
Camera and Gimbal Camera Camera Profile Using the Zenmuse Z30 as an example, this section will demonstrate the technical specifications of the camera while explaining how to use the gimbal. Camera Micro SD Card Slot To store photos and videos, plug the Micro SD card into the slot shown below before powering on the Matrice 200. The Matrice 200 comes with a 16 GB Micro SD card and can support card sizes of up to 128 GB.
MATRICE 200 User Manual Power on the aircraft before attempting to download the files. Camera Operation Remote Controller Use the Shutter and Record buttons on the remote controller to shoot photos or videos. For more information on how to use these buttons, please refer to Controlling the Camera. DJI GO 4 Use DJI GO 4 to shoot photos or videos. For more information, refer to the camera and gimbal User Manual.
MATRICE 200 User Manual In Flight (GPS) 74% 70% 12 P-GPS 4.07V 4.07V 09:29 ISO SHU T TER F 200 1/200 5.6 D 30m H.S 10.0km/h EV WB Custom 0.3 5000K H SD TIME 4KP30 AF/ MF 20:12 AE 10.0m VS 2.0m/s VPS 2.0m Gimbal Operation Modes Three gimbal operation modes are available. Switch between the different operation modes in DJI GO 4's Camera View. Note that your mobile device must be connected to the remote controller for changes to take effect.
DJI GO 4 This section introduces the main functions of the DJI GO 4 app.
DJI GO 4 Use the DJI GO 4 app* to control the gimbal, camera, and other aircraft functions. The app features Equipment, Editor, SkyPixel, and Me sections, which are used for configuring your aircraft, editing, and sharing your photos and videos with others. It is recommended that you use a tablet for the best possible experience.
MATRICE 200 User Manual 1. System Status : This icon indicates aircraft flight status and displays various warning messages. READY TO GO (GPS) 2. Battery Level Indicator : The battery level indicator provides a dynamic display of the battery level. The colored zones on the battery level indicator represent the power levels needed to carry out different functions. 3. Flight Mode : The text next to this icon indicates the current flight mode. Tap to configure the Flight Controller Settings.
MATRICE 200 User Manual 11. Battery Level : This icon shows current battery level. Tap to view the battery information menu, set various battery warning thresholds, and view battery warning history. 12. General Settings : Tap to enter the General Settings menu to set metrics to enable live streaming, display flight routes, and so on. 13. AF/MF : Tap to switch the focus mode. 14. Auto Exposure Lock AE : Tap to lock the exposure value. 15.
MATRICE 200 User Manual 22. Flight Telemetry (1) Tap to switch to map view. (2) Flight Attitude and Radar Function: N The red arrow shows which direction the aircraft is facing. The ratio of gray area to blue area indicates the aircraft’s pitch. The horizontal level of the gray area indicates the aircraft’s roll angle. A blue arc indicates the gimbal's pan angel. The outermost gray circle displays the current power capacity. (3) Flight Parameters: Altitude: Vertical distance from the Home Point.
MATRICE 200 User Manual Editor A dedicated video editor is built into the DJI GO 4 app. After recording several video clips and downloading them to your mobile device, go to Editor on the home screen. You can then select a template and a specified number of clips that automatically combine, creating a short film for sharing. SkyPixel View and share photos and videos on the SkyPixel page.
Flight This section describes safe flight practices and flight restrictions.
Flight Ensure that all flights are carried out in an open area. It is important to understand basic flight guidelines for the safety of both you and those around you. Refer to the Disclaimer and Safety Guidelines for more information. Flight Environment Requirements 1. Do not use the aircraft in severe weather conditions. These include wind speeds exceeding 10 m/s, snow, rain, and fog. 2.
MATRICE 200 User Manual The GEO System is for advisory purposes only. Individual users are responsible for checking official sources and determining which laws or regulations may apply to their flight. In some instances, DJI has selected widely-recommended general parameters (such as a 1.5-mile radius at airports) without making any determination as to whether these guidelines match regulations that apply to specific users.
MATRICE 200 User Manual Maximum Flight Altitude Max Radius Home Point Height of aircraft when turned on Strong GPS Signal Restriction Description DJI GO 4 App Message Max Altitude Aircraft's altitude cannot exceed the specified value. Maximum Flight Altitude reached. Adjust your altitude using FC Settings if required. Max Radius Flight distance cannot exceed the specified value. Maximum Flight Distance reached. Adjust your distance using FC Settings if required.
MATRICE 200 User Manual GEO Zone Flight Restrictions GEO Zone Description Takeoff: The aircraft’s motors cannot be started. Restricted Zone In-flight: When GPS signal changes from weak to strong, DJI GO 4 starts a 20-second countdown. Once the countdown is over, the aircraft immediately lands in semi-automatic descent mode and turns off its motors after landing. In-flight: When the aircraft approaches the boundary of the Restricted Zone, it automatically decelerates and hovers.
MATRICE 200 User Manual GEO Unlocking Due to differing laws and regulations between countries and regions, and differing flight restrictions between GEO Zones, DJI provides users with two methods for unlocking GEO Zones: Self-Unlocking and Custom Unlocking. Self-Unlocking is used for Authorization Zones, where the user is required to submit an unlock request by authenticating their phone number for a registered DJI account. This feature is only available in certain countries.
MATRICE 200 User Manual 3. Hold the aircraft vertically, with the nose pointing downward, and rotate it 360 degrees around the center axis. Re-calibrate the aircraft if the aircraft status indicators blink red. If the Aircraft Status Indicator blinks red and yellow after the calibration procedure, move your aircraft to a different location and try again. DO NOT calibrate the compass near metal objects such as a metal bridge, cars, scaffolding.
MATRICE 200 User Manual Auto Takeoff and Auto Landing Auto Takeoff Use auto takeoff only if the Aircraft Status Indicators are blinking green. Follow the steps below to use the auto takeoff feature: 1. Launch the DJI GO 4 app and tap GO FLY to enter Camera View. 2. Complete all steps on the pre-flight checklist. 3. Tap“ ”, and confirm that conditions are safe for flight. Slide the icon to confirm and takeoff. 4. Aircraft takes off and hovers at (1.2 meters) above ground.
MATRICE 200 User Manual 2. When the aircraft has landed, push and hold the left stick down. The motors will stop after three seconds. OR Method 1 Method 2 Stop the Motor Mid-flight Pull the left stick to the bottom right inside corner and press the RTH button at the same time. Only stop the motors mid-f light in emergency situations when doing so reduces the risk of damage or injury. Please check that CSC is activated inside DJI GO 4 app, then the user can stop the aircraft mid-air.
MATRICE 200 User Manual Video Suggestions and Tips 1. 2. 3. 4. 5. Go through the full pre-flight checklist before each flight. Select the desired gimbal operation mode in the DJI GO 4 app. Only shoot video when flying in P-mode. Always fly in good weather and avoid flying in rain or heavy wind. Choose the camera settings that suit your needs. Settings include photo format and exposure compensation. 6. Perform flight tests to establish flight routes and preview scenes. 7.
Appendix
Appendix Specifications Aircraft Model Dimensions M200 Unfolded, 887×880×378 mm Folded, 716×220×236 mm Diagonal Wheelbase 643 mm Max Takeoff Weight 6.14 kg Max Payload 2.34 kg (with two standard batteries ), 1.61 kg (with two optional batteries) Vertical: ±1.64 feet (0.5 m) or ±0.33 feet (0.1 m, Hovering Accuracy (P-mode with GPS) Downward Vision System enabled) Horizontal: ±4.92 feet (1.5 m) or ±0.98 feet (0.
MATRICE 200 User Manual Remote Controller Model GL6D10A Operating Frequency 2.400-2.483 GHz; 5.725-5.825 GHz Max Transmitting Distance 2.4 GHz: 4.3 miles (7 km, FCC); 2.2 miles (3.5 km, CE); 2.5 miles (4 km, SRRC) 5.8 GHz: 4.3 miles (7 km, FCC); 1.2 miles (2 km, CE); 3.1 miles (5 km, SRRC) EIRP 2.4 GHz: 26 dBm (FCC); 17 dBm (CE); 20 dBm (SRRC) 5.
MATRICE 200 User Manual Charger Model IN2C180 Voltage 26.1 V Rated Power 180 W Battery (Standard) Name Intelligent Flight Battery Model TB50-4280mAh-22.8V Capacity 4280 mAh Voltage 22.8 V Battery Type 6S LiPo Energy 97.
MATRICE 200 User Manual Aircraft Status Indicator Description Normal X2 Red, yellow, green, blue, and purple flashes Power on and self-check Green and Yellow Flash Alternatively Aircraft warming up Green Flashes Slowly Safe to Fly (P-mode with GPS and Vision System) Green Flashes Twice Safe to Fly (P-mode with Vision System but without GPS) Yellow Flashes Slowly Safe to Fly (A-mode but No GPS and Vision System) Fast Yellow Flashing Remote Controller Signal Lost Slow Red Flashing Low Battery
MATRICE 200 User Manual The firmware update will take around 15 minutes. It is normal that the gimbal will go limp, the aircraft status indicator blinks abnormally when the aircraft reboots. Wait patiently until the update is complete. During an update, the aircraft will sound a quick single beep continuously. The warning sound will then alternate between a longer beep and a quick double beep once the update is complete. Restart the aircraft after the firmware update is complete.
MATRICE 200 User Manual After-Sales Information Visit the following pages to learn more about our After-sales Service Policy and warranty information: 1. After-sales Policy: http://www.dji.com/service 2. Refund Policy: http://www.dji.com/service/refund-return 3. Paid Repair Service: http://www.dji.com/service/repair-service 4. Warranty Service: http://www.dji.com/service/warranty-service DJI incorporates HDMITM technology.
This content is subject to change. Download the latest version from http://www.dji.com/matrice-200-series If you have any questions about this document, please contact DJI by sending a message to DocSupport@dji.com. © 2018 DJI All Rights Reserved.