
Quick Start

4
EN
Using Matrice 210/Matrice 210 RTK
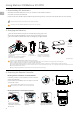
1. Downloading DJI Assistant 2
Download and install DJI Assistant
TM
2 on your computer via the website link below:
http://www.dji.com/matrice-200-series
Ensure that the built-in DJI GO 4 app and DJI Pilot app are working normally. This manual uses the DJI GO 4 app as an example.
First-time activation requires your DJI account and an internet connection.
Internet
DJI Assistant 2 is only available for Windows 7 (or later) or OS X 10.11 (or later).
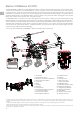
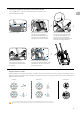
Press the Battery Release Button before removing the battery.
Press the Battery Level Button once to check the battery level.
3. Preparing the Remote Controller
CrystalSky monitors and the Cendence remote controller
use the same batteries.
Put the battery into the Battery Slot, then slide it to the end
until you hear a click.
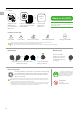
2. Charging the Batteries
Press the release button and open the corresponding charging port cover.
Insert the Intelligent Flight Battery into the charging port to begin charging.
Be sure to press the release button when removing fully charged batteries.
DO NOT charge TB50-M200/TB55 and WB37 batteries simultaneously.
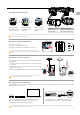
When charging is complete, the LED lights on the Intelligent Flight Battery will turn off, and the LED on the Charging Hub will turn solid green.
When charging is complete, the display on the remote controller will show 100%.
The Charging Hub will sound an alert when the battery has been fully charged. The alert can be turned on or off by toggling the switch under the hub.
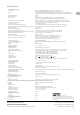
Connect the Intelligent Flight Batteries to the aircraft and power them on. If battery temperature is lower than 15° C, the system will auto heat the batteries to maintain
a temperature between 15° and 20° C.
Pairing Intelligent Flight Batteries is recommended. This can be done with the DJI GO 4 app.
Power Outlet
100~240 V
(50Hz/60Hz)
Using the IN2CH Charging Hub, charging time
is approximately.
TB50-M200: 1 hour and 30 min (two batteries)*
TB55: 2 hours and 33 min (two batteries)*
Charging Time:
2 hours and 24 min*
Using the WCH2 Charging Hub,
charging time is approximately
1 hour and 11 min (one battery)*
*Provided charger
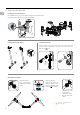
A
2
1
A
B
B
B
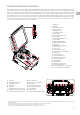
Mounting Monitor and Remote Controller Batteries
Ensure that Part B is
unlocked. Connect Part
B to Part A.
Lock the Mounting
Bracket.
Use a coin to adjust the
tightness of the tilt axis.
Mounting the Monitor to the Remote Controller
B
A
Low
High