
Quick Start

7
EN
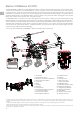
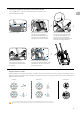
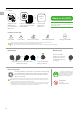
Mounting the Gimbal and Camera
Press the Gimbal
Detachment button
to remove the cover.
Align the white and
red dots and insert
the gimbal.
Rotate the gimbal
lock to the locked
position.
Make sure to press down the gimbal detachment button when rotating the gimbal lock to remove the gimbal and camera. The gimbal lock should be fully rotated when
removing the gimbal for the next installation.
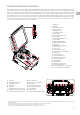
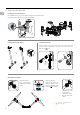
Mounting the Intelligent Flight Batteries
Insert a pair of batteries.
Press once to check the battery level.
Press again and hold until the batteries turn on or off.
Only use battery slot B when only using one battery to supply power.
Make sure to press the Battery Removal button when removing the battery.
A
B
Low
High
1
3
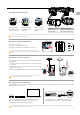
This manual uses the Datalink Pro 900 as an example. Please refer to the
D-RTK and Datalink Pro user guides for more details.
For the M200 series, only mount the D-RTK Ground System to
the M210 RTK.
1. Rotate the screws to secure the antenna bracket, and install
the battery.
2. Rotate the clamp to secure the battery, and install the
Datalink Pro antenna.
3. Install the D-RTK Ground System onto an appropriate tripod.
Mounting the D-RTK Ground System
4
5
2
1/4"or3/8"
Ensure that the D-RTK Ground System is powered on rst. DO NOT power on the aircraft before the D-RTK Ground System’s Working Status LED is solid green.
Set the Flight Mode Switch to P mode or F mode.
Activating D-RTK and Datalink Pro
For the M200 series, you can only activate D-RTK and Datalink Pro with the M210 RTK. Be sure to activate both with DJI
Assistant 2 before rst time use.
Connect the Datalink Pro Air System, Datalink Pro Ground
System, and D-RTK Ground System one by one to the
computer with a Micro USB cable for activation.
Connect the aircraft to the computer and toggle the
USB Mode Switch to the RTK position for activation.
Micro USB
11
2
3
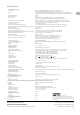
Gimbal Connector II Gimbal Connector I
Zenmuse XT Zenmuse X4S/X5S/Z30
Zenmuse Z30 Zenmuse X4S/X5S/XT