
Installation & Assembly
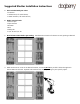

5. Set shutters aside for a moment, and use 1/4” bit to drill into holes in the wall from the previous step.
This will widen the holes in the wall sufficiently to accept wall anchors.
6. Use a hammer to lightly tap all 10 wall anchors into holes until flush with the surface of the wall.
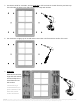
7.
Final step:
Hold shutters so holes
align with wall anchors,
and use Phillips bit to
install fasteners into
wall anchors.
Countersinking is
recommended if you
prefer fasteners to be
flush with exterior
surface of shutters.
WARNING: This product can expose you to Formaldehyde (gas), Carbon Black (airborne, unbound particles of respirable size), N- methylpyrrolidine, Cumene, Ethylene glycol (ingested), and Toluene,
which are known to the State of California to cause cancer, birth defects, or other reproductive harm. For more information, go to: www.p65warnings.ca.gov.