
Specifications

3
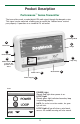
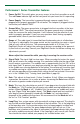
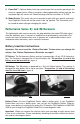
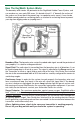
Performance™ Series Transmitter Features
1. Power On/Off: This switch gives you easy access to turn the transmitter on or off.
The red
Power indicator light on the front panel lets you know that it is operating.
2. Power Supply: The transmitter is powered through a power supply that is
plugged into a properly grounded 110 volt outlet. The adapter is plugged into the
transmitter jack labeled “PWR.”
3. Ground Wire: The green ground wire is plugged into the transmitter at the loca-
tion labeled “GND.” The round connector on the green ground wire is attached
under the screw on the outlet faceplate. It will, however, only be effective if your
outlet is properly grounded. If you have any questions about having a properly
grounded outlet, consult your local electrician.
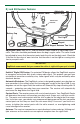
4. Range +/-: The radio signal is transmitted from the boundary wire in all directions.
The signal is adjusted by the range control on the transmitter to create a signal
field on each side of the wire. The recommended width is 6-10 feet. Your
DogWatch Dealer will adjust the radio signal distance according to the personal-
ity and traits of your dog. Consult your DogWatch Dealer first before making any
adjustments yourself.
Never adjust the transmitter while your dog is wearing the receiver collar.
5. Signal Field: The signal field has two areas. When your dog first enters the signal
field, he will receive an audible warning. If he continues further into the signal field,
he will receive a correction. The audible area is approximately the first 10% of the
total signal field. To prevent your dog from entering the signal field and remaining
in the audible area causing depletion of the battery, the receiver will transition from
an audible warning to a short warning correction after a period of 10 seconds. This
will activate regardless of the mode switch setting, but will not activate if the receiv-
er is in the “Audible Only” Training Level
(see Phase 1: page 15).
6. Rate: This adjusts to three levels (1-slow, 2-medium, 3-fast). When your dog gets
a correction, he receives it in a series of pulses. Increasing the
Rate means that he
will receive a greater number of pulses per second.
7. Mode: This turns the stimulation on and off. If your dog enters the signal field with
the
Mode “on,” (Full Function) he will receive an audible warning followed by a cor-
rection. When the
Mode is “off,” (Audible Only) he receives an audible only warn-
ing (see “Signal Field” description above). The
Mode should only be turned off if
your dog has been thoroughly trained with the
Mode “on” and consistently
responds to the audible warning alone. We recommend that the
Mode be left in
the “on” or “Full Function” position.
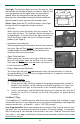
8.
Loop Plug
:
Y
our system comes with zip cord with a plug on one end. This plug fits
into the hole marked “
Loop” on the bottom of the transmitter. This is the beginning
of the boundary wire. Once your boundary wire has been properly installed and
plugged into the transmitter, the green
Loop indicator light will turn on. If the
boundary wire is broken or the signal is interrupted, the
Loop indicator light will go
out and an audible warning will sound. If the Loop light is out, consult your Dealer.
You should also check around your property for a visible broken wire.