
Installation Guide


4
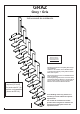
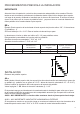
No. of rises No. of steps:
One less than
no. of rises
X: Distance from bottom
step tread front to wall
Y: Vertical measurement of
wall - lower oor to upper
oor
12 11 63” 87
1
/
2
” – 106
1
/
4
”
13 12 68
1
/
8
” 94
1
/
2
” – 115”
X
Y
R1-99672-USA-01 / 10-03-2011
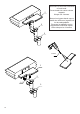
BEFORE INSTALLATION
IMPORTANT
Before starting installation, calculate the exact rise height of each step of the staircase. This is
done by measuring the distance from the lower oor to the upstairs oor measuring vertically
along the wall and then dividing by the number of rises. The number of rises is the same as the
number stair treads plus 1. The plus 1 is to consider distance of the last step of the staircase to the
upstairs oor.
BB =
Example: Top edge of oor to top edge of next oor: 102”, 12 rises (11 steps + 1).
102” divided by 12 = 8 ½”. This is the rise height per step.
The opening in the ceiling should not be less than 51 ¼” for straight ights of steps.
This is to ensure that walking up the steps is a comfortable experience.
Recommended rise height: 7
5
/
16
” to 8
1
/
16
”
Maximum rise height: 7
5
/
16
” to 8
1
/
16
”
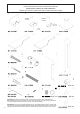
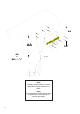
INSTALLATION
Top step element
AA =
Measure (from the top edge of the top oor) the calculated rise height plus the thickness of one
step (e.g. step 1
3
/
8
” thick + calculated rise height 8 ½” = 9
11
/
16
”).
This is the installation height for the top edge of the step support.
Please look at page 5 - BB: Is the calculated rise height e.g. 8 ½”.
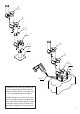
It’s important to support the staircase temporarily during installation to prevent the weight of the
stairs to skew the riser measurements before fastening the lowest column support to the oor -
please see page 6.
NOTICE: VERY IMPORTANT - Staircase is to be assembled from the top oor down.
NOTICE: VERY IMPORTANT - WHEN MOUNTING OUTSIDE BANISTER
If the staircase is mounted with a turn, please note that the distance between the banister
elements may vary from 5
5
/
16
” to 13
9
/
16
” when mounting the outside banister.