
Installation Guide


WOOD DUST CAUTION!
SAWING, SANDING OR MACHINING WOOD PRODUCTS CAN
PRODUCE WOOD DUST WHICH CAN CAUSE A FLAMMABLE OR
EXPLOSIVE HAZARD.
WARNING: Modifications to this product can release wood dust, a
substance known to the State of California to cause cancer.
WOOD DUST MAY CAUSE LUNG, UPPER RESPIRATORY TRACT,
EYE AND SKIN IRRITATION. SOME WOOD SPECIES MAY CAUSE
DERMATITIS AND/OR RESPIRATORY ALLERVIC EFFECTS. THE
INTERNATIONAL AGENCY FOR RESEARCH ON CANCER (IARC)
HAS CLASSIFIED WOOD DUST AS A NASAL CARCINOGEN IN
HUMANS.
• Avoid dust contact with ignition source.
• Avoid prolonged or repeated breathing of wood dust in air.
• Avoid dust contact with eyes and skin.
• First Aid: If inhaled, remove to fresh air. In case of contact, flush
eyes and skin with water. If irritation persists, call a physician.
To ensure that your installation goes smoothly, please read these
instructions thoroughly prior to starting.
DANGER: Failure to follow warnings and cautions could result in
serious injury. Do not exceed the maximum load capacity. Do not
stand on cabinet. Use cabinet on level ground.
WARNING: Base cabinet supports a maximum weight of 150 lbs.
Exceeding maximum weight limit will compromise the integrity of
the cabinet structure and could cause the cabinet to fail.
CAUTION: Do not sit, stand or hang from the cabinet.
Vanity: To clean surface of doors or cabinet, use non-abrasive
cleaners and/or cleaning agents that do not contain solvents.
Vanity Top: Your vanity top will remain in its original state if you
maintain and clean it properly. Clean the surface with a glass
cleaner or other household cleansers that are non-abrasive. Using
abrasive cleansers will damage the surface.
Mirror: Use non-abrasive cleansers only.
CARE AND CLEANING
SAFETY INFORMATION
FOR CALIFORNIA CUSTOMERS ONLY
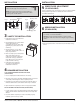
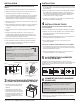
Fig.1
right spring clip
Fig.2
left spring clip
DRAWER REMOVAL
1
FULL EXTENSION DRAWER GLIDE REMOVAL (IF APPLICABLE)
1. Open the drawer as far as possible.
2. Identify the plastic spring clips located in both slides.
3. At the same time, press the right slide spring clip downward
and the left slide spring clip upward (Fig.1 & Fig.2).
4. Once both spring clips are held in the indicated position, pull the
drawer straight out.
EPOXY DRAWER GLIDE REMOVAL (IF APPLICABLE)
1. Open the drawer as far as possible.
2. Lift the front part of the drawer to reach a 30º angle position.
3. Pull the drawer straight out.
INSTALLATION
PRE-INSTALLATION - TOOLS REQUIRED
Level
Phillips screwdriver
Safety gloves
Safety glasses
Measuring tape
Wrench
Silicone
Drill
Rag
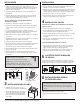
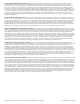
WALL CABINET INSTALLATION
2
INSTALLATION INSTRUCTIONS FOR DRYWALL
1. Determine the desired wall location for the cabinet.
2. Locate at least 2 wall studs and mark their location.
3. Determine desired height for top of cabinet and mark a
horizontal line on the wall using a level (Fig.3).
4. Install the wall hanging cleat (included) to at least one wall stud
6.5" below the marked horizontal line using a minimum of 2
drywall anchors (not included)(Fig.3).
5. Hang the cabinet to the installed wall hanging cleat (Fig.4).
6. Secure cabinet to at least 2 wall studs through the cabinet’s back
top cleat using a minimum of 4 drywall anchors (not included).
INSTALLATION INSTRUCTIONS FOR CONCRETE OR BRICK WALL
1. Determine the desired wall location for the cabinet.
2. Determine desired height for top of cabinet and mark a
horizontal line on the wall (Fig.3).
3. While holding the wall hanging cleat (included) 6.5" below the
marked horizontal line drill through wall hanging cleat just
enough to mark the position of installation (Fig.3).
4. Remove wall hanging cleat and finish drilling holes in the wall.
5. Secure wall hanging cleat to wall by using a minimum of 2
concrete or brick wall anchors (not included).
6. Hang the cabinet to the installed wall hanging cleat (Fig.4).
7. Mark the wall hanging cleat (included) with desired wall anchor
location; drill a hole through the cabinet’s back top cleat, enough
to make a mark on the wall.
8. Remove cabinet and finish drilling holes to the wall.
9. Secure cabinet to wall through the cabinet’s back top cleat using
a minimum of 6 concrete or brick wall anchors (not included).