
Installation Guide


NOTE: Some mirrors have hanging brackets that allow
for vertical or horizontal installation.
NOTE: Be sure the hanging hardware is rated to handle
the weight of the mirror. The mirror weight is approximately
20 lbs.
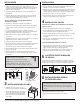
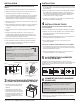
A
Used to adjust door height
A
B
Used to adjust gaps between
doors
B
Used to adjust between
door and cabinet
C
C
CABINET FRONT VIEW CABINET FRONT VIEW
CABINET SIDE VIEW
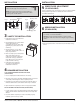
NOTE: When installing the hanging cleat,
make sure the angle cut is facing the wall.
NOTE: Use at least 4 wall anchors when installing a
24" and 30" cabinet. Use at least 6 wall anchors when
installing a 36" and 48" cabinet.
horizontal line
Fig.4Fig.3
6.5"
WALL
wall hanging cleat
wall stud
wall hanging cleat
back top cleat
3
Please contact (USA) 1-800-235-7747 for further assistance.
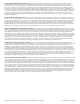
DRAWER INSTALLATION
4
FULL EXTENSION DRAWER GLIDE INSTALLATION
(IF APPLICABLE)
1. Close completely both slides attached to the vanity.
2. Move the component of the slides with ball bearings to the front
of the slides, maintaining the slides completely closed.
3. Carefully line up the slides of the drawer box with the slides in
the base cabinet and close the drawer all the way to the back.
4. Open the drawer completely to ensure it is properly installed.
EPOXY DRAWER GLIDE INSTALLATION (IF APPLICABLE)
1. In a 30º angle position, introduce the drawer in the base cabinet
making sure the drawer slide wheels are above the vanity slide
wheels.
2. Close the drawer completely to ensure it has been properly
installed, open it as far as possible.
MIRROR INSTALLATION
(IF INCLUDED)
6
INSTALLATION
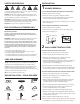
VANITY TOP INSTALLATION
3
1. Install the faucet per manufacturer’s
installation instructions.
2. Hand tighten the pop-up drain with a
wrench. Be careful not to
over-tighten the pop-up drain. Over
tightening may cause cracks on the
marble top.
3. Set the vanity top on top of the
vanity base, checking the location of
the p-trap and drain.
4. Remove vanity top from vanity base.
Apply a thin bead of silicone
compound around the vanity base
and set the vanity top carefully in
place. Remove any excess silicone
compound with a wet rag.
5. Install water lines and P-trap
according to manufacturer’s
installation instructions.
HINGE/DOOR ADJUSTMENT
(IF APPLICABLE)
5
The door alignment was set in the factory, but it could have shifted
during transit. If adjustment is needed, follow the instructions
provided in chart below.
INSTALLATION
1. Determine the desired location of the mirror.
2. Use appropriate screws or wall anchors (not included) to hang
mirror.