
Operation Manual


6
3 The generator tends to stall.
Causes and Solutions:
3.1 No more fuel left in the tank: refill.
3.2 Low oil level.
Check and top up.
(See Maintenance section).
3.3 Air filter is dirty.
(Have checked by qualified personnel).
4 The generator does not produce current
Causes and Solutions:
4.1 Thermal switch off.
Set it to 'on' by pushing the switches (pos. 10 fig. 6
and 14) for 230V A.C., (pos. 11 fig. 6 and 14) for 12V
D.C.
4.2
Condenser (pos. 19 fig. 8) damaged.
(Have checked by qualified personnel).
4.3 Diode rectifier (pos. 21 fig. 8) damaged.
In this case, only the 12V D.C. and the green LED on
the control board are not working.
(Have checked by qualified personnel).
4.4 Rotor diodes damaged.
(Have checked by qualified personnel).
4.5 Frequency too low.
(Have checked by qualified personnel).
5 The unloaded current produced oscillates.
Causes and Solutions:
5.1 Too much oil in the engine: check.
5.2 Defective carburation.
Have the carburettor cleaned by qualified personnel.
5.0 MAINTENANCE OPERATIONS
IMPORTANT
Use only genuine spare parts. The generator may get
damaged if other than genuine parts having a different
quality standard are used.
To make sure that the generator keeps working to maximum
efficiency, it is essential that it is properly and regularly
maintained. Additionally, a proper maintenance grants the
generator a longer lifetime.
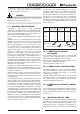
DANGER
Before carrying out any check or maintenance operation on
the genset, rotate safety switch (pos. 7 fig. 6 and 14) to "0"
position to prevent any accidental startings of the unit.
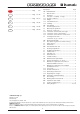
5.1 NATURE AND FREQUENCY OF CHECKS
5.2 MAINTENANCE OPERATIONS WHICH
DO NOT REQUIRE QUALIFIED
TECHNICIANS
To carry out these operations, the generator door first
needs to be opened. Therefore, the following measures
should be taken:
1) The generator must be stopped with all parts cold.
2) Let the unit cool.
3) Set the safety switch to the “0” position.
N.B.Remember to set it to the “I” position again after check!
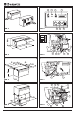
OIL LEVEL CHECK
1) Remove the oil filling cap (pos. 9 fig. 8) and clean the
dipstick.
2) Reintroduce the dipstick by screwing it in fully.
3) Remove the dipstick and check that the oil level is
between min. and max. levels.
If not, top up with the recommended oil.
4) Refit the cap.
IMPORTANT
All checks should be carried out with the genset horizontal.
5.3 MAINTENANCE OPERATIONS WHICH
REQUIRE QUALIFIED TECHNICIANS
For some maintenance operations you need to slide the unit
out on its runners (pos. 28 fig. 7 and 15) after first loosening
the fixing screws.
Inspection
▲
Change
▲
(2)
▲
(2)
Air filter Cleanin
g
(1) ▲(2)
Spark plug
Inspection-Cleaning
▲
(2)
Valve adjustment Check - adjust ▲
(2)
Fuel filter and tank
Cleaning ▲
(2)
R.p.m.
or frequency Adjust ▲
(2)
▲
(2)
Suspension points for
vibration dampers In
spection ▲
(2)
Fuel hoses Check (replace,
Every two years
(2)
if necessary)
REMARK (1):Clean more frequently when used in dusty areas
(2): Get this work done by a specialist only
ORDINARY MAINTENANCE INTERVAL
carry out at the intervals or after the running
hours given in the table, depending on which
occurs first.
Every
year
or
300 hours
Every
6 months
or
100 hours
First
month
or
20 hours
Every
3 months
or
50 hours
Every
use
Engine oil