VCR User’s Guide Changing Entertainment. Again.
Important Information WARNING CAUTION To reduce the risk of fire or electric shock, do not expose this product to rain or moisture. RISK OF ELECTRIC SHOCK. DO NOT OPEN. To reduce the risk of electric shock, do not remove cover (or back). No user serviceable parts inside. Refer servicing to qualified service personnel. This symbol indicates "dangerous voltage" inside the product that presents a risk of electric shock or personal injury.
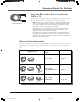
Introduction Introduction Key Features Overview Your VCR is equipped with features that will add to your recording and viewing experience. The following information summarizes a few of these features. Chapter 4 provides more information about the rest of the VCR’s features and how to use them. VCR Plus+® SILVER System The VCR Plus+ system allows for simple timer recording programming by using a single PlusCode® programming number found in most TV program listings.
Introduction TIMER RECORDINGS 1 Create a New Program 2 Review Existing Progs. 3 Use VCR Plus+ Code Express Recording (XPR) Description: XPR quickly records the remaining portion of a program already in progress. XPR is a great way to capture the end of a sporting event that has run into overtime or a live broadcast that runs long. Requirements: Repeatedly press the Record button on the VCR front panel or remote control to set the desired duration of time to record.
Table of Contents Product Registration ............................................................................................................. i Introduction ............................................................................................................................ 1 Key Features Overview ......................................................................................................... 1 Connections & Setup .......................................................................
Table of Contents Using the Remote Control ............................................................................................... 25 Remote Control Buttons ..................................................................................................... 26 Component Buttons ..................................................................................................... 26 VCR Function Buttons ..................................................................................................
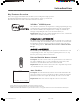
Chapter 1 Connections & Setup Chapter Overview: • Things to Consider Before Connecting • Choosing Your Connection • Making Connections • Navigating On-Screen Menus • Completing the QuickSet™ Guide • Basic Recording Changing Entertainment. Again.
Connections & Setup Things to Consider Before Connecting Components Protect Components From Power Surges • Connect all components before plugging any power cords into the wall outlet. • Always turn off the TV and other components before you connect or disconnect any cables. Position Cables to Avoid Audio Hum or Interference • Insert all cable plugs firmly into their jacks.
Connections & Setup Using the RF Coaxial Cable to Connect the VCR to a TV This graphic shows the RF coaxial cable supplied with your VCR. This will be the cable used for the basic connections represented in this chapter. Notes: To hear stereo sound, you will need to purchase Audio/Video (A/V) cables (not provided) and connect the VCR to the TV. A/V jacks and cables also provide a superior image and sound quality. For details about using this advanced setup, see the instructions on page 58.
Connections & Setup TV (back panel) VIDEO AUDIO R L / MONO IN TV L OUT CABLE/ ANTENNA S-VIDEO VCR 1 VCR ANT. IN AUDIO R L OUT RF OUT IN CH. VIDEO 3 2 4 From Cable or Antenna TV + VCR Need Some Help? If you prefer, we can provide you with the name of an Authorized Service Representative who will visit your home for a fee to install your electronic entertainment system and to instruct you in its operation. For details about this service, call 1-888-206-3359.
Connections & Setup TV AUDIO VIDEO R L / MONO IN L TV OUT CABLE/ ANTENNA S-VIDEO 1 VCR VCR ANT. IN AUDIO R L OUT RF OUT IN CH. 3 VIDEO 4 2 SATELLITE RECEIVER IN FROM ANT CH3 CH4 OUT OUT TO TV e llit te Sa VIDEO R L S-VIDEO SATELLITE IN 3 From Cable or TV Antenna 4 From Satellite TV + VCR + Satellite Receiver Note: Your television and/or satellite receiver back panels may not look exactly like the models shown here. Need Some Help? 1.
Connections & Setup TV VIDEO AUDIO R L / MONO IN TV L OUT CABLE/ ANTENNA S-VIDEO VCR 1 VCR ANT. IN AUDIO R L OUT RF OUT IN CH. VIDEO CABLE BOX 3 4 2 IN FROM ANT ox B ble Ca CH3 CH4 OUT TO TV S-VIDEO 3 From Cable Feed TV + VCR + Cable Box Need Some Help? If you prefer, we can provide you with the name of an Authorized Service Representative who will visit your home for a fee to install your electronic entertainment system and to instruct you in its operation.
Connections & Setup Set the VCR’s CH 3/4 Switch The CH 3/4 switch on back of the VCR determines what channel the TV must be tuned to see the VCR’s image. Choose whichever channel is not used locally in your area. Note: If you connected components using A/V jacks and cables, the VCR’s signal must be viewed using the TV’s Video Line Input.
Connections & Setup Using the Remote Control to Navigate On-Screen Menus The technical term is “Navigation” – how you move through the on-screen menus. The theory is the same for all the menu screens; use the corresponding number button on the remote control select it. To choose an on-screen item, press the remote control’s corresponding number button. Note: Selecting a menu item can take you to another menu, activate a choice, or activate a data entry field (such as the hour field in the Set Time menu).
Connections & Setup VCR Basics Once your initial settings are complete, you can begin using your VCR. In order to begin, you must first understand some basic concepts. Playing a Tape 1. Tune the TV to your VCR viewing channel (03, 04, or the video line input). 2. Insert a tape in the VCR. If the Auto Play feature is set to ON, the tape automatically begins playback (if the safety tab on the tape is removed). .
This page left blank intentionally 15708270 (VR661HF)(E) 04 Setup 14 2/7/01, 4:55 PM
Chapter 2 Using the VCR’s Menu System Chapter Overview: • Using On-Screen Menus • Cable Box Setup • Setting Time and Date • Setting VCR Preferences Changing Entertainment. Again.
Using On-Screen Menus Using On-Screen Menus to Set Up Features You set up many of the VCR’s features by using the menu system as discussed in the previous chapter. Each feature that appears in the QuickSet Guide is explained in this section as well as a few other features you should set up to get the most out of your VCR. Note: Not all the VCR screens are shown in this manual when explaining how to access features.
Using On-Screen Menus CABLE BOX SETUP 4. Select one of the three choices. If “ALL Channels” is selected, enter the output channel of the cable box (usually 03 or 04), or if A/V jacks connect the VCR to the TV, press the INPUT button on the VCR’s remote control. 5. Once you complete the setup, the VCR confirms that it will now receive all signals on the designated channel.
Using On-Screen Menus Changing the Signal Type This feature is useful if your cable signal goes out; it allows you to switch to a regular antenna for alternate television reception. CHANNELS 1 2 3 4 5 6 1. Press the MENU button to display the VCR MAIN MENU. 2. Press the 4 button to choose CHANNELS. 3. Press 3 to choose between Signal Type: Cable and Antenna. When finished, press 0 to exit back to the Main Menu and 0 again to exit to normal viewing.
Using On-Screen Menus Time and Date Your VCR gives you two ways to set the time and date; manually or by using the Auto Clock Set feature. Using Auto Clock Set enables the time to be updated each time the VCR is turned off by using time and date information carried in certain broadcast signals. Auto Clock Set Feature The Auto Clock Set feature is set to ON by default at the factory. In the ON setting, the VCR looks for a channel carrying time data and updates the clock automatically.
Using On-Screen Menus Setting Daylight-Saving Time 1 2 3 4 TIME Set Time and Date Auto Clock Set: ON Set Time Zone Set Daylight Saving 1. Press MENU to display the VCR MAIN MENU. 2. Press 3 to choose TIME. 3. Press 4 to choose SET DAYLIGHT SAVING. 4. Select the appropriate option. Time Data was found on channel 20. 0 Exit SET DAYLIGHT SAVING Notes: DST stands for Daylight–Saving Time.
Using On-Screen Menus 1 2 3 4 5 6 7 8 0 PREFERENCES Remote Control: VCR1 Auto Play: ON Auto TV/VCR: ON EnergySaver: 2:00 Front Panel: AUTO Tape Speed: SLP Set Auto Repeat COMMERCIAL ADVANCE Exit The PREFERENCES menu allows changes to be made to a variety of different VCR features. Additional Set Up Features in the Preferences Menu Note: The features described on the following pages are all accessed through the PREFERENCES menu. To Access the PREFERENCES menu: 1.
Using On-Screen Menus 1 2 3 4 5 6 7 8 0 PREFERENCES Remote Control: VCR1 Auto Play: ON Auto TV/VCR: ON EnergySaver: 2:00 Front Panel: AUTO Tape Speed: SLP Set Auto Repeat COMMERCIAL ADVANCE Exit Auto TV/VCR To control whether the VCR’s TV/VCR setting changes automatically to VCRviewing mode when turned on, use the Auto TV/VCR setting. To Access Auto TV/VCR: In the PREFERENCES menu, press 3 repeatedly to toggle between Auto TV/VCR: ON and OFF.
Using On-Screen Menus Recording Speeds Tape Speed SP (Standard Play) Gives the best quality recording, but fewer programs can be recorded on the tape. You can choose as the preferred recording tape speed either Standard Play (SP) or Super Long Play (SLP). The speed selected appears in the VCR’s front display panel and in timer and VCR Plus+ system recording menus. SLP (Super Long Play) Gives three times the recording time of tapes recorded in SP mode.
This page left blank intentionally 15708270 (VR661HF)(E) 05 Menu 24 2/7/01, 4:56 PM
Chapter 3 Using the Remote Control Chapter Overview: • Buttons on the Remote Control • Programming the Remote to Operate Other Components • How To Use the Remote After You’ve Programmed It Changing Entertainment. Again.
Using the Remote Control Remote Control Buttons The backlit remote has a light button ( ) that glows in the dark. Press this button to light the buttons on the remote. The remote buttons remain lit when they are pressed within a few seconds of each other. If a button is not pressed within approximately seven seconds, the light turns off to conserve battery power. ON•OFF TV The remote control is capable of controlling your VCR and many brands of televisions.
Using the Remote Control PAUSE Pauses playback or recording. Press PAUSE a second time to return to playback or recording. PLAY Plays a tape. RECORD Starts VCR recording. Also used for Express recording. REVERSE Rewinds the tape when the VCR is stopped. Searches backward through a tape during playback. Starts slow motion during play-pause and decreases slowmotion speed. SEARCH Displays INDEX and GO-TO Search menus on screen when the VCR is stopped.
Using the Remote Control Using the INPUT Button Use the INPUT button to toggle through the available Video Line Input sources (L1, L2, and regular broadcasting signals) and regular broadcast signals. Video Line Input allows you to view the image from a connected device (like a camcorder) through the VCR. 1. Press the remote control’s VCR button to activate VCR-controlling mode. Make sure that the VCR is turned ON. 2. Press the remote control’s INPUT button to tune to the Video Line Input source.