English ip880dect Owners Manual
Index About this User Manual 1 Welcome ����������������������������������������������������������������������������������������������������������� 1 Handset – view 2 Display ��������������������������������������������������������������������������������������������������������������� 2 Gateway – view 3 Gateway – rear view ������������������������������������������������������������������������������������������ 3 Gateway – front view �����������������������������������������������������������������
Settings 22 Audio Settings 22 Telephony Settings 22 VoIP settings 23 Internet Settings 23 System Settings 24 Firmware update ��������������������������������������������������������������������������������������������� 25 Restore configuration settings ������������������������������������������������������������������������ 25 Configuring via web-interface 26 Configure using a web browser ����������������������������������������������������������������������� 26 Home ���������������������
About this User Manual Welcome Thank you for purchasing the Doro ip880dect. This user manual describes how to install, configure, and use the phone, enabling you to make Internet calls, landline calls, and receive on-screen information services. This user manual consists of a number of sections to guide you through the process of installing, configuring, and setting up your phone for first use. These sections are best read from beginning to end.
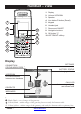
Handset – view 1� Display 2� Volume UP/DOWN 3� Speaker 4� Line button/R button (Recall) 1 2 3 4 5 6 5� Keypad 6� Headset jack 10 9 8 7 7� Disconnect ON/OFF 8� Navigation buttons 9� OK button 0 10� LEFT/RIGHT softkey Display SETTINGS CONNECTION STATUS INDICATORS 1) BATTERY STATUS and charging indicator INTERCOM for communication between two handsets CALL LOG for incoming, outgoing and missed calls CONTACTS MESSAGES 1) Black/black - out of range of the gateway Yellow/black - within range of the ga
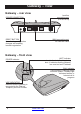
Gateway – view Gateway – rear view Landline connection port (POTS/PSTN) POWER CONNECTION WAN connection port for Ethernet cable RESET BUTTON for activating configuration changes and enabling handset registration Gateway – front view I-NET indicator I-net indicator is flashing during boot. It indicates that the gateway has received an IP address POWER indicator indicates power on CALL indicator Call indicator is flashing during firmware update.
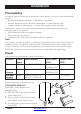
Installation Prerequisites In order to take full advantage of the features of the phone, you need to have the following in place: • Broadband Internet connection – cable, DSL, or equivalent • Internet Telephony Service Provider subscription – to make Internet calls • Landline telephone subscription – to make ordinary phone calls (optional) Furthermore, before you start the installation process, make sure that you have the following close to the gateway: • Wired Ethernet router or broadband modem • Power ou
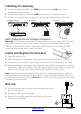
Installing the Gateway 1� Connect the Ethernet cable to the WAN port and then to a LAN port on your broadband modem or router. 2� Connect the telephone cord to the LINE port and then to a telephone outlet. 3� Connect the appropriate power adapter to the gateway and to a mains power outlet.
First setup via the handset Before you start using your phone, we strongly recommend that you set handset language, country selection, time zone, and routing of emergency numbers to ensure that your functions properly. Set handset language 1� Press 0, choose Settings and press 0. 2� Choose System settings 0, and then choose Language. Press 0. 3� Choose the preferred language and press the 0. Please note that you need Internet access to download other languages besides English.
Country selection Setting the country selection properly ensures, among other things, that you can make and receive landline calls and receive Caller ID information on your phone if supported by your telephony provider. It is therefore important that you specify in which country you are using the phone. 1� In the Main menu, choose Settings and press 0. 2� Choose System settings, press 0, and then choose Country and press 0. 3� Select the country that you are in, and then press 0.
Configure VoIP servers and accounts. VoIP Server 1� In Idle mode, press 0, choose Settings, and press 0. 2� Choose VoIP settings, and press 0. 3� Chose Server 1 (and Server 2 if required) and then press 0. You then specify the Domain and the SIP proxy. • Choose Domain and press 0. • Enter the domain name. Press 0. • Choose SIP proxy, press 0, and then key in domain name or IP address of the SIP proxy, if it is different from the Domain. SIP Account(s).
First setup via web-interface The following sections describe how to configure and set up your phone for first use. You have to configure your phone before it is ready for first use. You will need the account information that you received from your SIP Service Provider to complete the configuration of your phone. Configure using a web browser 1� Open a browser on your PC; go to the IP address of the gateway (Press the volume up key to get the IP address). 2� Log in to the menu.
Making and answering calls With this phone you can make both Internet and landline calls. All outgoing calls are by default Internet calls unless you specify otherwise. The following sections describe how to make and answer Internet and landline calls. Internet call If your primary line is Internet, you do the following to make an Internet call. • In Idle mode, type the number you want to dial, and then press O . If your primary line is Landline, you do the following to make an Internet call.
• • • • Firmware update is in progress Battery is empty Power failure Handset is out of range of the gateway Landline Calls When you make and receive landline calls, the following icons are displayed: • Calling • Ongoing call Make a landline call If your primary line is Internet, you do the following to make a landline call. • In Idle mode, type the number you want to dial, press the Options key, and then choose Call on landline. Press 0.
1� In Idle mode, type the speed dial number assigned to the contact you want to call. 2� Press the Options key, choose Call on landline, and then press 0. Answer a call • Pick up the handset, and then press O . You can also set the phone to auto answer when you pick up the handset from the charger. Lock and unlock the keypad 1� In Idle mode, press *, and then press the Lock key. 2� To unlock, press *, and then press the Unlock key.
When you select a number in the call log and press the Options key, you have the following options: Option What it does Add as contact Opens a text editor so that you can add the selected number as a contact. Opens Contacts so that you can add the selected number to an Append as already existing contact. contact Opens the number editor so that you can edit the number before Edit for call calling. Deletes the selected number from the call log. Delete Delete list Deletes all numbers in the call log list.
Answer an Internet call during an ongoing landline call 1� Press O . The current call is automatically put on hold. 2� Press the Options key, and then choose Swap calls to switch between the two calls. 3� Press L to end the ongoing call. Answer a landline call during an ongoing Internet call 1� Press O . The current call is automatically put on hold. 2� Press the Options key, and then choose Swap calls to switch between the two calls. 3� Press the L to end the ongoing call.
Intercom You can register up to 8 handsets to the same gateway and you can have up to 8 different VoIP accounts provided they belong to the same Internet Telephony Service Provider. However, you can only have 4 active calls at a time: 3 Internet calls and 1 landline call. If you use Call Groups, you should only include up to 6 handsets in a Call Group, because only 6 handsets at a time can receive incoming calls.
Give your handset a name Naming your handsets can be useful when you register extra handsets with the gateway. This way you can easily identify the various handsets when you make internal calls. When the phone is in Idle mode, the name of the handset is displayed. If you do not name your handsets, they are numbered consecutively starting with Handset 1, which is the handset first registered with the gateway. 1� In the Main menu, choose Settings, and then press 0.
Making conference calls Conference call with one external party and two internal parties. You can make a 3-way conference call that includes two handsets registered with the same gateway and either an Internet call or a landline call. 1� During a call, press the Hold soft key. 2� Press the Options key, choose Intercom, and then press 0 3� Choose the preferred handset, and then press 0. 4� When the other handset has answered the call, press the Options soft key, choose Conference, and then press 0.
Contacts Contacts are used for storing names and numbers so that you can easily find the person or company you want to call. The Contacts menu consists of one or more tabs that you can scroll through using the navigation keys on the handset. The number of tabs depends on how many groups you have created. The names and numbers are listed in alphabetical order on the tabs. You can store up to 170 contacts, and you can add 4 numbers to each contact.
The first number you save for a contact is automatically the default number. If you use speed dial, for example, it is always the default number that is dialled. You can always change the default number for a contact. 1� In the Main menu, choose Contacts, press 0, and then choose a contact. 2� Press the Options key, choose Edit contact, and then press 0. 3� Choose the number you want as default number, and then press the Edit key. 4� Press the Options key, choose Default, and then press 0.
Groups Create a group You can organize your contacts into appropriate groups to gain an easier overview of all your contacts, and you can specify a different ringer melody for each group. When you create a group, a new tab named after the group is automatically added to the Contacts menu. The tab contains all the members of the group. 1� In the Main menu, choose Contacts, and then press 0. 2� Press the Options key, scroll down and choose Groups, and then press 0.
Remove a contact from a group 1� In the Main menu, choose Contacts, press 0, and then choose the contact that you want to remove from a group. 2� Press the Options key, choose Edit contact, and then scroll down and select Groups. 3� Choose the group from which you want to remove the contact, and then press 0. 4� Press L , press the Save key, and then press the Yes key when prompted to save. Change a ringer tone for a group You can specify a different ringer tone for each group you create.
Settings Audio Settings The following settings are available in the Settings/Audio Settings menu: 1� Ringer Melody: Choose the type of call and specify a ringer melody. 2� Ringer volume: Adjust the volume. 3� Message tone: Set tone, select Silent for no message tone. 4� Keypad sound: Set sound, select Silent for no keypad sound. 5� Advisory tones: Set the following advisory tones. Battery alert: Battery warning ON/OFF. Range tone: Handset is out of range ON/OFF. Confirmation: Tone after action.
6� Primary line: The primary line setting determines which line is used for outgoing calls when you press O . Select Landline or VoIP line. 7� VoIP line: The VoIP line setting determines which VoIP account is used for outgoing VoIP calls. Select the VoIP account you want to use for outgoing VoIP calls. All nicknames for the VoIP accounts you subscribe to are listed. If you only have one account, only one nickname is listed.
System Settings The following settings are available in the Settings/System Settings menu: 1� Time and Date: By default, date and time are automatically synchronized with a time server on the Internet to ensure that the time and date displayed on the phone is always correct, but you can always disable automatic time setting. Auto set time: Select Disabled/Enabled to automatically synchronize time. Time server: If the pre-configured time server fails you may set another.
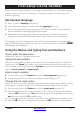
Firmware update When new firmware is available the displays reads: “New firmware available”. 1� Press 0. The Firmware update menu appears. 2� To update to the latest version, choose the update listed on the Simple tab, press 0, and then press Yes when prompted if you want to update the system. If you press the View soft key before you start installation, you can find out about the software version number and the date and time it was released. 3� Select language and press 0.
Configuring via web-interface The following sections describe how to configure your phone via the web-interface. Configure using a web browser 1� Open a browser on your PC; go to the IP address of the gateway (Press the volume up key to get the IP address). 2� Log in to the menu.
Home Start page displaying system and status information. Phone Type: Hardware type MAC-Address: Unique hardware address IP-Address: IP address Firmware-Version: Doro-ip880-DECT-SIP/01.03//09-May-08 11:32 Firmware-URL: Firmware update location SIP Identity Status: Displays status information of each account VoIP Server 1 (or 2) In the menu, select and configure VoIP Server 1 (and VoIP Server 2 if required): • Server is local: Yes or No.
Management Settings In the menu, choose Management Settings to configure the following: • Configuration server address: Enter the URL of the settings server where the phone is supposed to obtain the configuration file. • Firmware update server address: Enter the URL of the firmware image file. This address should normally not be changed. • Firmware path: Enter the path of the firmware image file. This path should normally not be changed. • Management password: This password should normally not be changed.
SIP/RTP Settings SIP/RTP ports can be defined if server or routers requires it. • Silence suppression for G729: This defines if silence suppression shall be used. This is only used if the codec supports it. Currently supported: G729 annex B • SIP/RTP port range: The number of ports that can be used for RTP audio streaming • SIP/RTP port: The first RTP port to use for RTP audio streaming • Local SIP port: Port used for first user agent (UA) instance.
Telephony Services In the menu, choose Telephony Services to configure the Call Forwarding codes for each line/account. It is not possible to activate Call Forward before these settings are done: You can either specify a complete number that the Call Forward always will be directed to or you can specify 'x' (small letters) as wildcard. Call Forward is server based. • Forward on busy activate: Activation code for Call forward on busy (ex.
Time Settings In the menu, choose Time Settings to configure Automatic Time settings for your phone. • Time server: Set IP address or URL for a valid time server. • Time server refresh interval: Network time update frequency. Time between fetch of network time. • Timezone: The local time zone (the difference from GMT) • Daylight Saving Time (DST): Enable/disable DST changes to display time. • DST Fixed By Day: Specifies whether or not to use a fixed day when applying DST changes.
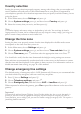
Provisioning This section describes how to provision the phone using hosted configuration server and hosted firmware update server. The servers can either be a TFTP server or a HTTP server. From the production the phones are configured to retrieve firmware from an Doro hosted server (http://www.doro.com/downloads/ip880dect/upgrade/). The Doro server should normally be kept as Firmware server unless you network topology requires differently.
Creating Configuration Files You must create a configuration file for each phone. The phone interfaces with the configuration server through a text-based configuration file for downloading. Note! When creating or editing configuration files, use a standard text editor like Notepad. XML editors, Microsoft Word, and other types of editors may leave hidden extended characters that may cause problems. The location from which configuration files can be downloaded is preset.
///-----------Network Settings-----------%SIP_RPORT_ENABLE%:1 //0-disable, 1-enable, a way around NAT %SIP_STUN_ENABLE%:0 //0-disable, 1-enable stun services %NETWORK_STUN_SERVER%:”stun01.sipphone.com” //STUN Server address %SIP_STUN_BINDTIME_GUARD%:80 //seconds how often the system will guard the NAT bindings %SIP_STUN_BINDTIME_DETERMINE%:0 //0-disable, 1-enable %SIP_STUN_KEEP_ALIVE_TIME%:90 //seconds how often keep-alives are sent //------------Network Time--------------%NETWORK_SNTP_SERVER%:”europe.pool.
// ------------- Registration 4 ------------------%SUBSCR_3_SIP_UA_DATA_SIP_NAME%:”” %SUBSCR_3_UA_DATA_DISP_NAME%:”” %SUBSCR_3_UA_DATA_AUTH_NAME%:”” %SUBSCR_3_UA_DATA_AUTH_PASS%:”” %SUBSCR_3_SIP_UA_DATA_VOICE_MAILBOX_NUMBER%:”” %SUBSCR_3_SIP_UA_DATA_SIP_NAME_ALIAS%:”” %SUBSCR_3_SIP_UA_DATA_VOICE_MAILBOX_NAME%:”” %SUBSCR_3_SIP_UA_DATA_SERVER_ID%:0 // ------------- Registration 5 ------------------%SUBSCR_4_SIP_UA_DATA_SIP_NAME%:”” %SUBSCR_4_UA_DATA_DISP_NAME%:”” %SUBSCR_4_UA_DATA_AUTH_NAME%:”” %SUBSCR_4_UA_D
Through the web interface 1� 2� 3� 4� Press the Volume Up key to show the local IP address of the gateway on the display. Type this IP address into the address field of your web browser. Log in using the username and password. The default setting for both is “admin”. Enter the IP address or FQDN of your boot server in the Configuration Address field of the Management Settings section. 5� Click on Save Changes. 6� Click on Reboot for the change to take effect.
Troubleshooting The following is a list of solutions to the most common issues that you may experience. Most of the problems you can easily solve yourself, whereas others require that you contact your service provider. Problem The handset display is black. The handset does not charge. Possible Causes 1) Handset is in power saving mode. 2) Battery is drained. 3) Power is not turned on. 1) The charger is not powered. 2) Battery is not inserted correctly. Possible Solutions 1) Press any key.
Problem I cannot make Internet calls, the VoIP indicator on the gateway is not lit, and the right status indicator in the upper left corner of the display is black. Possible Causes 1) The configuration of the phone is not complete. 2) The gateway has not been reset after you saved the configuration. 3) The router uses port forwarding. 4) The router blocks Internet telephony. 5) The router firmware needs updating. I cannot make Internet calls, but it worked yesterday.
Other Specific Absorption Rate (SAR) This device meets applicable international safety requirements for exposure to radio waves. The cordless handset measures 0.06 W/kg (measured over 10g tissue). The max. limit according to WHO is 2W/kg (measured over 10g tissue). Declaration of conformity Doro hereby declares that the product Doro ip880dect conforms to the essential requirements and other regulations contained in the directives 1999/5/EC (R&TTE), 2002/95/EC (ROHS).
Index www.doro.
English Version 1.