
Instructions


08
06 | FIRST COMMISSIONING
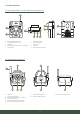
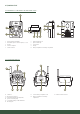
06.1 INSERTING THE BATTERIES INTO THE RECEIVER
Slide down the battery compartment cover (10) to open it. Insert 3 pcs AAA LR03
batteries (optional) according to the polarity markings +/- in the battery compart-
ment. Close the battery compartment lid.
06.2 INSERTING THE BATTERIES INTO THE MOTION DETECTORS SENDERS
Unscrew the screw (17) of the battery compartment cover and remove the battery
compartment cover (18). Insert 3 pcs AAA LR03 batteries (optional) according to the
polarity markings +/- in the battery compartment. Close the battery compartment
and screw on the screw again.
07 | OPERATION
07.1 TURNING ON/OFF
Receiver:
To turn on the receiver, switch the On/O switch (8) to position ON. The LED power
indicator (6) flashes red. To turn the receiver o, switch the On/O switch (8) to
position OFF.
Motion detectors (senders):
To turn the motion detectors on, press the On/O button (15). The On/O button
flashes green for about 2 seconds. Then the green LED will shut down to save bat-
tery power — but the motion detector is still on and ready for operation. To turn the
motion detectors o, press the On/O button (15) for about 3 seconds.
07.2 CONNECTING THE RECEIVER WITH THE MOTION DETECTORS
1. Set the On/O switch of the receiver (8) to the ON position. The LED power indi-
cator (6) flashes red and indicates readiness for signal reception.
2. Press the On/O button (15) of the motion detectors.
3. The motion detectors now connect automatically with the receiver. While con-
necting the corresponding LED signal indicator (2) flashes green with sound
and vibration. After successful connection the LED signal indicators (2) will light
green constantly.
LED indication kit with 2 motion detectors (Item No 204802)
LED No. 1 lights green constantly Motion detector 1 is active
LED No. 2 lights green constantly Motion detector 2 is active
LED indication with further motion detectors HA-300S
(Item No. 204802-A,-B,-C optional)
LED No. 3 lights green constantly Motion detector 3 is active
LED No. 4 lights green constantly Motion detector 4 is active
LED No. 5 lights green constantly Motion detector 5 is active
NOTE
•
The distance for connection is approx. 300 m in an open environment.
•
If distance between receiver and the motions detectors is quite far, please
pull out the receiver antenna (1) to enhance the signal.
07.3 ALARM SIGNAL
When a motion detector registered a movement, the corresponding LED indicator
flashes green. For example: motion detector 2 registers a movement = LED 2 at the
signal indicator (2) flashes and the receiver will send out a 15-second sound and
vibration alarm.
07.4 ADJUSTING THE VOLUME/EARPHONES
The volume of sound alarm can be regulated or turned o completely by turning
the volume controller (5) on the top of receiver. Optionally you can use earphones.
In this case connect the earphones (optional) to the earphones socket (4).
CAUTION: A too loud volume can damage your hearing when
using earphones!
07.5 VIBRATION ALARM
The vibration alarm is always active and cannot be regulated.
07.6 OPTIONAL MOTION DETECTORS SENDERS
Item No Model
204803-A DÖRR Motion detector (sender) No. 3
204803-B DÖRR Motion detector (sender) No. 4
204803-C DÖRR Motion detector (sender) No. 5
08 | ORIENTATION/MOUNTING OF RECEIVER AND MOTION
DETECTORS
08.1 MOTION DETECTORS
The maximum detecting range of PIR sensor is up to 12 m and 70° in an open en-
vironment. To avoid false alarm, kindly note that no fluttering leaves/branches etc.
are near to the motion detectors. For an optimum detection of objects, we recom-
mend to mount the motion detectors in a height of min. 0,3 m – max. 2,00 m above
the ground (e.g. to a tree).
NOTE
The higher you mount the motion detectors, the lower the detection range.
Best results can be achieved with a mounting height of about 0,8 m.
To mount the motion detectors, use the supplied mounting straps. Alternatively
you can screw on the motion sensors through the mounting jack (16).
08.2 RECEIVER
With the belt clip (9) the receiver can be attached to the belt or clothing.
Alternatively the receiver should be placed protected from rain within a distance of
approx. 300 m to the motion detectors.
RECEIVER
MOTION
DETECTOR