Aladdin Hearth Products 401 N. Wynne Colville, WA99114 ADivision of Hearth Technologies Inc. THE MODEL 400 WOODSTOVE INSTALLATION & OPERATING INSTRUCTIONS Model 400 Woodstove SAFETY NOTICE: IF THIS STOVE IS NOT PROPERLY INSTALLED, A HOUSE FIRE MAY RESULT. FOR YOUR SAFETY, FOLLOW THE INSTALLATION DIRECTIONS. CONTACT LOCAL BUILDING OR FIRE OFFICIALS ABOUT RESTRICTIONS AND INSTALLATION INSPECTION REQUIREMENTS IN YOUR AREA.
MODEL 400 WOODSTOVE PLEASE RETAIN THIS MANUAL FOR FUTURE REFERENCE. Table of Contents A. Listings and Code Approvals..........................................................................................................................3 B. Woodstove System Components...................................................................................................................3 C. Pre-Installation Preparation.............................................................................................
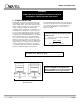
MODEL 400 WOODSTOVE A. LISTINGS AND CODE APPROVALS These installation instructions describe the installation and operation of the DOVRE® Model 400 woodstove. This stove meets the U.S. Environmental Protection Agency's 1990 particulate emission standards. Under specific test conditions this stove has been shown to deliver heat at rates ranging from 8,700 to 22,500 BTU/HR. The DOVRE® Model 400 is listed by Underwriters Laboratories Inc. to UL Safety Standard 1482 and ULC Safety Standard S627.
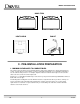
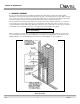
MODEL 400 WOODSTOVE DOOR TRIM DT6BK DT6G HEAT SHIELD FAN KIT 400HSB DFK1 C. PRE-INSTALLATION PREPARATION 1. MINIMUM CLEARANCES TO COMBUSTIBLES. The clearances listed in Table I are the minimum distances that must be maintained, as demonstrated in Figures 1 and 2. It is important to note that simply covering a combustible material with a non-combustible material does not offer sufficient heat protection.
MODEL 400 WOODSTOVE CLEARANCES FROM UNIT TO COMBUSTIBLES FLUE TOP FLUE REAR FLUE TOP (WITH REAR HEAT SHIELD) BACKWALL SIDEWALL CEILING 15” 24” 8” 15” 15” 15” 18” -18” Table I Minimum Clearances to Combustibles Figure 1 Flue Top Clearances Figure 2 Flue Rear Clearances Figure 3a 5-98 Figure 3b 5 72308B
MODEL 400 WOODSTOVE WARNING! COMPLIANCE WITH ALL MINIMUM CLEARANCES SHOWN IN THIS MANUAL IS NECESSARY FOR YOUR SAFETY. 2. FLOOR PROTECTION. Acombustible floor must be protected from the radiant heat given off by the unit and from the inevitable spark or falling ember. This includes almost any floor surface. Only a solid masonry or concrete floor adequately covering the distance around the unit is acceptable. Alayer of thin brick or ceramic tile over a combustible floor is insufficient.
MODEL 400 WOODSTOVE EXAMPLES OF INSULATION Required Thickness “K” Value 1" .45 MICORE 300 (Thermal Conductivity) “K” = BTU in./hr. ft2 F (based on 1” thickness) To substitute alternate insulation material, you need to know the “K” factor for that material. To calculate the required thickness for the alternate material use the following formula: “K” of brick = 5 “K” Alt. x 1 = Thickness of alternate mat. (inches) .45 5 .45 x .50 = 5.5 In. of brick. Figure 5 3. CHIMNEY HEIGHT REQUIREMENTS.
MODEL 400 WOODSTOVE Amasonry chimney or a factory-built chimney must be the required height above the roof and any other nearby obstructions. The chimney must be at least 3 feet higher than the highest point where it passes through the roof and at least 2 feet higher than the highest part of the roof or structure that is within 10 feet of the chimney, measured horizontally. See Figure 6. These are safety requirements and are not meant to assure proper flue draft.
MODEL 400 WOODSTOVE 5. MASONRY CHIMNEY. Be sure a masonry chimney meets the minimum standards of the National Fire Protection Association (NFPA) Standard 211. It must have at least a 5/8 inch/16 mm fire clay liner or a listed chimney liner system. Make sure there are no cracks, loose mortar or other signs of deterioration and blockage. It is best to have the chimney inspected by a professional and be sure to have the chimney cleaned before the stove is installed and operated.
MODEL 400 WOODSTOVE EIGHT INCH SOLID PACK CHIMNEY WITH METAL SUPPORTS AS A THIMBLE. For the method of installation to a masonry chimney shown in Figures 10 & 11, it will be necessary to purchase a 8 inch inside diameter 12 inch long section of prefabricated listed solid pack chimney to use as a thimble. Purchase a wall spacer, trim collar and a ware manufactured to fit the chimney section you purchase.
MODEL 400 WOODSTOVE Figure 10 Installation to a Masonry Chimney Figure 11 Installation to a Masonry Chimney 5-98 11 72308B
MODEL 400 WOODSTOVE CONNECTION TO A MASONRY FIREPLACE. There are several kits available to connect the stove to a masonry fireplace. Look for a listed kit. The kit is an adapter which is installed at the location of the fireplace damper. The existing damper may have to be removed to allow installation of the kit.
MODEL 400 WOODSTOVE Figure 14 Figure 13 Installation of an Interior Chimney 5-98 13 72308B
MODEL 400 WOODSTOVE Figure 15 Installation of an Exterior Chimney Figure 16 5-98 14 72308B
MODEL 400 WOODSTOVE D. STEP BY STEP INSTALLATION OF THE WOODSTOVE 1. ASSEMBLY. the heater with the bolts and nuts provided. Fur- Before assembly, place the unit near the final position, then follow the procedures below. nace cement may be used to seal under the a. Open the stove and remove all the parts and arti- Collar. See Figure 17. cles packed inside. Inspect all the parts and the Should a rear flue exit be necessary, you will cast iron body for shipping damage.
MODEL 400 WOODSTOVE WARNING! CAUTION: NEVER DRAW COMBUSTION AIR FROM A WALL, FLOOR OR CEILING CAVITY OR FROM ANY ENCLOSED SPACE SUCH AS AN ATTIC OR GARAGE. IF THE OPTIONAL BLOWER KIT IS USED, THE CORD SHOULD BE ROUTED AWAY FROM THE UNIT. 2. FIREBRICK PLACEMENT. Make sure the firebricks are in position and not broken before operating the unit. Also make sure the baffle insulation is positioned all the way against the rear of the unit.
MODEL 400 WOODSTOVE E. OPERATING INSTRUCTIONS WARNING! DO NOT ATTEMPT TO OPERATE THIS WOODSTOVE WITHOUT READING AND UNDERSTANDING THESE OPERATING INSTRUCTIONS THOROUGHLY. FAILURE TO OPERATE THIS APPLIANCE PROPERLY MAY CAUSE A SERIOUS HOUSE FIRE. The more combustion air allowed into the Firebox, the hotter and faster the fire will burn. Closing the Air Intake slows the rate of combustion resulting in a slower burning fire.
MODEL 400 WOODSTOVE STARTING THE FIRE. 1. 2. WARNING! Place several crumpled newspaper pages on the firebox floor. BUILD THE FIRE DIRECTLY ON THE FIREBRICK FLOOR. DO NOT USE A GRATE OR OTHERWISE ELEVATE THE FIRE WHEN BURNING WOOD. Cover the paper with several pieces of kindling. The kindling should be less than 1" in diameter, well seasoned, dry, split firewood. WARNING! FAILURE TO FOLLOW INSTRUCTIONS LISTED MAYAFFECT THE PERFORMANCE OF THE APPLIANCE.
MODEL 400 WOODSTOVE 7. 8. Maintain the fire by adding small pieces of firewood periodically until a uniform fire bed has been established. RE-FUELING. When adding fresh wood to an existing fire: After establishing the fire bed, and the small firewood is burning briskly, add a minimum of three average sized pieces of split firewood, place the wood in such a manner to allow combustion air and flames between them. 1. Open the air intake by moving the control lever all the way to the left. 2.
MODEL 400 WOODSTOVE WOOD FUEL. MOISTURE CONTENT. Hardwood vs. Softwood Regardless of which species of wood you burn, the single most important factor that effects the way your stove operates is the amount of moisture in the wood. The majority of the problems woodstove and fireplace insert owners experience are caused by trying to burn wet, unseasoned wood. Your woodstove’s performance depends a great deal on the quality of the firewood you use.
MODEL 400 WOODSTOVE F. MAINTENANCE INSTRUCTIONS ASH HANDLING. Open the ash grate by sliding the upper grate to the left. See Figure 19. Use a fireplace tool to work the desired amount of ash through the grate into the ash pan. Some ash on the grate is desirable to help keep an active bed of coals for refueling. We recommend emptying the ash pan at least once a day when the stove is in constant operation. The amount of ash is dependent on the type of wood being burned.
MODEL 400 WOODSTOVE To help prevent creosote build-up, always burn dry, well seasoned firewood. When re-fueling after an extended low burn rate, allow the appliance to burn with the combustion air intake fully open (temperature setting on HI) for ten to twenty minutes to burn off creosote deposits that accumulate during the low burn. WARNING! ASHES SHOULD NEVER BE PLACED IN WOODEN OR PLASTIC CONTAINERS, OR IN PAPER OR PLASTIC BAGS, REGARDLESS OF HOW LONG THE FIRE HAS BEEN OUT.
MODEL 400 WOODSTOVE DOOR GLASS. Do not strike or slam the door shut. Inspect the glass regularly for cracks or breaks. If you detect a crack or break, extinguish the fire immediately and contact your DOVRE® dealer for replacement. Aportion of the combustion air entering the firebox is deflected down over the inside of the door glass. This air flow “washes” the glass helping to keep smoke from adhering to it’s surface.
MODEL 400 WOODSTOVE 1. Availability of combustion air. Asource of air (oxygen) is required in order for combustion to take place. The air enters the firebox through an opening in the insert body. The amount of air allowed in is regulated by the draft slide control. The important thing is to realize that whatever air is consumed by the fire must be replaced. If you are using room air, the air is replaced through cracks around windows, under doors, etc.
MODEL 400 WOODSTOVE H. INSTALLATION OF REPLACEMENT GLASS WARNING! DO NOT OPERATE THE WOODSTOVE IF THE DOOR GLASS IS BROKEN OR MISSING. DANGEROUS OVERFIRING CAN OCCUR WHICH CAN DAMAGE THE APPLIANCE OR IGNITE CREOSOTE IN THE CHIMNEY, POSSIBLY CAUSING A HOUSE FIRE. 1. Make certain the fire is out and the appliance is cool to the touch. 2. Remove door from the appliance. 3. Lay door face down on a table or counter with the door handle hanging off the edge of the table so the door lays flat.
MODEL 400 WOODSTOVE THIS PAGE LEFT BLANK INTENTIONALLY 5-98 26 72308B
MODEL 400 WOODSTOVE WARRANTY Aladdin Hearth Products warrants their wood heating appliances to the original purchaser for the lifetime of the appliance, to be free from defects in material and workmanship. This warranty gives you specific legal rights; you may have other rights which may vary from state to state. This limited Lifetime Warranty covers items such as but not limited to steel and cast iron components, combustion chambers, doors, gold plating and glass damaged by thermal breakage.
Attention WOODSTOVE INSTALLER Please return these Operating & Installation Instructions to the Firebox for Consumer Use Aladdin Hearth Products 401 N. Wynne Colville, WA99114 ADivision of Hearth Technologies Inc.