
Installation&Assembly

2- The burner / pan assembly is shipped ready for
right-hand gas connection.
NOTE- If an 18” log set is being installed
with a safety pilot kit, if left-hand gas supply
connection is necessary, or if unit must be
converted for use with propane gas, follow
the steps outlined in the sections which
begin on page 3 and then continue with step
3.
3– Remove the existing cap or gas jet assembly
from the gas stub in your fireplace. Clean the
threads using either a wire brush or steel wool.
Apply Teflon tape or pipe dope to the steel
fitting and attach the provided brass adaptor to
the stub.
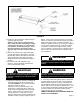
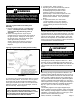
4– Place the burner / pan assembly in the
fireplace. The pan should be centered both
front to back and side to side.
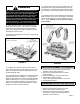
5- Bend the provided gas connector to facilitate its
installation between the burner and the gas
stub. BE CAREFUL! The connector is easily
kinked if it is bent too sharply.
Attach one end of the gas connector to the
brass elbow or safety pilot fitting. Attach the
other end to the brass adaptor at the gas stub.
NOTE– Brass-to-Brass connections do not
require pipe dope or Teflon tape to ensure
tightness. Follow the procedures outlined in the
operation section on page 5 to light the pilot or
Burner. Once burner or pilot has been lit, use a soap
solution to check the gas connection before proceeding.
Apply soapy water to each connection and watch for
bubbles. If bubbles are seen, turn off the gas, retighten
the connection, relight the burner or pilot and recheck
for tightness. DO NOT use a lighted match or other
source of ignition to check for leaks. Repeat this proce-
dure until you are sure that there are not leaks in the
gas connections.
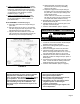
6- Pour the provided sand (Natural Gas) or Vermiculite
(Propane Gas) into the burner pan. The sand should
follow the slope of the pan, covering it and the burner
tube completely. Allow the sand to spill out the front of
the pan and over the sides onto the fireplace floor. Tear
or cut the ember material into smaller pieced to make it
look more realistic and spread the ember material
evenly over the sand (or vermiculite).
REMOVE THE PROTECTIVE COVERING FROM THE
SAFETY PILOT ASSEMBLY.
IMPORTANT
If this decorative gas log set is to be used in a pro-
pane application, complete changeover procedures
as outlined in changeover kit instructions before
continuing.
IMPORTANT
If your system includes a safety pilot, cover the pilot
assembly to protect it before installing sand and
embers.
WARNING
Provided sand must not be used in propane gas ap-
plications. Vermiculite mixture provided with pro-
pane changeover kit must be used in place of sand.
Page 2
FIGURE 2