
Installation&Assembly
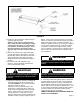
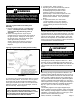

7– Center the grate over the burner pan and set it in
place as shown in figure 3. The burner pan should be
centered left-to-right between the front legs and the
grate. The front legs of the grate should be even with
front edge of the burner pan.
8- Install the two grate steps on the back of the grate as
shown in figure 3.
9- Carefully remove the two base logs from the box.
Place the longer of the two base logs in the front of the
grate. The shorter base log should be placed across
the elevated grate steps.
10– Light the burner as outlined in the operation section.
Allow the flame pattern to stabilize. You may have to
adjust the grate placement to achieve the desired flame
patter around the logs. If you move the burner/pan as-
sembly, be careful not to disturb the gas connections.
When you are satisfied with the flame pattern, shut off
the gas and continue with the next step.
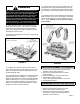
11– Arrange the top logs on top of the base logs. This
arrangement is left up to personal preference entirely.
You may have to repeat this exercise several times be-
fore deciding on your personal favorite. Refer to figure
4.
12– Spread the black cinder material evenly around the
edge of the pan on the floor of the fireplace. If possible
use the cinder material to cover the aluminum gas con-
nector. Again, DO NOT cover any part of the safety
pilot assembly.
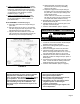
ORIFICE REPLACEMENT - 18” LOG SETS
1- Loosen the connection between the burner/pan
assembly and the safety pilot valve.
2- Remove the existing brass spacer from pilot
valve assembly.
3- Remove existing gas orifice from pilot valve.
4- Install replace orifice (provided).
NOTE– Use smaller #26 orifice for 18” log sets.
5- Re-install brass spacer.
CONVERSION FOR LEFT-SIDE GAS PIPING
1- Remove the brass hex plug from the burner
pipe on the left side of the burner pan.
2- Loosen the connection and remove either the
brass elbow or safety pilot assembly from the
right side of the burner pan.
WARNING
The sand/ember mixture can be stacked up to the
bottom of the grate in natural gas applications; how-
ever, this is not the case in propane applications.
The Vermiculite/ember combination should not be
stacked more than 1/2” above the height of the
burner pan in propane applications. Again, the sand
provided with the hearth kit is NOT to be used in
propane applications. The Vermiculite provided
with the gas changeover kit must be used instead.
FIGURE 3
FIGURE 4
Page 3