
Installation&Assembly

OPERATION
Lighting Log Sets Without the Safety Pilot
Assembly
1– Place the fireplace damper in the fully open
position. The damper must be in the fully
open position any time the log set is in
operation.
2- Place a burning match on top of the pan
material at the end of the burner tube closest to
the gas connector. Slowly turn on the gas at
the shut-off valve. Gas should slowly ignite
within approximately 5 seconds.
NOTE– Adjust burner flame by opening or
closing manual gas shut-off valve beside
fireplace.
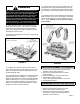
Lighting Log Sets With the Safety Pilot Assembly
2– Push in the gas control knob slightly and turn it clock-
wise to the OFF position. Do not force. Turn on gas at
the manual shut-off valve beside the fireplace and re-
check gas connections for leaks. Do not continue until
leaks are corrected. If you do not smell gas, continue
with the next step. Refer to figure 6.
HIGH ALTITUDE DERATE
In USA, input BTU shall be derated 4% (1 orifice
size) per 1000 ft for altitudes above 2000 ft. In Can-
ada, input BTU shall be derated 10% (2 orifice
sizes) at altitudes from 2000 ft to 4500 ft.
3- Locate the pilot. Refer to figure 6.
4- Depress gas control knob all the way and turn
knob counterclockwise to pilot position.
Immediately light the pilot with a match.
Continue to hold the control knob in for
approximately 1 minute after the pilot is lit. Pilot
should remain lit and control knob should pop
back out when released. If not, repeat steps
above.
5- To light burner flame, turn control knob
counterclockwise to “FULL ON” position.
NOTE– Adjust burner flame by opening or
closing manual gas shut-off valve beside
fireplace.
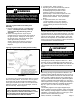
WARNING
All gas-burning appliances produce smoke and car-
bon monoxide gas during operation. These fumes
can be harmful if not properly vented. The damper
must be open and the chimney must be drawing
properly to ensure safe operation of this decorative
gas log set.
FIGURE 6
PILOT FLAME ADJUSTMENT
The pilot flame should be a soft blue color and should
surround the last 1/2” of the thermocouple tip. The pilot
adjustment screw is located on the pilot valve just to the
right of the control knob. Refer to figure 6. If the pilot
flame must be adjusted, use a standard slotted screw-
driver to turn the screw clockwise to reduce the flame or
counterclockwise to increase the flame.
CURING REFRACTORY LOGS
IMPORTANT
The hard refractory logs provided with this set re-
quire curing the first time they are put into opera-
tion. You must follow the instructions given for cur-
ing the logs to avoid cracking the logs with
continued used.
After lighting the burner, adjust the flame to 2’. Allow
the flame to burn for additional 30 minutes at this set-
ting. Raise the flame and additional 2” and continue ad-
justing the flame at 30 minute intervals for a total of 3
hours.
WARRANTY
Refractory gas logs are guaranteed for lifetime to the
original purchaser against destruction by fire or heat. If
the product should become defective manufacturer will
elect to repair or replace the logs free of charge. Burn-
ers, grates and other hardware are guaranteed against
defects in materials and workmanship for 5 years and
will be replaced free of charge. Safety pilot assembly is
guaranteed against defects in materials and workman-
ship for 1 year. The owner must pay all shipping
charges.
The warranty applies to the original equipment pur-
chaser, subject to proof of purchase, and is not transfer-
able. Warranty coverage begins on the date of original
installation. This warranty does not cover logs or other
parts that become defective by misuse,
abuse, accidents, or mishandling.
Page 5