US UK DE Drive Medical Design & Manufacturing, NY 11050 Drive Medical Ltd, HX5 9JP Drive Medical GmbH & Co. KG, D-88316 Isny Part No. Royale_IFU (Issued June 2012) Illustrations, photographs and specifications may be subject to change. The team at Drive Medical develops its products to give our customers the freedom to live independently. This encompasses their daily home life and provides them with the opportunity to enjoy an outing with family and friends.
CONTENTS 1. 2. 3. 4. 5. 6. 7. 8. 9. 10. Safety Instructions Electromagnetic Interference (EMI) Specifications Comfort Adjustment Control Panel Operation Charging Instructions Battery Instruction and Maintenance Scooter Maintenance and Repair Troubleshooting and Fault Repair Warranty scooter in traffic. Do not make a sharp turn or a sudden stop while riding your scooter.
Warning – Do not operate your scooter for the first time without completely reading and understanding this owner’s handbook 1. Do not operate scooter on public streets and roadways. Be aware that it may be difficult for traffic to see you when you are seated on the scooter. Obey all local pedestrian traffic rules. Wait until your path is clear of traffic, and then proceed with extreme caution. 2.
Modifications Drive Medical Product has designed your scooter to be as practical as possible. However, under no circumstances should you modify, add, remove, or disable any part or function of your scooter. Personal injury and damage to the scooter may result. 1. Do not modify your power scooter in any way not authorized by Drive. Do not use accessories if they have not been tested or approved for Drive products. 2. Get to know the feel of your power scooter and its capabilities.
move by itself or move in unintended directions. It can also permanently damage the powered scooter’s control system. The intensity of the EM energy can be measured in volts per meter (V/m).Each powered scooter can resist EMI up to a certain intensity. This is called “immunity level”. The higher the immunity level the greater the protection.
SPECIFICATION Model Weight Capacity (MUW) Drive Wheel Front Wheel Max Speed Battery Range Charger Type Controller Motor Type Weight (With Battery) Weight (W/Out Battery) Turning Radius Suspension Length Width Height Seat Width Seat Height Seat Depth Back Height Wheel Base Ground Clearance Footwell Royale 3 185kg (29 stone) 41 x 10cm (16” x 4”) 41 x 9cm (16” x 3.5”) 8mph (13kph) 12V x 70ah (2 pcs) 50km (32 miles) 8A Off Board 120/240V PG S-Drive 4100 RPM 1300W 21: 1 149kg (330lb) 103kg (227lb) 126cm (49.
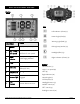
CONTROL PANEL OPERATION Display LED’s Left-Indicator (Green) (1) Hazard Light (Red) (2) FUNCTION Warning Light (Red) (3) Details Displays in mph or kph 1 Speedo 2 High / Low / Shows H or L top speed. Turn Speed Will flash for turn speed. 3 Power Indicator Battery remaining capacity and charging indicator 4 Clock Shows time. Parking lamp (Amber) (4) Headlight (Blue) (5) Right- Indicator (Green) (6) Buttons 5 Odometer ODO (99999 km max), TRIP (99.
(a) Braking The scooter has an electromagnetic brake which operates automatically when the speed lever is released. It also features a cable brake which can be operated by the user. To operate the cable brake, squeeze the lever on the left hand side of the handlebars. (b) Speed Lever (Throttle) The user moves the scooter by moves the lever on the right hand side of the handlebars. The more the user moves the lever, the faster the scooter will travel. Release the lever to stop the scooter.
3. 4. 5. 6. Then press SET to change until the hour is at the required setting Press the MODE button again so the minutes are flashing Press the SET to change until the hour is at the required setting Leave the scooter until the display stops flashing, or hold down the MODE and SET buttons for 2 seconds. (h) Odometer When the scooter is first started it will show ODO and the total mileage of the scooter for 5 seconds. After this the scooter will show TRIP and the trip distance.
BATTERY CHARGING 3. OPERATING INSTRUCTION Plug in the power cord. The LED will flash green when mains power is on. 1. APPEARANCE Connect the battery charger to the battery. Start charging; Description. please refer to 4. LED The scooter should be charged for 12 – 14 hours for a full recharge. Failure to do this could result in a reduced range. 4. LED DESCRIPTION (1) Green Flash: Power on 2.
Important! If red LED keeps flashing: Check that the battery connection is reversed. Check that there is no short circuit on the output connection. Check that the ambient temperature is not too low (0oC or less) The battery charger may be defective if the red LED still keeps flashing. Charging LED (orange) cannot turn to green: The battery might be defective, please stop charging and have the battery be repaired. Always charge your batteries in well ventilated areas.
SCOOTER MAINTENANCE Your power scooter is designed for minimal maintenance. However, like any motorized vehicle it requires routine maintenance. To keep your scooter for years of trouble-free operation, we recommend you follow the following maintenance checks as scheduled. Warning! Failure to maintain the brushes could void the power scooter warranty. To inspect or replace the motor brushes: 1. Unscrew the motor brush caps (by using a screwdriver on the caps shown by the white arrow). 2.
Keep wheels free from lint, hair, sand and carpet fibres. Visually inspect the tyre tread. If less than 1mm (1/32”), please have your tyres replaced by your local dealer. All upholstery can be washed with warm water and mild soap. Occasionally check the seat and back for sagging, cuts and tears. Replace if necessary. Do not store your scooter in damp or humid conditions as this will lead to mildew and rapid deterioration of the upholstery parts.
TROUBLESHOOTING AND FAULT REPAIR S-DRIVE controller: Your scooter is fitted with a S-Drive controller, which continuously monitors the operating conditions of your scooter. Error Number Reference Fault Impact Scooter on Notes 1 Low Voltage Error flashing The battery requires charging or there is a bad connection to the battery. 2 Motor Connection Scooter will not drive There is a bad connection to the motor. Check all connections between the motor and controller.
WARRANTY There is a comprehensive twelve-month warranty from the date on which your new scooter is delivered. The warranty covers the scooter for repairs or replacement during this period. For more detail, please see the Warranty Conditions below. Warranty Conditions: 1. Any work or replacement part installation must be carried out by an authorized Drive Medical dealer / service agent. 2.
Appendix A: Service Record YEAR 1 2 3 4 5 YEAR Service Dates Service Dates Controller Upholstery On/off switch Seat Control Lever Back Braking Armrests Recharge point Electrics Batteries Connections condition Levels Lights Connections Test run Discharge test Forwards Wheels and Tyres Reverse Wear Emergency stop Pressure Left turn Bearings Right turn Wheel nuts Slope test Motors Over obstacles Wiring List Items repaired 1 2 3 4 5 Noise Connections Brake Brushes C
Royale By Drive Owner’s Handbook (Royale_IFU 06/12) Page 16