SPITFIRE SCOUT OWNER’S MANUAL
TABLE OF CONTENTS I. PREFACE 3 II. SAFETY NOTICES 4 III. SAFETY GUIDELINES 6 IV. EMI & RFI INFORMATION 13 V. PARTS 14 VI. SETUP 16 VII. COMFORT ADJUSTMENTS 20 VIII. ASSEMBLY & DISASSEMBLY 22 IX. OPERATION 25 X. BATTERIES & CHARGING 26 XI. INSPECTION & MAINTENANCE 28 XII. BASIC TROUBLESHOOTING 32 XIII. SPECIFICATIONS 33 XIV. LIMITED WARRANTY 34 XV. ACCESSORIES 36 Spitfire Scout Owner’s Manual www.drivemedical.com 2 REV3.9.29.
I. PREFACE Please read this Owner’s Manual before operating your scooter for the first time. Improper use or unfamiliarity of the scooter may result in harm, injury, or traffic accidents. This Owner’s Manual includes operation instructions, assembly instructions, and best practices to ensure maximum use from your scooter. The symbols used throughout this Owner’s Manual are explained below.
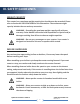
II. SAFETY NOTICES Read and follow the information in the owner’s manual. Fully charge the battery after every trip and prior to using the scooter. If you do not frequently use the scooter fully charge the batteries every two weeks to prevent battery failure. If the battery gauge drops to red, charge the scooter as soon as possible. Completely discharging the batteries may damage the batteries, or shorten the expected life of the batteries. Batteries contain lead and lead compounds.
II. SAFETY NOTICES Avoid exposure to moisture, standing water, rain, snow, ice or salt when possible. Store in a clean and dry condition. Do not drive your scooter at night without proper lighting. Do not remove the anti-tip wheels. Keep your feet on the foot board at all times during operation. Do not stand on the foot board. Keep your hands and feet away from moving parts while driving. Be aware of loose fitting clothes that can become caught in the drive wheels.
III. SAFETY GUIDELINES GENERAL GUIDELINES Before operating your scooter fully read and understand this Owner’s Manual. Be sure to follow the setup instructions prior to using your scooter for the first time. Users may encounter difficult maneuvering situations such as narrow doorways, travelling up and down ramps, cornering, and travelling on uneven terrain. Be sure to lower the speed, take your time, and carefully maneuver the scooter.
III. SAFETY GUIDELINES WEIGHT CAPACITY This scooter has a maximum weight capacity that should never be exceeded. Please refer to Section XII SPECIFICATIONS for this information. The maximum weight capacity includes the user and any accessories. WARNING – Exceeding the maximum weight capacity will void your warranty. Drive Medical will not be held responsible for injuries and/or damages resulting from failure to observe weight capacities. WARNING – Do not carry passengers on your scooter.
III. SAFETY GUIDELINES WARNING – Do not travel up an incline with the seat completely reclined without an attendant. Inclines vary, and doing so may decrease stability. WARNING – Do not, under any circumstances, travel on a slope greater than the maximum climbing angle for this scooter. Please refer to Section XII SPECIFICATIONS for this information. Exceeding the climbing angle may cause unstable conditions.
III. SAFETY GUIDELINES BRAKES & STOPPING Coming to a stop in your scooter can simply be done by releasing the throttle. The throttle will automatically return to the center position, and the scooter will come to a stop. ATTENTION – Quickly moving the throttle in the opposite direction of travel will cause the scooter to come to an abrupt stop, and if held continuously in the opposite direction may cause erratic movements if you are unfamiliar with the controls.
III. SAFETY GUIDELINES STEPS, CURBS & FIXED OBSTACLES Use extreme caution when operating your scooter near curbs, porches, stairs, escalators, drop-offs, unprotected ledges, and raised areas. WARNING – Never attempt to navigate your scooter over a fixed obstacle taller than the maximum ground clearance. Please refer to Section XII SPECIFICATIONS for this information. WARNING – Never attempt to navigate your scooter backwards over an obstacle.
III. SAFETY GUIDELINES TRANSPORTING YOUR SCOOTER When transporting your scooter by vehicle it should be securely stowed in the back of a van, truck, or trunk of a car. Adjustable parts should be removed or properly secured during transport. WARNING – Do not sit in your scooter while in a moving vehicle. POSITIONING BELT (OPTIONAL) A safety belt may be included with your scooter.
III. SAFETY GUIDELINES PHYSICAL LIMITATIONS, Rx DRUGS, ALCOHOL & SMOKING You must exercise awareness, caution, care, and common sense when operating your scooter. Always keep in mind your own limitations, and substance use when operating your scooter. WARNING – Never use your scooter while under the influence of alcohol or mind altering substances. WARNING – Never smoke while seated in your scooter. Damaged or worn upholstery increases the risk of fire hazard, and should be replaced immediately.
IV. EMI INFORMATION Electromagnetic interference (EMI) tests have shown to produce adverse effects on the performance and control of electrically powered mobility devices. EMI can be produced from different sources such as cellular phones, two-way radios, radio stations, television stations, amateur radio transmitters (HAM), wireless computer links, microwave signals, paging transmitters, and transceivers used by emergency vehicles.
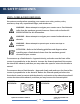
V. PARTS Please refer to the diagram below to identify your scooter parts. Familiarize yourself with the terminology to better understand part references throughout the Owner’s Manual. 1. Seat Back 2. Armrests 3. Seat Base 4. Control Panel 5. Basket 6. Tiller Adjustment Knob 7. Front Wheel Lock 8. Seat Swivel & Release Lever 9. Seat Post 10. Battery Pack 11. Charge Port 12. Circuit Breaker 13. Footboard 14. Accessory Post 15. Freewheel Lever 16. Anti-tip Wheels Spitfire Scout Owner’s Manual www.
V. PARTS Please refer to the diagram below to identify your scooter control panel and its functions. Familiarize yourself with the terminology to better understand references throughout the Owner’s Manual. 1. Battery Indicator 2. Horn Button 3. Speed Dial 4. Throttle 5. Key Switch 6. Key 7. Diagnostic Light (the red light on the battery indicator will also display flash codes when a problem exists) Spitfire Scout Owner’s Manual www.drivemedical.com 15 REV3.9.29.
VI. SETUP Your scooter requires assembly prior to initial use. Please be sure to follow these steps to properly set up your scooter. Step 1: Insert the seat post into the base of the scooter with the battery lock around the post. Secure tightly with the provided nut and bolt at the desired height. Step 2: Place the battery pack onto the front half of the scooter directly in front of the seat post. Then swivel the battery lock so the long side rests on top of the battery pack, and lock into place.
VI. SETUP Step 4: Insert the armrests into the attachment points in the seat frame so that the armrests face forward. Secure the armrests in place with the provided star knobs at the desired width. Step 5: Attach the front basket by aligning the bracket on the tiller with the mounting holes on the basket, and then push down to secure in place.
VI. SETUP Optional (DLX Models Only): Your scooter comes with interchangeable shrouds, allowing you to customize your scooter to your liking. The DLX models come with the red shrouds installed, and a spare set of blue shrouds included in the box. The shrouds can be interchanged by hand, or using a small pry tool. Be sure not to scratch the painted shrouds while using the pry tool.
VI. SETUP Rear Shroud Replacement: Reach underneath the rear shroud, and gently push up on the color panel until it releases from the scooter. The new panel will snap into place. Spitfire Scout Owner’s Manual www.drivemedical.com 19 REV3.9.29.
VII. COMFORT ADJUSTMENTS Prior to using your scooter, you may want to make adjustments for optimum comfort. Make all adjustments with the scooter off, and unoccupied. You may need the tool-kit included with your scooter to make these adjustments. WARNING – Some components of your scooter are heavy, and you may need assistance to lift or carry. Please refer to Section XII SPECIFICATIONS for component weights. WARNING – Do not make any adjustments while an occupant is seated in the scooter.
VII. COMFORT ADJUSTMENTS Armrest Width: The armrest width can be adjusted by loosening the star knob on the underside of the armrests, and sliding the armrests inward or outward to the desired width. Armrest Angle: The armrest angle can be adjusted by lifting up on the armrest, and tightening or loosening the bolt underneath the armrest. Tightening will lower the angle, and loosening will raise the angle of the armrest.
VIII. ASSEMBLY & DISASSEMBLY Your transport scooter can be disassembled into five sections without tools: the seat, basket, battery pack, front section and rear section. Please be sure to follow these steps to properly assemble and disassemble your scooter. Disassembly: Step 1: Pull upward on the swivel release lever to remove the seat from the post. Step 2: Unlock the battery lock, and rotate the battery lock 180° to allow for removal of the battery pack.
VIII. ASSEMBLY & DISASSEMBLY Step 4: Pull up on the connecting handle to split the front and rear section of the base. Assembly: Step 1: Line up the front and rear sections of the base. Lift up on the connecting handle, and slowly lower the front and rear sections until the two lock together. Spitfire Scout Owner’s Manual www.drivemedical.com 23 REV3.9.29.
VIII. ASSEMBLY & DISASSEMBLY Step 2: Loosen the tiller angle adjustment knob, and raise the tiller to the desired height. Tighten the angle adjustment knob to secure the tiller in place. Step 3: Lower the battery pack in to the compartment on the scooter. Rotate the battery lock over the battery pack, and lock to secure the batteries in place. Step 4: While lifting up on the seat release lever, place the seat onto the seat post. Release the lever and rotate the seat until it locks into place.
IX. OPERATION After your scooter is assembled, and adjustments have been made you are now ready to operate your scooter. Refer to the tiller diagram in Section V PARTS for key functions. The key switch applies power to the control system electronics, which in turn supplies power to the motors. Turn the key switch with the key inserted to turn on your scooter. ATTENTION – Do not use the key switch to stop, or as a brake. Doing so may shorten the life of the drive components.
X. BATTERIES & CHARGING CHARGING YOUR SCOOTER To charge your scooter, position the front of the unit next to a standard electrical outlet. Be certain the freewheel levers are engaged, and the power is turned off. Plug the charger into the scooter, and then into the electrical outlet. When the batteries are fully charged remove the charger from the scooter. SUGGESTION – The lights on your charger indicate different charge statuses.
X. BATTERIES & CHARGING BATTERY RANGE There are many factors that affect the range of your batteries, including the surfaces, inclines, curves, or wind you encounter when operating your scooter. If not ideal conditions, all of these factors will reduce the travel time or distance between charges. Follow these suggestions for maximum range: SUGGESTION – Fully charge the batteries prior to any trip, and plan your trip in advance to avoid inclines.
XI. INSPECTION & MAINTENANCE GENERAL GUIDELINES Your scooter is an advanced mobility device, and with the correct routine maintenance you can ensure years of maximum use. While some of the maintenance can be done by yourself, you may need assistance from an authorized Drive Medical provider. If you have any doubts, contact your authorized Drive Medical provider. Preventative maintenance is key to keeping your scooter in prime operating condition.
XI. INSPECTION & MAINTENANCE STORAGE If you need to store your scooter, be sure it is stored in a dry place free from extreme temperatures. Always fully charge, and then disconnect the batteries prior to storage. ATTENTION – Infrequently charged batteries, or batteries stored without a full charge are susceptible to permanent damage, causing unreliable performance from your scooter. If your scooter is stored for a prolonged period flat spots may develop in the wheels.
XI. INSPECTION & MAINTENANCE DISPOSAL OF YOUR SCOOTER & PARTS You must follow applicable local and national regulations when disposing of your scooter, or defective scooter parts. Contact your local waste agency, recycling center, or authorized Drive Medical provider for information on proper disposal. CONTACTING YOUR AUTHORIZED DRIVE MEDICAL PROVIDER The following conditions may indicate a serious problem with your scooter.
XI. INSPECTION & MAINTENANCE MAINTENANCE SCHEDULE Inspect your scooter routinely for service issue or wearable items.
XII. BASIC TROUBLESHOOTING The diagnostic flash codes for your scooter are designed to help you perform basic troubleshooting quickly and easily. A diagnostic flash code can be displayed in one of two ways: A light labeled “Diagnostic” on the control panel will flash OR The battery indicator light farthest to the left on the battery gauge (red light) will flash a 2 digit fault. Please refer to the diagram below for flash codes, description of problem, and recommended actions.
XIII. SPECIFICATIONS WEIGHT CAPACITY TOP SPEED* ESTIMATED RANGE* MAX. CLIMBING ANGLE TURNING RADIUS GROUND CLEARANCE LENGTH WIDTH HEIGHT WIDTH DEPTH BACK HEIGHT MOTOR CONTROLLER BATTERIES BATTERY CHARGER BRAKES FREEWHEEL MODE FRONT WHEELS REAR WHEELS ANTI-TIP WHEELS BASE WEIGHT BATTERY WEIGHT (PAIR) SEAT WEIGHT HEAVIEST PIECE WEIGHT TOTAL WEIGHT 300 lbs. 4.25 mph 9 miles (12AH), 15 miles (20AH) 6° 45.5” (3-Wheel), 53.75” (4-Wheel) 2.5” OVERALL DIMENSIONS 42.5” 21.25” 36” SEAT DIMENSIONS 16.5” 13.
XIV. LIMITED WARRANTY For the warranty periods listed below, beginning at the date of original purchase, Drive Medical will repair or replace, at its option to the original purchaser, free of charge, any of the following parts found upon examination by an authorized representative of Drive Medical to be defective in materials and/or workmanship. The warranties contained herein extend and apply only to the original purchaser.
XIV. LIMITED WARRANTY RECONDITIONED UNITS WARRANTY implied warranties are excluded. This is the exclusive remedy. Liabilities for incidental, punitive, special and consequential damages under any and all warranties are excluded. All reconditioned units are covered by a 90-day warranty from Drive Medical effective from the date of purchase.
XV. ACCESSORIES Add functionality and convenience to your Drive scooter with these options and accessories. Contact your authorized Drive Medical provider or visit www.drivemedical.com for more information.
Drive Medical Design & Manufacturing 99 Seaview Boulevard Port Washington, NY Tel: (516) 998-4600 Fax: (516) 566-2043 www.drivemedical.com Spitfire Scout Owner’s Manual www.drivemedical.com 37 REV3.9.29.