ELATION VENTED GAS FIREPLACE INSERT (4 LOG STYLE) INSTALLATION AND OPERATING INSTRUCTIONS WARNING: IMPROPER INSTALLATION, ADJUSTMENT, ALTERATION, SERVICE OR MAINTENANCE CAN CAUSE INJURY OR PROPERTY DAMAGE. REFER TO THIS MANUAL. FOR ASSISTANCE OR ADDITIONAL INFORMATION, CONSULT A QUALIFIED INSTALLER, SERVICE AGENCY, OR THE GAS SUPPLIER. FOR YOUR SAFETY DO NOT STORE OR USE GASOLINE OR OTHER FLAMMABLE VAPOURS AND LIQUIDS IN THE VICINITY OF THIS OR ANY OTHER APPLIANCE.
ELATION Fireplace Insert 2 TABLE OF CONTENTS GENERAL INFORMATION .................................................................................................. 3 WARNING............................................................................................................................... 4 SPECIFICATIONS .................................................................................................................. 5 OPERATION .................................................................
ELATION Fireplace Insert 3 GENERAL INFORMATION The ELATION fireplace insert is a high-efficiency free-standing gas appliance with a maximum input rating of 25,000 Btu/h (7.3 kWh) with natural gas or 25,000 Btu/h (7.3 kWh) with propane. It features an adjustable millivolt valve and a constant pilot. This means that you can set the height of the flame with a control knob or with an optional remote control. An optional wall thermostat is also available for automatic room temperature control.
ELATION Fireplace Insert 4 WARNING INSTALLATION SHOULD BE DONE BY A QUALIFIED INSTALLER. DO NOT BURN WOOD OR ANY OTHER MATERIAL IN THIS APPLIANCE. HOT WHEN IN OPERATION. KEEP CHILDREN, FURNITURE, CLOTHING AND FLAMMABLE MATERIAL AWAY FROM THE APPLIANCE. ADVISE ADULTS AND CHILDREN ABOUT THE HAZARD OF HIGH SURFACE TEMPERATURES AND THAT THEY SHOULD STAY AWAY TO AVOID BURNS OR CLOTHING IGNITION. YOUNG CHILDREN SHOULD BE SUPERVISED WHEN THEY ARE IN THE SAME ROOM AS THE APPLIANCE.
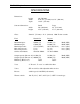
ELATION Fireplace Insert 5 SPECIFICATIONS Dimensions: height: width: depth: 20” (508 mm) front: 28” (711 mm) rear: 16” (406 mm) 14 3/4” (375 mm) width: height: Small 40” (1016 mm) 25 ½” (648 mm) Surround dimensions: Glass: Large 44” (1118 mm) 27 ½” (699 mm) 5mm 28" (711 mm) x 11 ¼” (286 mm) 1400° F clear ceramic Fuel: Natural Gas Propane Maximum input : Minimum input: Manifold pressure : Min. inlet pressure : Max. inlet pressure : Orifice size/Altitude: 25,000 (7.3) 17,000 (5.0) 3.5/1.8 (0.
ELATION Fireplace Insert 6 OPERATION BEFORE LIGHTING 1) Do not use this appliance if any part has been under water. Immediately call a qualified service technician to inspect the appliance and to replace any part of the control system and any gas control which has been under water. 2) Make sure that there are no obstructions in the air intake or venting system. 3) Clear the immediate area of combustible materials, gasoline, and other flammable liquids and vapours.
ELATION Fireplace Insert 7 CAUTION: This insert is hot while in operation. Do not touch. Keep children, clothing and flammable materials away. WALL THERMOSTAT To operate your ELATION using the wall thermostat, follow the lighting procedure and set the gas control to the ON position. Simply set your wall thermostat to a comfortable temperature and the insert will do the rest. During the heating season, you do not have to touch the gas control valve.
ELATION Fireplace Insert 8 MAINTENANCE INSTRUCTIONS TURN OFF THE GAS WITH THE SHUTDOWN VALVE AND DISCONNECT THE ELECTRICAL POWER BEFORE SERVICING THE APPLIANCE. The venting system and the fireplace insert should be inspected at least once a year. Remove the glass front and the logs and clean them if necessary. The control compartment, air circulating passages, firebox, logs and burner should be cleaned at least once a year by vacuuming or brushing. Check the pilot flame to see if it is adjusted properly.
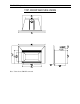
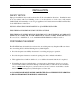
ELATION Fireplace Insert TOP, FRONT AND SIDE VIEWS Note: Views show SMALL surround 9
ELATION Fireplace Insert 10 INSTALLATION SAFETY NOTICE Improper installation may result in a house fire. Follow installation directions. Installation must be in accordance with local building codes or, in the absence of local codes, with current CAN/CGA B 149 installation codes for gas appliances in Canada and current National Fuel Gas Code ANSI Z223.1 in the USA. INSTALLATION SHOULD BE DONE BY A QUALIFIED INSTALLER. THIS FIREPLACE INSERT MUST BE VENTED OUTSIDE.
ELATION Fireplace Insert 11 CLEARANCES Clearance distances between the insert and any combustible material must be maintained while installing your appliance: Clearance to NON combustible hearth is: Clearance to combustible mantel: Clearance to combustible side wall: Minimum hearth extension: 0 38” (965 mm) 10” (254 mm) 16” (406 mm) INSTALLATION OF THE UNIT • Move the ELATION to the desired position.
ELATION Fireplace Insert • 12 If you wish to make a direct electrical connection to the blower without using the six-foot cord supplied, route a 120 volt, 60 Hz electrical power supply line to the same location.
ELATION Fireplace Insert 13 GLASS FRONT REMOVAL, CLEANING AND INSTALLATION Removal: • • • • Let the insert cool down for at least one hour. Open the top and bottom louvres to reveal the retaining brackets. Remove the two (2) screws holding the top bracket and remove the bracket still holding the glass in place. Lift out glass. (Do not let glass fall forward!) CAUTION : Do not operate your insert without a glass front or with a broken glass. Cleaning: • • Only clean the glass when cold.
ELATION Fireplace Insert 14 BURNER REMOVAL AND INSTALLATION REMOVAL: • • • • Remove the glass front assembly as shown on page 13. Remove the logs. Unscrew the line leading to the main orifice under burner (below floor of firebox) and then unscrew the orifice fitting from the burner. Lift out burner. WARNING: NEVER OPERATE THE FIREPLACE INSERT WITHOUT HAVING THE ORIFICE PROPERLY SCREWED TO THE VENTURI TUBE. THIS COULD RESULT IN SERIOUS DAMAGE TO THE GAS INSERT AND IS A SERIOUS RISK OF FIRE .
ELATION Fireplace Insert 15 EMBER KIT INSTALLATION Three small plastic bags are supplied with your unit. One of the bags contains vermiculite to simulate ashes in the fire box, another contains lava rock to simulate coals and the last one is filled with rock wool fiber which, when glowing red, resembles hot embers. 1. Remove log grate from the insert. 2. Place some vermiculite and some lava rocks on the burner and in front of the burner. Never put too much of these materials near the burner holes.
ELATION Fireplace Insert LOG INSTALLATION 1. Place rear log in rear log bracket as shown above. 2. Place front log on burner so front log holes fit over front log pins. 3. Place the left hand log so it lays on the left hand edge of the front and rear logs 4.
ELATION Fireplace Insert 17 BLOWER REPLACEMENT The blower is accessed through the firebox. 1. Unplug the blower cord or switch off circuit breaker. 2. Remove the glass as shown on page 13. 3. Remove logs and burner. 4. Remove the bottom of firebox by removing the 10 screws around the perimeter and the 2 in the back of the firebox. 5. Disconnect the two wires attached to the blower motor. 6. Remove the two blower retaining screws and lift out the blower.
ELATION Fireplace Insert 18 SURROUND ASSEMBLY LOUVRE MOUNTING HOLES 1. Lay parts A, B and C on a flat, non marking surface. Fasten these together with the ½ “ bolts and nuts supplied (D). 2. Position the three trim pieces over the surround and connect the ends with corner brackets (E). Ensure the mitered corners fit evenly before tightening down. (Note: brackets “E” come in 2 parts - the blank brackets go under the set screws). 3.
ELATION Fireplace Insert 19 ADJUSTMENTS NOTE: Adjustments to the valve assembly must be performed by a qualified service person. • The appliance and its individual shutoff valve must be disconnected from the gas supply piping system during any pressure testing of that system at test pressures in excess of ½ psi (3.5 kPa).
ELATION Fireplace Insert 20 ADJUSTING THE GAS PRESSURE NOTE: If cover plate is already installed, remove it by removing the two screws with a Phillips screw driver. NOTE: The maximum manifold pressure is set at the factory at 3.5” WC for natural gas and 10” WC for propane. To adjust the maximum manifold pressure for altitude, you must remove the manifold pressure adjustment cover. The variable gas control knob must then be removed using a special screwdriver.
ELATION Fireplace Insert 21 ADJUSTING AIR SHUTTER To adjust the air shutter there is an adjustment band below the firebox floor. The factory setting for the air shutter is 1/8” for natural gas, ¼” for propane. After operating the appliance for half an hour or so the flames should have turned a nice yellow colour. However, in higher altitudes you may find a smudging up of the glass after a few days. The shutter should then be adjusted open in 1/16” increments until the glass stays clear.
ELATION Fireplace Insert 22 OPTIONS • • • • DESCRIPTION CODE Wall thermostat kit Ultrasonic remote control Conversion kit to propane gas Conversion kit to natural gas E5558 E5568 REPLACEMENT PARTS NO. 1 DESCRIPTION................................... CODE PILOT ASSEMBLY .................................. 49103 (NATURAL GAS) ........................................................... 49106 (PROPANE) 2 BLOWER .............................................. 44070 3 GAS VALVE..........................
ELATION Fireplace Insert 23 DROLET STOVES AND FIREPLACES INC. hereby warrants the quality of its ELATION Vented Fireplace insert against manufacturing defects. The product shall be delivered to the buyer in good condition and the latter should inform the vendor immediately of any defect in the product delivered. During the first year of the limited warranty, DROLET STOVES AND FIREPLACES INC. will provide free replacement parts for the fireplace insert except for the glass assembly.