Model # DS18932 USE AND CARE GUIDE 6-LIGHT LINEAR CHANDELIER Questions or problems? Before returning to the store, call Design Solutions International Customer Service Mon-Fri 9:30 am to 3:00 pm EST 1-800-388-6141 ext. 216 For customer service support and the fastest response, please email us at CustomerSupport@DSILighting.
Table of Contents Table of Contents ........................................................... 2 Safety Information ......................................................... 2 Warranty ......................................................................... 2 Three (3) Year Warranty ............................................................. 2 What is Covered ........................................................................ 2 What is Not Covered ...................................................
Pre-Installation PLANNING INSTALLATION Read all instructions before installing. To avoid damaging this product, place it on a soft, non-abrasive surface, such as carpet or cardboard. NOTE: This product requires six 60W maximum medium base (E26) type "ST64" or type "A" bulbs or 9W maximum medium base (E26) self-ballasted LED bulbs (sold separately). IMPORTANT: Inspect the wire insulation for any cuts, abrasions, or exposed copper that may have occurred during shipping.
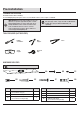
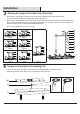
Pre-Installation (continued) PACKAGE CONTENTS K A B C D E F G G G L H I J Part A B Description Butterfly nut (Pre-assembled to the threaded pipe (E)) Lock washer (Pre-assembled to the threaded pipe (E)) Quantity Part 2 G H 2 C Metal plate 1 D Canopy 1 E Threaded pipe 2 F 6” tube 2 4 Description 12” tube Socket ring (Pre-assembled to the fixture body (J)) Quantity 6 6 I Glass shade 6 J Fixture body 1 K Safety cable 1 L Large tube 2
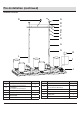
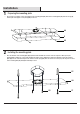
Installation 1 Preparing the mounting plate □□ Unscrew the four support screws (short) (GG) from the mounting plate (AA). Remove the mounting plate (AA) from the canopy (D), and keep the four support screws (short) (DD) for later use. AA D GG 2 Installing the mounting plate □□ Place the flat side of the mounting plate (AA) against the wall and make the location of the two long holes with a pencil (not provided).
Installation 3 Attaching the canopy and the tubes to the fixture body □□ Guide the fixture wires through each tube (F, G, L) as shown, and then tighten the tubes until secured as shown. □□ Unscrew the butterfly nuts (A) and lock washer (B) from the threaded pipe (E). □□ Guide the fixture wires through the threaded pipe (E), the canopy (D), the metal plate (C), the lock washer (B) and the butterfly nut (A).
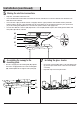
Installation (continued) 5 Making the electrical connections □□ Strip 3/4 in. of insulation from the wire ends. □□ Connect the black wire from the fixture to the black wire from the outlet box, then connect the white wire from the fixture to the white wire from the outlet box. □□ Connect the bare copper ground wire from the canopy (D) to the bare copper ground wire from the fixture and the ground wire from the outlet box.
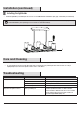
Installation (continued) 8 Installing the light bulbs □□ Install the light bulbs (not included) into the sockets. Use six 60W maximum medium base (E26) type “ST64” bulbs (recommended). NOTE: You can also use six 60W maximum medium base (E26) type "A" bulbs or 9W maximum medium base (E26) selfballasted LED bulbs (sold separately). Do not exceed the recommended wattage. J Care and Cleaning □□ Do not use any cleaners with chemicals, solvents, or harsh abrasives.
Questions or problems? Before returning to the store, call Design Solutions International Customer Service Mon-Fri 9:30 am to 3:00 pm EST 1-800-388-6141 ext. 216 For customer service support and the fastest response, please email us at CustomerSupport@DSILighting.com Retain this manual for future use.