
Instructions / Assembly
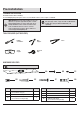
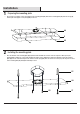


Option 1 Option 2
Option 7
Option 3 Option 4
Option 5 Option 6
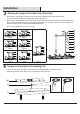
Installation
A
B
C
D
E
F
F
G
G
G
F
G
G
G
G
G
F
F
G
G
G
G
G
G
G
L
J
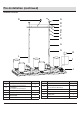
5
□ Guide the xture wires through each tube (F, G, L) as shown, and then tighten the tubes until secured as shown.
□ Unscrew the buttery nuts (A) and lock washer (B) from the threaded pipe (E).
□ Guide the xture wires through the threaded pipe (E), the canopy (D), the metal plate (C), the lock washer (B) and the buttery nut
(A). Screw the threaded pipe (E) into the top of the tube (F), and then place the canopy (D) on the top of the threaded pipe, secure
with the metal plate (C), the lock washers (B) and the buttery nuts (A).
□ There are seven height options for you to choose from:
4
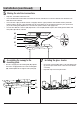
Hanging the xture body to the mounting plate
□ Hook the end of the safety cable (K) into the long hole of the mounting plate (AA) as shown in the diagram.
□ Slowly release the xture body to make sure it is supported by the safety cables (K).
a b
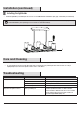
3
Attaching the canopy and the tubes to the xture body
K
D
AA