
Installation Guide


B
A
C
Installation
5
□
□
□
1
□
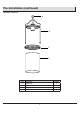
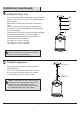
Installing the crossbar assembly
AA
BB
2
NOTE: The preassembled mounting nipple on the
crossbar should protrude outward.
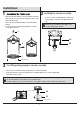
Guide the xture wire with bare copper ground wire through the
xture loop (A), and screw the xture loop (A) onto the top of the
xture body (B) securely.
Remove the pre-assembled mounting screw from the xture
body (B).
Secure the ring (C) to the xture body (B) with the mounting
screw. Tighten until snug.
3
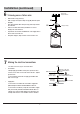
Test tting ceiling canopy to crossbar assembly
AA
EE
□
□
□
NOTE: If the ceiling canopy is not snug against the ceiling, remove it from the crossbar assembly and adjust the length of the
pre-assembled nipple by unscrewing the pre-assembled hex nut.
Screw the nipple in or out of the crossbar until the correct length is achieved. Then, re-attach the ceiling canopy.
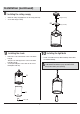
Remove the pre-assembled canopy lock ring from the crossbar assembly (AA).
Temporarily attach the ceiling canopy (EE) to the pre-assembled nipple on the crossbar assembly (AA).
Secure with canopy lock ring.
Canopy lock ring
Secure the crossbar assembly (AA) to the outlet box (not
included) with the outlet box screws (BB). Tighten until
snug.
Mounting screw