
Owner's manual


3
Projector features / Preparations
Projector features
The projector provides you with the broad use by the following features.
ü The unique optics system produces a large projected image in a short distance,
which provides you with various ways of use.
ü The double layer lter system is expected to function longer and offers you less
maintenance frequency.
• Keep the original packing materials, for future reshipment. Be sure to use the
original packing materials when moving the projector. Use special caution for the lens.
NOTE
Preparations
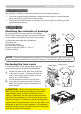
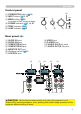
Checking the contents of package
Your projector should come with the items shown
below. Check that all the items are included. Require
of your dealer immediately if any items are missing.
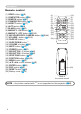
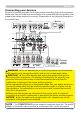
(1) Remote control with two AA batteries
(2) Power cord
(3) Computer cable
(4) Lens cover and Strap
(5) User’s manuals (Book x1, CD x1)
(6) Security label
(5)
(6)
(2)
(3)
(1)
VIDEO
DOC.CAMERA
KEYSTONE
ASPECT SEARCH
BLANK
MUTE
MY BUTTON
POSITION
12
ESC
ENTER
MENU
RESET
COMPUTER
MY SOURCE/
AUTO
MAGNIFY
PAGE
UP
VOLUME
DOWN
ON
OFF
㧗
FREEZE
(4)
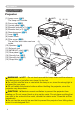
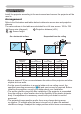
Fastening the lens cover
To avoid losing the cover, please fasten the lens
cover to the projector using the included strap.
Put the strap end into the slit of the lens
cover with the knot on the side of the lens.
Make sure that the strap is inserted to the
end of the slit.
Fasten the strap to the strap hole as shown
in the gure for step 1. Please note that the
knot on the strap is used to fasten it to the
lens cover in step 2 below.
1.
2.
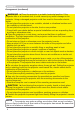
►Do not hang the lens cover in
front of the lens when the projector is mounted
upside down such as when mounted on the
ceiling. Otherwise, the lens cover may block the
light from the projector or hit the lens, which may
cause damage to it. When mounting the projector
upside down, hang the lens cover on the side of the
projector or place it on the projector. For instance,
wrap the strap around the elevator foot to hang the
lens cover (refer to the gure).
CAUTION
Lens cover
Strap slit
Strap hole
Strap
1 2