
Instructions / Assembly


“SAVE THESE INSTRUCTIONS”
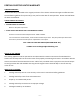
OPERATING INSTRUCTIONS
Note: When using the heater for the first time, you may notice a slight emission of smoke. This is normal
and will stop after a short time. The heating element is made of steel and was coated with a layer of
protective oil during production.
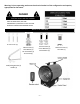
1. Attached heater to wall or ceiling as noted in instructions.
2. Connect the fan heater to the proper electrical power. See grounding instructions. Power indicator light will
illuminate
3. Press red power button. Display panel will flash five (5) times then display the room temperature.
4. To increase or decrease the set temperature press the Green mode button on the control panel or remote control
two (2) times then select the UP/Down arrows to increase or decrease the set temperature.
5. To set the timer functions press the Green mode button on the control panel or remote control three (3) times.
Digital display turns set temperature readout to time value for the timer OH. Press the timer
UP/Down arrows the value will vary from 0 hour to 9 hour duration (in1 hour intervals).
Electrical outlet wiring must comply with local building codes and other
applicable regulations to reduce the risk of fire, electrical shock and
injury to persons.
Do not use this appliance if any part of it has been underwater.
Immediately call a qualified service technician to inspect the appliance
and replace any part of the electrical system which has been under
water.
IMPORTANT: Read all instructions and warnings carefully before
installation and use. Failure to follow these instructions may result in a
possible electric shock, injury to persons, fire hazard and will void the
warranty
Usage on outlets above 220 volts may cause a slight whistling sound due to the higher fan speed. This
results from the voltage supply. This is normal and is not affecting the operation of the heater. This is
not a defect.
~ 6 ~