
DuraChimney II Product Catalog


Planning Your Installation
The following recommendations are a general guideline to assist
in the layout and selection of the chimney components needed for
your installation. Always follow DuraVent Installation instructions
enclosed with the cap or support box before installing your chim-
ney system. Installation instructions can be viewed online at www.
duravent.com, under catalogs and instructions.
• Measure the diameter of the replace ue outlet. An improperly
sized chimney results in poor draft and excessive creosote formation.
• Select the chimney with the same size diameter as the replace
ue outlet. Refer to the chimney sizing chart in the back of this
catalog for masonry replaces.
• Install the chimney in an enclosed chase.
• If possible, avoid osets. A straight vertical installation is
more ecient and less likely to develop creosote. If an oset
is required to avoid rafters or other obstructions, measure the
horizontal distance required and the vertical height available.
Both 15° and 30° elbows are available. Elbows greater than 30°
are not allowed in the United States. Two oset (four elbows) in
a single installation is permitted. Refer to the oset chart in the
back section of this catalog. At least one Elbow Strap is required.
Elbow Straps ensure adequate support.
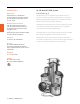
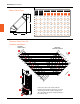
• Determine the minimum chimney height above the roof
line. Building codes require a minimum of 3’ above the roof
penetration and at least 2’ higher than any portion of a building
within 10’. See gure 1. The termination cap is installed above
that point.
• Chase Top Flashing is available. A pitched roof ashing can
be locally made, if required. A storm collar is required for all
installations using a ashing.
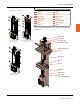
• Determine the total length of chimney required for the
installation. To calculate the installed per length of 10”-16”
DuraChimney II pipe, subtract 1” per joint. Minimum
recommended chimney height, at sea level of straight vertical
chimney, is 10’ to 15’ above the replace outlet. Higher
elevations, or the use of elbows, will require approximately 30%
to 60% more height to provide for an adequate draft.
• For a UL approved shroud, see the DuraChimney II Shrouds
Installation Instructions (L181). View online at www.duravent.
com, under catalogs and instructions.
• Be re safe. Maintain at least 2” clearance to combustibles.
Follow local building codes and have your chimney inspected by
a certied professional.
Figure 1
3 FT. MINIMUM
ABOVE ROOFLINE
2 FT.
ABOVE
10 FT.
HORIZONTAL
ANY POINT
WITHIN
DuraChimney II | All-Fuel Chimney
DuraVent | www.duravent.com
79