
Install Instructions


8
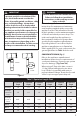
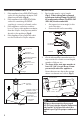
Figure 5
APPLIANCE
OUTLET
POLYPRO
VENT PIPE
TIGHTEN CLAMPS ON
RUBBER COUPLER
ADAPTER OR FERNCO
STYLE ADAPTER TO
SECURE VENT
PIPE TO APPLIANCE
APPLIANCE CONNECTION: 2" - 4"
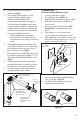
1. If the appliance has a PVC/CPVC female
outlet, use the Appliance Adapter/ PVC
Adapter and Clamp. (Fig.4)
2. If the appliance has a PVC/CPVC Male
outlet use a matching PVC/CPVC
coupling to convert to a female outlet.
3. If the appliance outlet has a rubber
boot or Fernco-style appliance adapter,
then the PolyPro vent pipe may attach
directly to the appliance (Fig.5).
4. If the appliance has a FasNSeal outlet
use the FasNSeal to PolyPro adapter.
Figure 4
POLYPRO PIPE
APPLIANCE
ADAPTER CLAMP
APPLIANCE ADAPTER/
PVC ADAPTER
APPLIANCE
EXHAUST OUTLET
OR PVC UNION
APPLIANCE
INSTALLATION
1. Pipe lengths may be cut to length
(Fig.6). If the Locking Tab is removed
use the new Locking Clamp (Fig.3b PPS-
LC) or alternative clamp ( Fig.4 PPS-PAC
/ PPS-LBC) for the connection.
• Cut square (not at an angle) to the
end of the pipe.
• Remove burrs before assembly.
2. Check with appliance manufacturer for
any restrictions or limits on vent length,
number of elbows, etc.
3. The slope of the vent pipe must be at
least 1.8° (3/8" rise per ft run, 31mm
per meter) back to the appliance.
Ensure there are no dips in the system
where condensate can collect. (Fig.7)
Figure 6
MARK
CUT WITH
HACKSAW
DEBURR
Figure 7
12"
3/8"
MIN
1/4" 5/8"
7.5mm 15mm
TO APPLIANCE
PP Pipe sections must be disengaged
1/4"-5/8" per joint (to allow for expansion)
and sloped 1.8°(3/8"per ft) back to the
appliance per Fig.7 for proper condensate
flow.
IMPORTANT