
Install Instructions


11
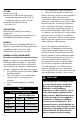
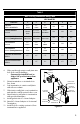
Figure 18
EXHAUST
AIR INLET
Figure 17
TERMINATION
CAP
FLASHING
STORM COLLAR
SUPPORT CLAMP
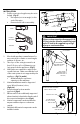
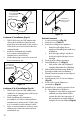
Vertical single pipe (Fig.19)
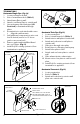
1. Locate penetration (Fig.16)
2. Cut hole in roof (Table 3)
3. Cut hole in ceiling above appliance
• Cut hole in all ceilings above
appliance if installing in a multi story
installation
• Hole through ceiling/s only has to
be big enough for the pipe to pass
through
4. Firestop each ceiling penetration
5. Attach ashing to roof (Fig.17 & 19)
• rubber boot ashing or similar,
ensure an eective, leak-proof seal is
maintained.
• Use black pipe (UV Protected)
where exposed to sunlight.
6. Maintain 12 in. (305mm)min. clearance
above highest anticipated snow level
Maximum of 24 in.(614mm) above roof
7. Install Poly Pro venting system to/from
black pipe to appliance
BIRD GUARD
UV PROTECTED PIPE
RUBBER FLASHING
Figure 19
MAINTENANCE:
Have your venting system checked annually.
This can be done easily by the same
technician who inspects & services the
appliance. Recommended areas to inspect
are as follows:
1. Check areas of the Venting System
which are exposed to the elements for
wear or damage. If damage is found,
the components should be replaced
immediately.
2. Where possible, look into the
Termination Cap to verify no foreign
material is there to block the vent.
Remove any foreign material found.
3. Inspect joints to verify that no Pipe
Sections or Fittings have been disturbed,
and consequently loosened. Also check
mechanical supports such as Wall Straps
for rigidity.