Owner’s Manual 3 Star Gas Hot Water Heater Models: 135SN / 135SL 170SN /170SL Installation Details Owner’s Information Warranty For advice, repairs and service, call: 1300 365 115 (Australia) 0800 729 389 (New Zealand) Carefully remove all packaging and transit protection from the heater before installation. Dispose of the packaging responsibly using re-cycling facilities where they exist. Specifications and materials may change without notice.
Owner’s Manual – Prodigy 3 Contents Welcome To Dux Hot Water 1 Installation Details 2 Plumbing Connections 3 Specifications 6 Gas Connections For units fitted with a Robertshaw gas controller 8 Commissioning Adjustments For units fitted with a Robertshaw gas controller 9 Gas Connections For units fitted with a Eurosit gas controller 10 Commissioning Adjustments For units fitted with a Eurosit gas controller 12 Owner’s Information 14 System Maintenance 16 Troubleshooting 17 Warrant
Owner’s Manual – Prodigy 3 Welcome To Dux Hot Water Your decision to purchase a Dux Hot Water system will reward you for many years to come. Since 1915, the Dux range has seen continuous research and development, resulting in many breakthroughs in the efficiency, reliability and longevity of hot water systems. Go with Dux and you’ll have a dependable, economical, efficient hot water system designed to perform well, year after year. And that’s a promise.
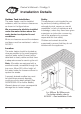
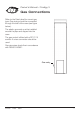
Owner’s Manual – Prodigy 3 Installation Details Outdoor Tank Installation The water heater must be installed outdoors, with the minimum clearances as shown in the figure below. We recommend a plinth be installed under the water heater where the water heater is subjected to wet conditions. Minimum clearance around the windows and doors must be maintained – refer to AS 5601.
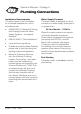
Owner’s Manual – Prodigy 3 Plumbing Connections Installation Requirements This water heater must be installed by a licensed tradesperson, and in accordance with: • AS/NZS3500.4 “National Plumbing and Drainage Code Hot Water Supply Systems – Acceptable Solutions”. • AS5601/AG601 “Gas Installations”. • Local authority regulations. • Outside Australia and New Zealand, please refer to local plumbing and building codes and regulations.
Owner’s Manual – Prodigy 3 Plumbing Connections Pressure & Temperature Relief Valve The Pressure & Temperature Relief Valve is supplied loose with the water heater. The valve rating is: All Models – 1400kPa The PTR valve must be installed directly into the top socket marked “RELIEF VALVE”. The drain line from this valve must run in a continuously downward direction in a frost-free ambient position with the discharge end left open to atmosphere permanently.
Owner’s Manual – Prodigy 3 Plumbing Connections Hot Water Connection The hot water pipe should be connected to either of the RP¾/20 sockets marked OUTLET at the top of the unit. For the most economical operation of the water heater, it is recommended that all hot water lines are insulated. Please check local regulations regarding the use of hot water supply pipework that are not made of copper. Insulation of Pipes All hot water pipes must be insulated with UV stabilized insulation.
Owner’s Manual – Prodigy 3 Specifications 2 1 System Components Component Description 1 PTR Valve 2 Hot Water Outlet To House 3 Cold Water Inlet 3 Tank Specifications Model Numbers 135SN / 135SL 170SN / 170SL Capacity (L) 135 170 Net Weight Empty (kg) 72 86 Relief Valve Pressure (kPA) 1400 1400 Water Capacity in First Hour* (L) 270 305 135SN: 33 MJ/h 170SN: 33 MJ/h 135SL: 29 MJ/h 170SL: 29 MJ/h Gas Consumption * Temperature rise at 45°C and inlet temperature of 15°C using natu
Owner’s Manual – Prodigy 3 Gas Connections Refer to the Data Label for correct gas type. Gas piping should be connected through the side of the case (see figure below). The plastic grommet must be installed around the pipe and clipped into the case. The gas control is fitted with a RC½"/15 socket. A union connection should be used. Gas pipe sizes should be in accordance with AS5601/AG601. Gas entry H1250 1250 Rev.
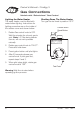
Owner’s Manual – Prodigy 3 Gas Connections Models with “Robertshaw” Gas Control Lighting the Water Heater The water heater must be filled with water before lighting. Instructions for lighting procedure are on the inside of the access cover and shown below: Shutting Down The Water Heater Turn gas control knob to position “OFF”. Control Knob / Reset Button 1. Rotate Gas control knob to OFF. Wait five minutes for unburnt gas to vent. Note: L.P. Gas being heavier than air, will not vent upwards naturally.
Owner’s Manual – Prodigy 3 Commissioning Adjustments Models with “Robertshaw” Gas Control Main Gas Pressure Regulator Adjustment The main burner pressure must be set at installation and should not need readjustment. Ignition System (Spark Gap) Check the gap between the spark electrode and the pilot burner is 3 – 5mm and adjust as necessary. Push the igniter button to test for a spark. The pressure is best checked by connecting a water manometer or equivalent to the test point nipple on the gas control.
Owner’s Manual – Prodigy 3 Commissioning Adjustments Models with “Eurosit” Gas Control Lighting the Water Heater The water heater must be filled with water before lighting. Instructions for lighting procedure are on the inside of the access cover and shown below: 1. Turn the knob fully clockwise to the “•” (off) position. 2. Wait five (5) minutes so any build-up of unburnt gas can escape. 3. Turn the knob to the position. Thermostat and gas control knob (pilot) Igniter 4.
Owner’s Manual – Prodigy 3 Commissioning Adjustments Models with “Eurosit” Gas Control 9. Turn the knob to a higher number for higher water temperatures or a lower number for lower water temperatures. 10. Set the test point pressure as per page 12. 11. Replace the access panel and ensure that it is firmly in position before operating the appliance. 12. If the burner does not light at the selected setting, the water may already be at the selected temperature.
Owner’s Manual – Prodigy 3 Commissioning Adjustments Models with “Eurosit” Gas Control Main Gas Pressure Regulator Adjustment The main burner pressure must be set at installation. The pressure is best checked by connecting a water manometer or equivalent to the test point nipple (4) on the gas control. The test point pressure must comply with the value on the Data Label.
Owner’s Manual – Prodigy 3 Commissioning Adjustments Gas Fitter – Test The Water Heater Test operation by lighting the water heater (see Lighting the Water Heater, earlier in this manual). Warning: This water heater should be checked on installation and the test point pressure set in accordance with that marked on Data Plate. User DO NOT place articles on or against this appliance. DO NOT use store chemicals or flammable materials, or spray aerosols near this appliance.
Owner’s Manual – Prodigy 3 Owner’s Information Operating Instructions The appliance is not intended for use by young children or infirm persons without supervision. Young children should be supervised to ensure that they do not play with the appliance. Warning: it is essential for the safe operation of this gas heater that clothing or any other flammable material should not be placed against or on top of the water heater.
Owner’s Manual – Prodigy 3 Owner’s Information How Long Will The Heater Run Each Day? The length of time that the heater will run each day will vary dependent upon the amount of hot water being used by the household. Caution: All water heaters have the ability to produce hot water in a surprisingly short time.
Owner’s Manual – Prodigy 3 System Maintenance This Dux water heater is designed such that there is little to do regarding system maintenance other than that detailed in this Owner’s Manual. Personally inspecting or servicing any part of the system is not recommended. After each 5 years of operation you should contact the local service agent to replace all safety valves and anodes to ensure continued system life and operational safety.
Owner’s Manual – Prodigy 3 Troubleshooting What Should I Check Before Making A Service Call? If there is not enough hot water, it is recommended that the following points be considered before making a service call. If after checking the following points the problem has not been identified, please contact Dux on 1300 365 115.
Owner’s Manual – Prodigy 3 Troubleshooting Water Discharge from the PTR Valve Pressure & Temperature Relief Valve (PTR) It is normal for the PTR to allow a small quantity of water to escape during the heating cycle. The amount of discharge will depend on hot water usage. Continuous trickle (PTR) This is most likely due to a build up of foreign matter. In this case try gently raising the easing lever on the Pressure & Temperature Relief Valve for a few seconds then release gently.
Owner’s Manual – Prodigy 3 Warranty Dux Hot Water Unit Manufactured by Dux Manufacturing Limited (“Dux”) Terms of Warranty and Replacement Guarantee All Prodigy 3 water heaters manufactured and sold after 1 January 2011 are backed by a comprehensive one (1) year full parts and labour warranty (conditions apply – see below). Furthermore, the Prodigy 3 tank includes a guarantee to replace your hot water unit if the inner cylinder fails within seven (7) years (conditions apply – see below).
Owner’s Manual – Prodigy 3 Warranty maltreatment, abnormal stress or strain, harsh or adverse water conditions including excessive water pressure or temperature, neglect of any kind or otherwise as a result of any use of the Unit contrary to the product manual or other instructions provided by Dux. Alterations or repair of the Unit other than by an accredited and licensed service agent or technician are not covered.
Owner’s Manual – Prodigy 3 Warranty • Product Serial Number Contact details Dux’ contact details are as follows: Business Address: Dux Manufacturing Limited Lackey Road Moss Vale, NSW, 2577 Australia Telephone: considered reasonably foreseeable. Our goods come with guarantees that cannot be excluded under the Australian Consumer Law. You are entitled to a replacement or refund for a major failure and for compensation for any other reasonably foreseeable loss or damage.
Owner’s Manual – Prodigy 3 Other Information Product Warranty is applicable only in Australia and New Zealand. See page 19 for terms of warranty. Privacy Act Amendment (2000): If and whenever warranty service is required, your personal details will be given to an Authorised Dux Service Agent only for the express purpose of carrying out the arranged warranty service work agreed by you the client and Dux Manufacturing Limited.
Owner’s Manual – Prodigy 3 H1250 1250 Rev.
Owner’s Manual – Prodigy 3 24 H1250 1250 Rev.
Owner’s Manual – Prodigy 3 H1250 1250 Rev.
Owner’s Manual – Prodigy 3 3 Star Gas Hot Water Heater For advice, repairs and service, call: 1300 365 115 (Australia) 0800 729 389 (New Zealand) Please Register Your Water Heater Preventative Maintenance Please take a moment to fill out your details for warranty registration at: Maintaining your hot water system will help extend its lifespan and reduce running costs. www.dux.com.au/warranty This will ensure all your current details are registered with us for prompt warranty service if required.