
Manual


. .2
. .3
. .4
. .5
. .6
. .6
. .8
. .9
.10
.11
.11
.11
.12
.13
.15
.16
.16
.16
.17
.20
.20
.20
.28
.33
7-39
.40
.44
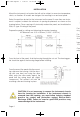
d for
to a
W &
ENTER keys for 5 Seconds (see Page 28.) Press the INDEX key until the dis-
play shows 1nP and press the DOWN ARROW until the display shows P385.
Don’t forget to press the ENTER key to retain your setting.
Next, press the INDEX key to display Unit. Press the DOWN ARROW
until the display shows C. Press ENTER.
Next, press the INDEX key until SPL is displayed (pass the dPt and 1nPt selec-
tions). Press the UP ARROW until the display shows 0. Press ENTER.
Finally, press INDEX key to display SPH. Press the DOWN ARROW until
the display shows 300. Press ENTER.
The necessary program changes are now complete. After 30 seconds the display will
switch back to the temperature reading. If you want to return faster, press the
UP ARROW and ENTER keys (at the same time) and then press the
DOWN ARROW and INDEX keys (again at the same time). This will ‘back
out’ of the menu and immediately display the temperature reading.
If you want to use Self Tune or Auto/Manual features, see the special sections on
these items. Page numbers for these are in the Contents section on the previous
page.
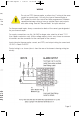
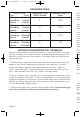
MODEL IDENTIFICATION
16A ——
Page 3
wire
wiring
rt on
your
ces-
the
ages
Option Description
992* RS-485 Serial Communications, Lovelink™ protocol.
993* RS-232 Serial Communications, Lovelink™ protocol.
995* RS-232 Serial Communications, Modbus™ protocol.
996* RS-485 Serial Communications, Modbus™ protocol.
9502 12-24 Vdc/Vac 50-400 Hz power supply (control operates on low voltage equipment).
* These options may not be combined with each other. Option 9502 may be combined with any other
options.
Features
2 = Standard
3 = Enhanced
Alarm
0 = No
1 = Yes
Output A
1 = SSR
2 = 15 VDC
3 = Relay, NO
4 = Relay, NC
5 = Current
8 = DC SSR
Output B
0 = None
1 = SSR
2 = 15 VDC
3 = Relay, NO
4 = Relay, NC
5 = Current
8 = DC SSR
Options
(blank if none)
949-1265:Layout 1 1/25/11 10:22 AM Page 3