
Manual

Page 8
5. Exercises for each function
• ZERO TRIM
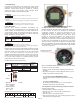
1. Access the menu by pressing the Zero+Span buttons.
2. Move to the sub directory using the Span button until the
1 TRIM message appears on the display.
3. Change the Zero Trim Function by using the Span button
until the 11 Z-TRIM message appears on the display.
• ZERO ADJUSTMENT : Change the PV value to 14
1. Exit the menu by pressing the Zero+Span button.
2. Moving thru the sub directory using the Span button until
1 TRIM message appears.
3
. Moving thru the sub directory using the Zero button until
11 Z-TRIM message appears.
4. Access the Zero Adjustment function by pressing the
Span button until the 12 Z-ADJ messages appears.
5. When the SelInc message appears, press the Zero button
repetitively until the 10.0 message appears on the LCD.
Set the value by pressing the Span button.
6. When the VALUE message appears, change the LCD
value to 10.0 and press the Zero button, then press the
Zero+Span buttons.
7. When SelInc message appears, change the LCD value to
1.0 and press the Zero button, then set the value and
press the Span button. Press the Zero+Span buttons
after the LCD value changes to 14.0.
8. To save the settings, press the Zero+Span buttons until
the SelInc message appears.
• CHANGE UNITS
1. Access the menu by pressing the Zero+Span buttons.
2. Moving to next menu by pressing the Zero button until the
1 TRIM message appears.
3. Moving thru the sub directory press the Span button until
the 2 SETUP message appears.
4. Press the Span button to access 21 UNIT, press Span
again to access Change Unit.
5. Save the values by pressing the Span button when the
desired value is displayed on the LCD.
• CHANGE UPPER RANGE VALUE
1. Access the menu by pressing the Zero+Span buttons.
2. Move to the next menu by pressing the Zero button until
the 1 TRIM message appears.
3. Press the Span button until the 2 SETUP message
appears.
4. Press the Span button until the 21 Unit message appears.
5. Press the Zero button until the 22 U-RNG message
appears.
6. Press the Span button until the Zero Adjustment
message appears.
• CHANGE LOWER RANGE VALUE
1. Access the menu by pressing the Zero+Span buttons.
2. Move to the next menu by pressing the Zero button until
the 1 TRIM message appears.
3. Press the Span button until the 2 SETUP message
appears.
4. Press the Span button until the 21 Unit message appears.
5. Press the Zero button until the 22 U-RNG message
appears.
6. Press the Zero button until the 23 L-RNG message
appears.
7. Press the Span button until the Change Lower Range
Value message appears.
• CHANGE LCD MODE (Cyclic or Fixed Display)
1. Enter programming menu by pushing both
(ZERO+SPAN) button together for 5 seconds. Release
buttons when LCD displays Menu and display will
automatically change to “1 TRIM” confirming access into
programming menu.
2. Push (ZERO) button when “1 TRIM” message appears on
LCD. Release button when display changes to “2
SETUP”.
3. Push (ZERO) button and release when display changes
to “3 LCD”.
4
. To move into sub directory push (Span) button after “3
LCD)” message appears on display. Release button
when 31 LCD-MD message is displayed.
5. To enter this sub-menu, push (Span) button and release
when display changes to 311. Bottom line of display will
show current Mode setting e.g. NOR-RO, NOR-PV etc.
6. Push (Zero) button to cycle through available mode
options and select desired LCD rotation mode. Options
are: NOR-RO (rotate all PV, %, mA), NOR-PV (fixed PV),
NOR-% (fixed %), NOR-mA fixed, ENG-RO, ENG-PV,
ENG-% or ENG-mA.
7. Push (Span) to save changes and EXIT programming
mode.