
User Manual

INSTRUCTIONS
Battery Installation
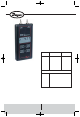
The unit is shipped with a separate 9 volt alkaline battery which must be installed before
operation. Remove the two screws holding the bottom endcap in place and remove the
endcap. Connect the battery to the enclosed battery clip observing correct polarity. Be
careful not to trap wires between the battery, case or foam pads which retain the battery.
This could make it difficult to install the battery or remove it later for replacement. Be sure
the rubber gasket is properly seated in the gasket channel of the endcap and replace end-
cap. Note that the endcap will only fit one way because the holes are slightly off-center.
Place the “Z” shaped wrist strap clip in one of the screw recesses and replace the screws.
Do not overtighten the screws. Attach wrist strap to clip.
When battery replacement becomes necessary, use only a 9 volt alkaline type such as
a Duracell
®
MN1604, Eveready
®
522 or equivalent. Zinc-carbon types, often labeled Heavy-
duty are not recommended because of the increased potential for leakage. Alkaline batter-
ies are also a better value because they last up to three times longer in this device.
On-Off Operation
The on-off control is a toggle function. Press and release the ON/OFF key once to turn
unit on; again to turn it off. If the manometer is left on with no activity for approximately 20
minutes, unit will turn itself off to conserve the battery.
Display Backlight
The Model 477A includes a display backlight to allow use in the dark or in poor lighting con-
ditions. Manometer must be switched off before this feature can be activated. Next, press and
hold the ON/OFF key down. After about 1 second the backlight will come on and remain light-
ed for approximately 2 minutes after which it will turn itself off to conserve battery life.
Zeroing Pressure Reading
Potential inaccuracy due to temperature ef fects can be minimized by r e-zer oing immediately
before use. To zero the display, vent both ports to atmosphere so no pressure is applied to
either port. Press the ZERO/STORE key and - - - - will be momentarily displayed as zeroing
occurs. Zeroing is not possible when the memory mode is in use. It must be done befor e select-
ing that function.
If the unit is accidently zeroed with pressure applied to one of the ports, the pressure read-
ing might display incorrectly. To correct, vent the pressure ports to atmosphere and press the
ZERO/STORE key to zero the unit.
Pressure Connections
To measure single positive pressure, connect tubing to port marked + and vent oppo-
site port to atmosphere. To measure differential positive pressure, connect higher positive
pressure to port marked + and lower positive pressure to port marked -. Manometer will
indicate the difference between the two.
Selecting Pressure Units
Up to seven pressure units are available. The display will indicate the current selection.
To change to different units, use the UNITS/LOC key. Each touch will cause an advance to
the next choice. The selected units will remain in memory even when power is shut of f. This
way, your preference will always be displayed after the initial selection.
D-26:D-26(478) 7/10/09 10:04 AM Page 2