Heavy-Duty Compact Barrel Charcoal Grill MODEL #DGSS443CB-D / DGSS443CB Français p. 19 Español p. 37 ATTACH YOUR RECEIPT HERE Serial Number ________________________________ Purchase Date _________________________________ 70-10-596 Questions, problems, missing parts? Before returning to your retailer, call our customer service department at 1-877-447-4768, 8:00 a.m. – 4:30 p.m. CST, Monday – Friday or email customerservice@ghpgroupinc.com. 1 Rev.
TABLE OF CONTENTS Safety Information ...................................................................................................................... 2 Package Contents ...................................................................................................................... 4 Hardware Contents .................................................................................................................... 5 Preparation ...................................................................
SAFETY INFORMATION • Use caution when assembling and operating this unit to avoid cuts and scrapes from edges. • DO NOT use this product in a manner other than its intended purpose. It is NOT intended for commercial use. It is NOT intended to be installed or used in or on a recreational vehicle and/or boats. • DO NOT store this unit near gasoline or other combustible liquids or where other combustible vapors may be present. • DO NOT use, store or operate this unit in an area accessible to children or pets.
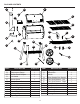
PACKAGE CONTENTS C A A B Y D E X W F H I V A U T G M N K J R S Q L PART A B C D E F G H I J K L M DESCRIPTION Lid Temperature Gauge Smoke Stack Damper Lid Handle Smoke Stack Smoke Stack Gasket Grill Body Side Handle Grease Cup Support Left Leg - Rear Bottom Shelf Left Leg - Front Right Leg - Rear O P QUANTITY 1 1 1 1 1 1 1 1 1 1 1 1 1 PART N I O P Q R S T U V W X Y 4 DESCRIPTION Right Leg - Front Wheel Axle Wheels Offset Smoker Box Support Front Shelf Bracket - Left Front Shelf Bracke
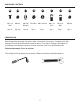
HARDWARE CONTENTS AA BB CC M6 x 12 Bolt M6 Nut M6 Flat Washer Qty. 31 Qty. 28 Qty. 16 DD EE M12 Nut M6 Lock Nut Qty. 2 Qty. 1 FF GG HH M6 x 14 Bolt M5 x 13 Bolt M5 Nut Qty. 1 Qty. 1 Qty. 1 PREPARATION Before beginning assembly of product, make sure all parts are present. Compare parts with package contents list and hardware contents above. If any part is missing or damaged, do not attempt to assemble the product. Contact customer service for replacement parts.
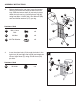
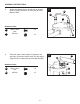
ASSEMBLY INSTRUCTIONS CAUTION: This unit is HEAVY! Do not attempt to handle this unit without assistance! 1. Remove the pre-installed bolt and washer from the left lid hinge on the grill body (G) and slide the lid (A) off the grill body hinges. 1 Pre-installed Hardware A G 2. Attach the left front leg (L) and right front leg (N) using four M6 x 12 bolts (AA), four M6 nuts (BB) and four M6 flat washers (CC) per leg.
ASSEMBLY INSTRUCTIONS 3. Before attaching the rear legs, insert the bottom shelf (K) posts into the holes located on all four legs. WIth the bottom shelf (K) securely in place, attach the left rear leg (J) and right rear leg (M) using four M6 x 12 bolts (AA), four M6 nuts (BB) and four M6 flat washers (CC), per leg. 3 CC BB AA Hardware Used M AA M6 x 12mm Bolt x8 BB M6 Nut x8 CC M6 Flat Washer x8 K J 4.
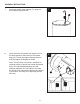
ASSEMBLY INSTRUCTIONS 5. Attach side handle (H) to the left side of the grill body (G) using four M6 x 12 bolts (AA) and four M6 nuts (BB). 5 H AA G Hardware Used AA M6 x 12mm Bolt x4 BB M6 Nut x4 6. BB Place the smoke stack gasket (F) between the grill body (G) and the smoke stack (E) and attach using four M6 x 12 bolts (AA) and four M6 nuts (BB).
ASSEMBLY INSTRUCTIONS 7. Attach the smoke stack damper (C) using the pre-installed spring and nut. 7 C 8. Insert the end of the grease cup support (I) into the hole located on the bottom of the smoker body (G). Thread the support through the hole until the support is hanging as shown. Note: This grill does not include a container for catching grease or liquids from inside the smoker body.
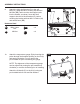
ASSEMBLY INSTRUCTIONS 9. Attach the right shelf bracket (S) to the grill body (G), using two M6 x 12 bolts (AA) and two M6 nuts (BB), and insert the shelf support wire into the bracket, as shown. Insert the shelf supports into the left shelf bracket (R), before securing the bracket with two M6 x 12 bolts (AA) and two M6 nuts (BB). 9 S G Hardware Used AA M6 x 12mm Bolt x4 BB M6 Nut x4 10.
ASSEMBLY INSTRUCTIONS 11. 12. Attach the lid assembly (A) to the hinges on the grill body (G) using the pre-installed bolt and washer. 11 Attach the side damper plate (V) to the inside of the the access door (W) using one M6 x 12 bolt (AA) and one M6 lock nut (EE). 12 Attach the door latch (U) to the outside of the access door (W) using one M5 x 12 bolt (GG) and one M5 nut (HH).
ASSEMBLY INSTRUCTIONS 13. Screw one M6 x 14 shoulder bolt (FF) into the grill body (G). Attach the access door (W) to the grill body (G) by sliding the hinge rods into the hinge openings on the grill body (G). 13 G Latch the access door (W) by pivoting the door latch (U) onto the M6 x 14 bolt on the grill body (G). W Hardware Used FF 14. M6 x 12mm Bolt x1 FF Install the charcoal grates (X) on the bottom support rails inside the grill body (G).
ASSEMBLY INSTRUCTIONS 15. Attach the offset support bracket (Q) to the right front (N) and rear leg (M) using two M6 x 12 bolts (AA).
REPLACEMENT PARTS LIST For replacement parts, call our customer service department at 1-877-447-4768, 8:00 a.m. – 4:30 p.m. CST, Monday – Friday or email customerservice@ghpgroupinc.com.
REPLACEMENT PARTS LIST 3 2 1 26 25 4 A 5 24 22 6 8 9 23 7 14 13 10 20 18 19 11 12 21 17 A 15 16 70-10-596 Printed in China 18