
Installation Guide

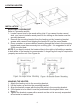

MULTIPLE VERTICAL ANGLES
NOTE: For the heater to be tilted
vertically, it must be mounted in bottom
keyhole slots of mounting brackets to
maintain adequate clearance and prevent
possible overheating.
WARNING
To prevent possible electric shock, disconnect power to the heater at the
main service box before attempting to adjust the heat output of this unit.
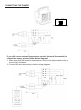
3. Adjust louvers to the desired position (see Figure 6)
NOTE: The louvers are designed so they cannot be completely closed. Do not
attempt to defeat this feature; damage to the unit can result.
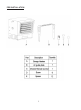
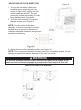
1. To turn the unit when it has been
installed with a single lag bolt (as
shown in Fgure 4a), simply turn the
entire heater as needed. The unit
cannot be turned horizontally if it has
been installed with 2 lag bolts.
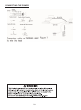
2. To tilt the unit vertically, loosen the
bracket screws (see Figure 5).
ADJUSTING AIR FLOW DIRECTION
Figure 5
7